Table of Contents
Template Engine
The Ventuz Template Engine extends the capabilities of the AnimationState Logic to make it more suitable for certain kinds of applications. As the name indicates, it is built for creating graphical templates which can be easily populated with dynamic data and/or customized on the fly. Examples for this could be slide-show style presentations or broadcast on-air graphics.
There are a number of functionalities that are combined in the Template Engine:
Auto-routing between states
Ventuz can automatically perform pathfinding inside the State Engine to find a path to a given state. So rather then performing a chain of trigger events, all one needs to do is tell Ventuz which template to arrive at and the pathfinding will figure out how to get there. This also is possible between multiple templates, animation nodes or even scenes. Essentially it allows for Ventuz to find a transition between any two templates without the need for complex transition tables.
Relationships between Templates
The Ventuz Template Engine allows for the definition of relationships between templates in terms of concurrency, dependency or independency. For example, you can determine whether two templates can exist at the same time, or whether they are mutually exclusive. Thus, a fullscreen graphic might not be allowed to co-exist with another fullscreen graphic, but two smaller graphics in different screen spaces might be.
Templates
A Template is an entity that describes both the logical and visual parts of a scene that can be activated in conjunction with its corresponding data. Every scene automatically defines a Scene Template, which represents the scene without any predefined data. All other templates in the scene are defined by the Present States of the animation logic and are usually associated with some dynamic data. All Templates defined by a scene are organized in a hierarchical order that also declares their relationship between each other (Concurrency, Dependency, Independency). Collections of Templates within a single scene are always organized as a Template Host. Template Hosts are organized as a host-tree, where each host has one parent host (except for the root) and has one or more sub-hosts.
Relationships
- Concurrent: Templates defined in the same template host are concurrent. Only one of these templates may exist at the same time.
- Dependent: Templates defined in the same template host-branch are dependent. A dependent template may only be called up if its parent template has already been activated. If the parent template is not currently activated, calling the child template will first activate the parent followed by the child.
- Independent: Templates defined in different host-branches are independent from one another.
Every Template defines which templates of a direct sub-host are allowed as a sub-template. This definition creates the template-dependency.
Template Hosts
Ventuz manages 3 different types of template hosts:
Project Templates
If the template engine is used Scene-comprehensively, it defines the root of the host-tree. For every scene that is injected into the project template host one Template is defined. This means all scenes managed by this host are concurrent and there can be a maximum of one scene active at a time.
Scene Templates
Every scene defines exactly one single template that describes the Scene Template even if the user did not explicitly define such a template (in that case the scene template has no DataModel. Every template defined in the project host has a direct dependency to its corresponding scene template host. These templates do not define any data and are not addressable by the user. They are of type System Template since they are only required by the system (the template engine).
Scene Template hosts can only be parented by a Project Template host. A Scene Template Host can also act as a root (without parent) if the template engine runs only on one single scene and is never asked to switch between scenes.
Animation Templates
The Present States of an State Logic declare the actual templates and their dependency to sub-templates. An Animation Template Host can have another Animation Template Host or the Scene Template Host as its parent.
Therefore user defined template-nesting is only possible below scene-level.
Animation Groups
Multiple Animation nodes can be grouped into one or multiple nested Animation Groups. All templates defined in all animations within a group-tree are treated as concurrent as if they were defined by a single Animation Node. This grouping technique increases the usability since technically independent animations can be combined into one logical animation host if the actual templates shall behave concurrently. A template host that is defined by an animation group is the only host that can have multiple DataModels and is therefore restricted in some functionality.
Every Template of the entire system defines the dependent sub-hosts. This is either done automatically (system-templates) or manually via the DataModel. Only templates defined in a Template Host that is linked in the host-tree are accessible. Unlinked elements are currently useless. In order to link a template host into the system, the user has to either inject the scene into the project template host (programmatically) or add the animation to the DataModel of the parent host which can be the SceneData or the DataModel of another animation node, see Project and Scene Data.
DataModel
A DataModel defines the structure, names and types of the data required for the hosted templates. Every template within a host selects a subset of one of these data models. This subset could be empty or the entire data model. Every Template Host defines zero, one or multiple DataModels. A template host defines its default DataModel where grouped animations do not have a default DataModel.
- System Templates defined in the Project Template Host do not have a DataModel
- Scene Templates defined by the scene have exactly one DataModel. This is the default.
- Animation Templates have
- exactly one DataModel if the declaring animation node is not grouped, or
- zero or more DataModels defined by the grouped animations but no default !DataModel!
The data model can be created and accessed via the Data View of the animation editor window. As we saw above, this is also where Subtemplates are added and controlled.
To add a data item, simply drag and drop the property to be controlled as animation data into the animation data panel. It will be added in a similar fashion to a scene data or project data element, except that each data element can be associated or disassociated with any of the templates of that animation node. The data panel lists all of the data items for the templates in an animation node and a column layout allowing for every item to be checked or unchecked for each template. By checking the item, the data will be associated with that template. Thus it is possible to have quite complex data models where some data items are shared between templates and others are not.
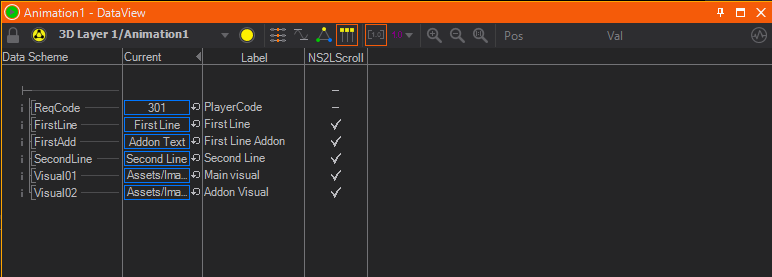
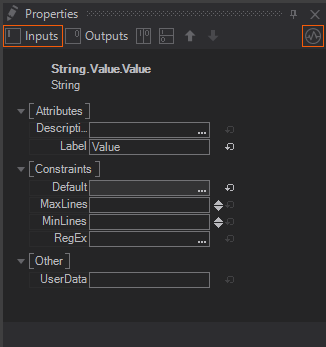
Each element should be given a unique name, and by clicking on it, you can also edit, in the properties panel, settings such as default value, allowable minimum and maximum values, a label for operator identification, or a description. Remember that as soon as you set up a data channel, any local value you had set will be overridden by the animation data, so it is worth setting up a default value first.
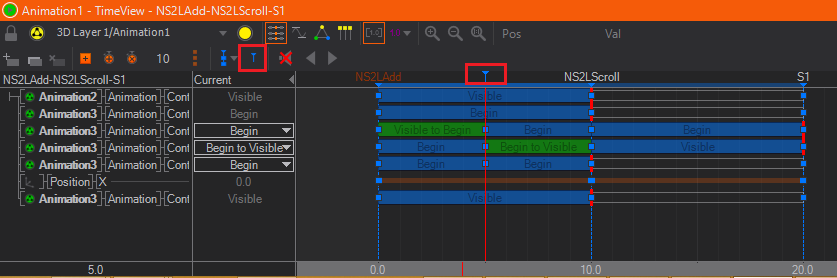
An important key to transitions is the exact point when this data, associated with a template, is passed to the animation node. So, for example, if a self-to-self transition is called, but the data changes, perhaps an animation is desired where the data is changed at a specific moment, but the actual template changes very little. The exact transfer point for the data can be defined in the timeline by positioning a data marker. To place this marker, enter the animation editor window and position the timeline at the point where the data should be transferred, then press M. It will add a small marker at the top of the animation timeline. This marker can be moved, as its properties edited by dragging or selecting it. Multiple markers are allowable, in which case data will be updated on the first marker that is passed and subsequent markers ignored unless the data has changed.
Grouped animations define the name of their DataModels by combining all names of the Animation Group and Animation Nodes together where the root-group is not part of that name. Multiple name segments are separated with an underscore character "_".
The name of a default DataModel is the empty string "".
Example: The names of the three DataModels defined by group (Group1) that contains one animation (Animation1) and another group (Group2) that again contains two more animations (Animation2 and Animation3):
Animation1
Group2_Animation2
Group2_Animation3
DataItems
A DataModel defines a list of DataItems. The following types of DataItems exist:
| Name | C# Type | Modes | Description | Attributes |
|---|---|---|---|---|
| Animation | - | - | The Animation item defines a field that addresses a possible sub-template. The actual value of this field is null or a data instance (TemplateData) of a sub-template. | Required |
| Trigger | - | RW | A Trigger can be either an asynchronous event sent out to the remote client (R), a trigger sent from the remote client to Ventuz (W) or both (RW). | |
| Group | - | (RW) | A Group contains multiple sub-DataItems and acts like a folder. The mode is the sum of all sub-items only defines if the items below are readable and/or writable. The group itself has no value. | |
| Float | float | RW | A floating point value | Default, Min, Max, Speed |
| Double | double | RW | A double precision floating point value | Default, Min, Max, Speed |
| Integer | int | RW | An integer value | Default, Min, Max, Speed |
| Boolean | bool | RW | A boolean value | Default |
| String | string | RW | A string value | Default, MaxLines, MinLines |
| Enum | string | RW | A string value of type that matches the values of an enumeration. The possible values are define in the field Elements. | Default, Elements |
| Color | Color | RW | A color value | Default, Alpha |
| Asset | Uri | RW | A general Uri value that addresses one or multiple asset pools | AssetPools |
| FloatArray | float[] | RW | An array of float values | Default, MinLength, MaxLength |
| DoubleArray | double[] | RW | An array of double values | Default, MinLength, MaxLength |
| IntegerArray | float[] | RW | An array of integer values | Default, MinLength, MaxLength |
| BooleanArray | bool[] | RW | An array of boolean values | Default, MinLength, MaxLength |
| ByteArray | byte[] | RW | An array of byte values | Default, MinLength, MaxLength |
| StringArray | string[] | RW | An array of string values | Default, MinLength, MaxLength |
Data Items Meta Data
All Data Items are described by meta data that can be edited in the Property Editor after clicking it. For example the Ventuz Director uses them to display Template and Project Data properly for the operator of the program. In Remoting you can use the Data Model's Meta Data to accomplish similar results. Below you can see how Ventuz handles these meta data.
General Properties
Besides the Ventuz specific meta data you can define your own data using the UserData property. This is not used by Ventuz anywhere and you can safely use it for information specific to your own application.
Each type of the Data Channels has a Label property that defines the user friendly display name of the channel. As opposed to the data channel names, labels can consist of special characters, e.g. spaces. In addition they are not used to identify a channel, so the data model can have duplicate labels. Similar to the label, the Description is used to present further information to the user - e.g. in the Ventuz Director this is displayed while hovering over the data item.
Format is somewhat specific to the Ventuz Director and its template based workflow - when creating a Page from a template you can decide to automatically create the page's display name and/or description from the current values of the template data. The format property defines what to use from each data item for the automatic naming. The table below shows the possible options - the dropdown of the property also displays some presets that you can choose from.
| Data Types | Value | Effect |
|---|---|---|
| all | empty string | Not used in the automatic naming. |
| !X | Shows the value of this data item in the display name of the page instead of in its description. | |
| float, double | fX | Fixed point number with X decimals. X defaults to 2. |
| cX | Currency with X decimals. X defaults to 2. | |
| eX | Exponential notation with X decimals. X defaults to 6. | |
| nX | Number with X decimals. X} defaults to 6. | |
| p | Percentage. Note that the displayed number is therefore multiplied by 100. | |
| integer | dX | Integer number with minimum X digits. X defaults to 1. |
| xX | Hexadecimal number with minimum X digits. X defaults to 1. | |
| boolean | X;Y | X if true, else Y. |
| string, enumeration | X | Show string truncated to X characters. Do not truncate if 0. |
| -X | Show string truncated to X characters and show elipsis for truncated characters. | |
| color | c | Known color name or expressed as Red, Green, Blue values. |
| # | Hexadecimal string. | |
| array | 0 "X" | Show number of values followed by X |
| csv | Show values as comma separated list. | |
| asset | nx | File name with extension. |
| n | File name without extension. | |
| uri | Full file path. |
In the above descriptions, X and Y are wildcards.
Constraints
Each different type of data channels has a set of Constraints guiding the user when setting values on these items. Below is a list of all constraint properties and their functions in Ventuz.
| Data Types | Property | Usage |
|---|---|---|
| all | Default | The initial value of the data item. |
| float, double, integer | Max | Maximum possible value. Value will be set to Max if it is greater. |
| Min | Minimum possible value. Value will be set to Min if it is less. | |
| Speed | Change speed when using drag and slide to change the value. | |
| string | Choices | You can add a comma seperated list of values to change the text box to a combo box, so that the user can choose from predefined values as well as type a custom text. |
| MaxLines | Maximum number of lines. Will be truncated to this number of lines if it is exceeded. | |
| MinLines | Minimum number of lines. Will be truncated to this number of lines if it is underrun. | |
| RegEx | A regular expression that the given text is tested against so that only input of a certain form is allowed. If it does not match the text cannot be set. | |
| color | Alpha | Whether alpha can be defined as well or not. |
| enumeration | Elements | Comma separated list of elements that the user can choose from. Note that Default must be present in this list. |
| array | MaxLength | Maximum allowed number of values in the array. |
| MinLength | Minimum allowed number of values in the array. | |
| asset | AssetPools | The allowed asset pool to choose from. All assets that are not associated with any of the chosen pools will be ignored. Misc allows any type of file. This also filters the list of assets in the shotbox of the Ventuz Director when it was opened by clicking on the asset channel. |
| Required | If set it disallows to leave this data item empty. |
Addressing Templates
The Ventuz Template Engine is not only available in the given workflow with the Ventuz Director but can be integrated in almost every system by the Ventuz Remoting API. Therefor the following section describes the Template address structure.
- Template Engine - BaseUri: All elements of the Template Engine can be addressed by an absolute Uri. These Uris always start with this base uri:
ventuz://templates
- Template Hosts: The absolute address of any template host is constructed as a full path of the entire host chain. All names of the hosts are combined with an uri path separator ("/") and also end with a trailing slash ("/")
- Project Host: Usually there is no need to address the project template host, if required this Uri is its address. It only differs in the trailing slash to indicate that a template host is addressed.
ventuz://templates/
- Scene Hosts: The name of this host uses the Scene Identity of the scene it belong to. The Scene Identity is the lower case filename of the scene file without extension. Special characters are Url-encoded where the path separator "/" is replaced by "|".
ventuz://templates/<sceneidentity>/
Examples:ventuz://templates/scene1/ ventuz://templates/scene2/ ventuz://templates/folder|scene3/
Please note that the Project Template Host does not have a name! Therefore the first path segment after the base uri is always the name of the Scene Template Host regardless if the scene host is parented in a project host or not!
Two scenes saved as .\Scenes\Folder\Scene1.vzs and .\Scenes\Folder_Scene1.vzs would result in an identical Uri address for their template hosts: ventuz://templates/folder_scene3/. Injecting these two scenes into a project template host will cause an error to be thrown!
- Animation Hosts: The name of an Animation Host is defined by the Animation DataItem of the parent DataModel. By default this name is bound to the name of the actual Animation Node (or Animation Group Node), but this name-binding could be released by the user and a different name could be applied. If the DataItem is grouped within a DataGroup, the full path inside the declaring DataModel is used. A dot (".") is used as path separator.
ventuz://templates/<sceneidentity>/<AnimationDataItem>/
ventuz://templates/<sceneidentity>/<AnimationDataItem>/<AnimationDataItem>/.../
Examples:ventuz://templates/scene1/Animation1/ ventuz://templates/scene1/DataGroup.Animation.DataItem/ ventuz://templates/folder|scene3/DataGroup.Animation.DataItem/ ventuz://templates/folder|scene3/DataGroup.Animation.DataItem/DataGroup.DataItem/
Two Animations bound to a DataModel as /DataGroup/Animation1 /DataGroup_Animation1 would result in an identical name for their sub template hosts: ventuz://templates/scene1/DataGroup_Animation1/. The Scene Model Validator will cause an error to be thrown!
- Project Host: Usually there is no need to address the project template host, if required this Uri is its address. It only differs in the trailing slash to indicate that a template host is addressed.
- Templates
Absolute address of Templates uses the address of their Template Host plus the name of the template. The resulting Uri can be distinguished from Template Host addresses by the lack of the trailing slash "/" (they addressing a file not a path). The name is the actual name of the present state defined in the Animation Logic.ventuz://templates/<scene_identity>/Scene ventuz://templates/<scene_identity>/<Animation_DataItem>/<TemplateName>
Examples:ventuz://templates/scene1/Animation1/Template1 ventuz://templates/scene1/Animation1/Template2 ventuz://templates/scene1/Animation1/Animation2/Template3
The Scene Template has always the reserved name "Scene". This name cannot be changed by the user. Other Scene template may be added in the future (Global, Constant, etc
All templates defined in a template host must be unique. If multiple Animation Nodes are grouped all Present States must have a unique name across all animations within that group. Otherwise an error will be thrown.
- DataItems
To address a DataItem the engine must know which DataModel is addressed. A DataModel is addressed by the Template Host that declares it and by the name of the DataModel which is an empty name for the default DataModel. The DataItem itself is addressed by the fullpath within the DataModel where groups (folders) are separated by ".". An address of a DataItem is expressed as a file within the folder defined by the Template Host. There are three ways to qualify a DataItem-Address:
- Default: (first character is a dot ".")
".group.group.item"
- DataModel-Qualified: (first character is "$" followed by the name of the DataModel)
"$DataModelname.group.group.item"
- Template-Qualified: (first character is a letter or an underscore "_")
"TemplateName.group.group.item"
- Default: (first character is a dot ".")
Examples:
.Text1
Animation1/Template1.Line1.Text
Animation1/Template1.Line1.Color
Animation1/Animation2/$Group2.Headline.Text
Data Formats
Ventuz supports three different data formats: XML, JSON and BIN. all of these formats are 100% compatible to each other and the user can decide which format he wants to use. All three formats are text based and the receiver (Ventuz) can easily decide which parser to user. It simply looks to the first non-whitespace character: "<" for XML, "{" for JSON and any other for base64-BIN
The JavaScript Object Notation (JSON.org) has some advantages and disadvantages compared to XML:
- JSON has strong types (number, boolean, string, arrays, etc) where XML only has text. Without XML-Schema a XML reading application must interpret all data as text, because it doesn't know if a value is a number or an array of floats.
- JSON doesn't support attributes for objects. Since our Template Data is using attribute to add meta and user data to a data instance, we introduce a notation to handle such data: every named field starting with a '@' character for its name is handle as attribute for the current object. Attributes must appear before any normal data field in order to help parsers only to read the metadata without interpreting the actual data structure.
- JSON doesn't support namespaces. That's why we introduce a reserved attribute name "@". It is used to store that template URL. In XML we use the attribute "ns" to make it easier for XML handlers. Template Data in XML always fall into the default namespace ("").
The BINary format is always expressed in base64 encoding in order to ensure that a simple text can be used to store the data. Handling 'real' binary data sometimes become complicated. So we accept the base64 overhead of 33% (3 bytes -> 4 bytes).
Examples for all three formats. The three instance contain exactly the same information. The BIN format has the smallest size but is not human-readable anymore. Ventuz Director is using the BIN format to transfer data to the Ventuz Renderer, but XML and/or JSON to store data instance on disk.
XML
<VTD ns="ventuz://templates/ingame/Scene">
  <LowerThird_Center ns="ventuz://templates/ingame/LowerThird_Center/NS2LAdd">
    <FirstLine>First Line</FirstLine>
    <FirstAdd>Addon Text</FirstAdd>
    <SecondLine>Second Line</SecondLine>
    <Visual01>ventuz://scenes/Assets/logos/FrankfurtSnakes.vzs</Visual01>
    <Visual02>ventuz://images/Assets/sponsorlogos/HH.png</Visual02>
  </LowerThird_Center>
  <UpperThird ns="ventuz://templates/ingame/UpperThird/Scoreboard">
    <Banner ns="ventuz://templates/ingame/UpperThird/Scoreboard_Banner/Banner2LAdd">
      <FistLine>First Line</FistLine>
      <FirstAdd>Addon Text</FirstAdd>
      <SecondLine>Second Line</SecondLine>
      <Visual>ventuz://scenes/Assets/logos/HP.vzs</Visual>
    </Banner>
  </UpperThird>
</VTD>
JSON
{
	"@": "ventuz://templates/ingame/Scene",
	"LowerThird_Center": {
		"@": "ventuz://templates/ingame/LowerThird_Center/NS2LAdd",
		"FirstLine": "First Line",
		"FirstAdd": "Addon Text",
		"SecondLine": "Second Line",
		"Visual01": "ventuz://scenes/Assets/logos/FrankfurtSnakes.vzs",
		"Visual02": "ventuz://images/Assets/sponsorlogos/HH.png"
	},
	"UpperThird": {
		"@": "ventuz://templates/ingame/UpperThird/Scoreboard",
		"Banner": {
			"@": "ventuz://templates/ingame/UpperThird/Scoreboard_Banner/Banner2LAdd",
			"FistLine": "First Line",
			"FirstAdd": "Addon Text",
			"SecondLine": "Second Line",
			"Visual": "ventuz://scenes/Assets/logos/HP.vzs"
		}
	}
}
BIN
VlREMSAfdmVudHV6Oi8vdGVtcGxhdGVzL2luZ2FtZS9TY2VuZaARTG93ZXJUaGly
ZF9DZW50ZXIgM3ZlbnR1ejovL3RlbXBsYXRlcy9pbmdhbWUvTG93ZXJUaGlyZF9D
ZW50ZXIvTlMyTEFkZGEKRmlyc3QgTGluZQlGaXJzdExpbmVhCkFkZG9uIFRleHQI
Rmlyc3RBZGRhC1NlY29uZCBMaW5lClNlY29uZExpbmVhMHZlbnR1ejovL3NjZW5l
cy9Bc3NldHMvbG9nb3MvRnJhbmtmdXJ0U25ha2VzLnZ6cwhWaXN1YWwwMWEqdmVu
dHV6Oi8vaW1hZ2VzL0Fzc2V0cy9zcG9uc29ybG9nb3MvSEgucG5nCFZpc3VhbDAy
/6AKVXBwZXJUaGlyZCAvdmVudHV6Oi8vdGVtcGxhdGVzL2luZ2FtZS9VcHBlclRo
aXJkL1Njb3JlYm9hcmSgBkJhbm5lciBCdmVudHV6Oi8vdGVtcGxhdGVzL2luZ2Ft
ZS9VcHBlclRoaXJkL1Njb3JlYm9hcmRfQmFubmVyL0Jhbm5lcjJMQWRkYQpGaXJz
dCBMaW5lCEZpc3RMaW5lYQpBZGRvbiBUZXh0CEZpcnN0QWRkYQtTZWNvbmQgTGlu
ZQpTZWNvbmRMaW5lYSN2ZW50dXo6Ly9zY2VuZXMvQXNzZXRzL2xvZ29zL0hQLnZ6
cwZWaXN1YWz/////
Template Data Editor
Templates can be launched in Designer directly via the Template Data Editor. The editor can be used to inject Template Data directly into the Template Engine. It is also very useful to check the Template Data for a remoting application and the data structure in different datatypes.
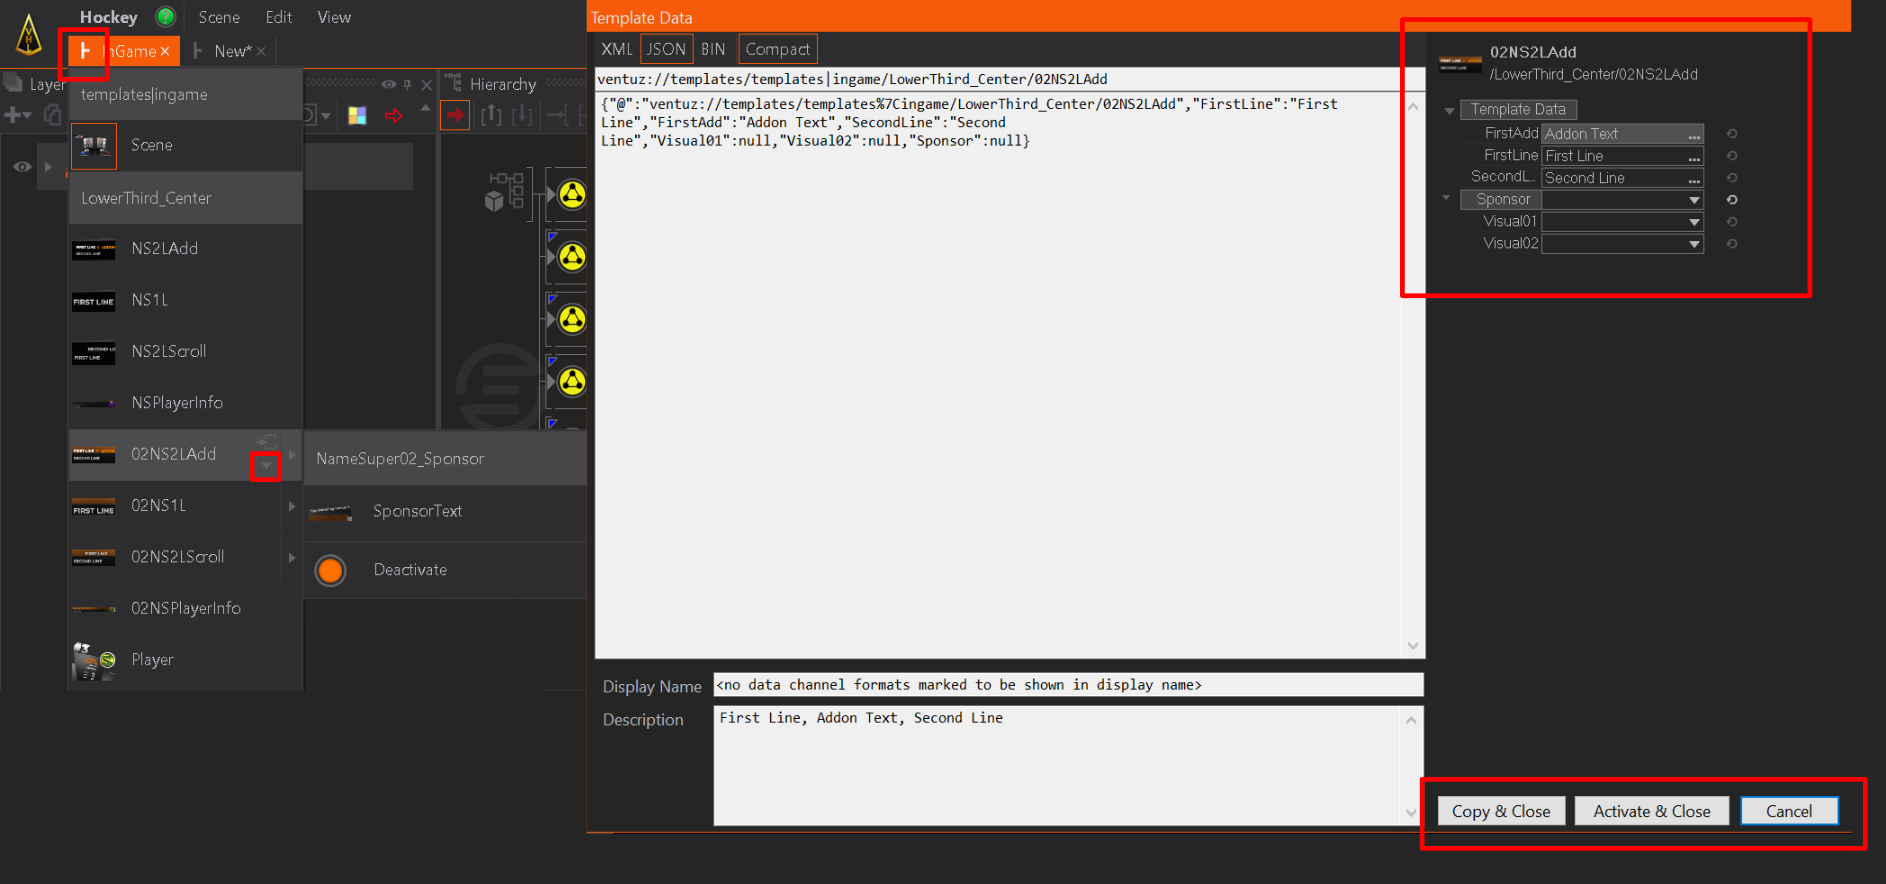
The editor can be opened via the small downwards arrow next to the Template, acessed either directly from the Scene or the Scene Data.
On the left side, the data structure in different data types is accessible. You can change the existing one, copy it or paste an own data structure for testing purposes.
On the right side, the interactive editor can edit the Template Data items, with the standard Property Editor. With Activate & Close the Template is launched with the current data structure.