Navigation

Ventuz Introduction

  • Introduction
  • Getting Started
  • Ventuz Editions
  • Ventuz Products
  • Realtime Rendering
  • Frequently Asked Questions
  • Common Mistakes
  • Deploying a Ventuz Presentation
  • Scene Performance and Tweaks

Quick Guides

  • Quick Guide Index
  • Business Logic
  • 3D Art
  • 2D Art
  • Programming
  • System Engineer

General

  • Index
  • What's New
  • Ventuz System Requirements
  • Configuration Editor
  • Device Configuration
  • Machine Configuration
  • Render Setup Editor
  • Introduction to Compositions, Screens and Outputs
  • Explanation of Compositions, Screens and Outputs
  • Live Runtime Control
  • Project and Show Management
  • Web Configuration Editor
  • Communication Protocol Overview
  • GPI Configuration for Runtime or Director
  • Introduction to the Ventuz Video Engine
  • Supported Formats
  • Supported Hardware
  • Color Management and HDR Workflow
  • Multisampling / Anti-Aliasing
  • Input Subsystem
  • Ventuz Proprietary Files
  • Migrating Configs & Content to Ventuz 8
  • Migrating Content to Ventuz 7
  • Migrating Content to Ventuz 6
  • Migrating Content to Ventuz 5
  • Summary Shortcuts
  • Terminology
  • Manual Index

Ventuz Designer

  • Designer Indices
Introduction
  • Designer Introduction Index
  • Designer Overview
  • Realtime Rendering
  • Project Browser
  • Designer Interface
  • Designer Options
  • Working with Nodes
  • Hierarchy and Content Editors
  • 2D Workflow
  • 3D Workflow
  • PBR Workflow
  • Animation Workflow
  • Best Practices
  • Reading Data in Ventuz
  • Display Images and Movies
  • Scene Performance and Tweaks
  • Deploying a Ventuz Presentation
  • Render to Disk
  • Multi Screen and Output Setup
  • Explanation of Compositions, Screens and Outputs
  • Workflow of using Multi Screens
  • Multi GPU
  • Previs
User Interface
  • Designer User Interface Index
  • Designer Interface
  • Renderer Window
  • Layer Editor
  • Property Editor
  • Property Groups
  • Hierarchy Editor
  • Content Editor
  • Find and Replace
  • Toolbox
  • Animation Editor
  • Shader Editor
  • Text Editor
  • Message View
  • Scene Tree
  • Stage Editor
  • Container Outline
  • Watches Editor
  • Scene Control Window
  • Performance Statistics
2D Workflow
  • 2D Workflow Index
  • 2D Workflow
  • Layer Editor
  • Common Layer Properties
  • IPP Effects
  • Color Correction FX
  • Distortion FX
  • Filter FX
  • Hierarchy and Content Editors
  • Display Images and Movies
3D Workflow
  • 3D Workflow Index
  • 3D Workflow
  • Hierarchy and Content Editors
  • Renderer Window
  • Camera Navigation
  • Manipulate Objects with Gizmos
  • In-Scene Editing
  • Layer Editor
  • Property Editor
  • Hierarchy Editor
  • Working with Nodes
  • Isolated Objects
  • Containers
  • Text Rendering
  • Character Sets
  • Geometry Import
  • Color Management and HDR Workflow
  • Display Images and Movies
  • Particle System
  • Creating Realistic Reflections
  • Unreal Integration
  • Notch Integration
  • E2E Node Overview
Logic Workflow
  • Logic Workflow Index
  • Hierarchy and Content Editors
  • Content Editor
  • Hierarchy Editor
  • Working with Nodes
  • Property Editor
  • Containers
  • Project and Scene Data
  • Reading Data in Ventuz
  • Display Images and Movies
  • Input Subsystem
  • Multitouch
  • TUIO Protocol
  • Open Sound Control
  • Unreal Integration
  • Notch Integration
  • E2E Node Overview
Animation Workflow
  • Animation Workflow Index
  • Animation Workflow
  • Animation Editor
  • Content Editor
  • Hierarchy Editor
  • Property Editor
  • Animation and State Engine
  • Templates
  • Template Engine
  • Scene Transitions
  • Unreal Integration
  • Notch Integration
Project Structure
  • Project Structure Index
  • Annotations
  • Project Documentation
  • Projects and Scenes
  • Project Properties
  • Project Maintenance
  • Project and Scene Data
  • Scene Management
  • Scene Statistics
  • Scene Tree
  • Performance Statistics
How Tos
  • Designer How to Index
  • How to Run Ventuz
  • How to Work with Designer
  • Ventuz Designer Drag&Drop Workflow
  • How to work with Shadows
  • How to Build Content for Multiple Screens
  • How to Use Emoijs
  • How to Build a Template
  • How To Build a Custom Scene Transition
  • How to Use the Color Difference Keyer
  • How To Enable HDR Video Output
  • How To Work with the HDR Layer
  • How Create Lens Flares and Bloom
  • How to Create Visuals Loader Node
  • How to Remote Control with a Phone
  • How to use Head Mounted Displays
  • How to work with 3D Reference Layers
  • How to create a Firework Particle System
  • How to use DDS with new Block Compression modes
  • How To use Stream Out
  • How to use the Substance Integration
  • How To Integrate Unreal
  • How To Integrate Notch
  • How To use the Vertex Integration
  • How To Control and Customize Ventuz
  • How to use the Companion with Director
  • How to build Previs scenes with Designer
  • How to migrate from Ventuz 6 to Ventuz 7
Reference
  • Available Nodes
  • Animation Nodes
  • Material&Color Nodes
  • Data Nodes
  • E2E Nodes
  • Geometry Nodes
  • Interaction Nodes
  • IO Nodes
  • Layers
  • Light Nodes
  • Logic Nodes
  • Previs Nodes
  • Render Option Nodes
  • Slides Nodes
  • Sound Nodes
  • Text Nodes
  • Texture Nodes
  • VR Nodes
  • World Nodes
  • Summary Shortcuts
  • Layer Editor Shortcuts
  • Hierarchy Editor Shortcuts
  • Content Editor Shortcuts
  • Animation Editor Shortcuts
  • Director Shortcuts

Ventuz Director

  • Index
  • What's New in Director
  • Introduction
  • Environment
  • Show
  • User Interface
  • Assets
  • Taking Action
  • Property Editor
  • Shot Box
  • Project Data
  • Pages
  • Playlist
  • Transitions
  • Timeline
  • Content References
  • Topology
  • Channels
  • Macros
  • Designing Templates
  • Scene Transitions
  • Plug-Ins
  • Shortcuts
  • Command Line Options
  • Application Settings
  • Glossary
  • GPI Configuration

Ventuz Runtime & Configuration

  • Runtime Index
  • Configuration Editor
  • Machine Configuration
  • Device Configuration
  • Project and Show Management
  • Live Runtime Control
  • Web Configuration Editor
  • Render Setup Editor
  • Warping and Soft-Edging Editor
  • Multi Screen and Output Setup
  • How to migrate from Ventuz 6 to Ventuz 7
  • Machine Clustering
  • Supported Hardware
  • Director Mode
  • How to Configure Audio
  • How to Use Live Options
  • How To Play Out On Multiple Screens
  • How To Render on a Machine Cluster
  • How to Use Head Mounted Displays
  • How to Setup Spout with Ventuz
  • How to Use Newtek NDI
  • How to Use a Mixed Frame Rate Cluster
  • How to Use Tracking

Multi Output & Display Setups

Introduction
  • Introduction to Compositions, Screens and Outputs
  • Explanation of Compositions, Screens and Outputs
  • Machine Clustering
  • Support for multiple GPU's
Editors
  • Configuration Editor
  • Device Configuration
  • Render Setup Editor
  • Warping and Soft-Edging Editor
  • Designer Stage Editor
Workflows
  • How to Build Content for Multiple Screens
  • How To Play Out On Multiple Outputs
  • How To Render on a Machine Cluster
  • How to build Previs scenes with Designer

How To

Designer
  • Designer How to Index
  • How to Run Ventuz
  • How to Work with Designer
  • Ventuz Designer Drag&Drop Workflow
  • How to work with Shadows
  • How to Build Content for Multiple Screens
  • How to Use Emoijs
  • How to Build a Template
  • How To Build a Custom Scene Transition
  • How to Use the Color Difference Keyer
  • How To Work with the HDR Layer
  • How To Enable HDR video output
  • How Create Lens Flares and Bloom
  • How to Create Visuals Loader Node
  • How to Remote Control with a Phone
  • How to use Head Mounted Displays
  • How to work with 3D Reference Layers
  • How to create a Firework Particle System
  • How to use DDS with new Block Compression modes
  • How to use the Substance Integration
  • How To Integrate Unreal
  • How To Integrate Notch
  • How To build and playback Ventuz Content in Vertex
Runtime & Configuration
  • Runtime How Tos Index
  • How to Configure Audio
  • How to Use Live Options
  • How To Play Out On Multiple Screens
  • How To Render on a Machine Cluster
  • How to use Head Mounted Displays
  • How to setup Spout with Ventuz
  • How to use Newtek NDI
  • How to use a Mixed Frame Rate Cluster
  • How to use Tracking
  • How To Integrate Unreal
  • How To Integrate Notch
  • How To build and playback Ventuz Content in Vertex
  • Multi Screen and Output Setup
  • How To Enable HDR video output
Director
  • How To Control Multiple Graphics Independently From Each Other
  • How to use the Companion with Director

Ventuz Node Reference

Available Nodes Overview
  • All Designer Nodes
ANIMATION
  • Mover
  • Alternator
  • Simple Control
  • Timeline Control
  • Anmation Rig
  • Keyframe Animation
  • Animation Group
COLOR/MATERIAL
  • Alpha
  • Fog
  • Ground Fog
  • Sky Box
  • Color to RGBA
  • HSLA to Color
  • RGBA to Color
  • Color Transformer
  • HLSL Shader
  • Color
  • Material
  • Color Picker
  • Substance Material
DATA
  • Database
  • Excel
  • JSON
  • RSS Feed
  • Resource Linker
  • Text File
  • XML
E2E
  • E2E Axis
  • E2E Data
  • E2E Control
  • E2E Layer
  • E2E Provider
  • E2E Node Overview
GEOMETRY
  • Rectangle
  • Rounded Rectangle
  • Gradient Rectangle
  • Overlay Rectangle
  • Cube
  • Circle
  • Sphere
  • Cylinder
  • Cone
  • Torus
  • Chart
  • Random Points
  • Mesh Loader
  • Geometry Import (Live)
  • Volume
  • Get Bounding Box
  • Arrow
  • Particle System
  • Path Renderer
  • Geometry Renderer
INTERACTION
  • Interaction Rect
  • Touch Button
  • Touch Excluder
  • Touch Marker
  • Touch Paint
  • Touch Pattern
  • Touch Proxy
  • Touch Ripples
  • Touch Transformations
  • Web Browser
  • Touch Teleport
  • Touch Simulator
INPUT/OUTPUT (I/O)
  • GPI
  • Joystick
  • Keyboard
  • MIDI
  • Mouse
  • Network
  • Open Sound Control
  • Serial
  • Timecode
  • DMX
  • HTTP
  • RamDiskWriter
LAYER
  • 3D Layers
  • 3D Layer Reference
  • Composition Layer
  • 2D Layers
  • PSD Import Layer
  • E2E Layer
  • Mixer Layer
  • Others
LIGHT
  • Light Sources
LOGIC
  • Array Processing
  • Convert To Text
  • Cluster Synchronization
  • Counter
  • Data Portals
  • Date Time
  • Directory
  • Dispatcher
  • Enumeration
  • Expressions
  • Invert
  • Log
  • Loop Breaker
  • Math Effects
  • Matrix Operations
  • Scene Event
  • Script
  • String Operations
  • System ID
  • Render Setup Relation
  • Text Splitter
  • Timer
  • Toggle
  • Transition Info
  • URL
  • Value Switch
  • Value Buffer
  • Variables
  • Visual Indexer
PREVISUALIZATION
  • Introduction to Previs
  • Previs Screen
  • Previs Canvas
  • Compositon List
  • Rendersetup Objects
  • Composition Projector
  • Previs Screen Render Options
RENDER OPTIONS
  • Alpha Blending
  • Color Write
  • Alpha Testing
  • Clip Plane
  • Filter
  • Mask
  • Mirror
  • Effect
  • Render Cube Map
  • Draw Modes
  • Stencil
  • ZTesting
SOUND
  • Audio Clip
  • Sound
  • Volume Control
  • Audio Analysis
SLIDES
  • Slide Manager
  • Slide
  • Slide Port
  • Pivot
TEXT
  • Text Effects
  • Text Layouts
  • Text Rendering
TEXTURE
  • Background
  • Hatch
  • Image
  • Texture
  • SVG Loader
  • Gradient Texture
  • Live Video
  • Movie Stream
  • Movie Frame
  • Movie Clip
  • Texture Loader
  • Snapshot
  • Snapshot Framebuffer
  • Texture Saver
  • Video Source Selector
  • VIO Input
  • Spout Receiver
  • NDI Receiver
  • Substance Loader
  • QR Code
VR/AR
  • Tracked Devices
  • Draw Tracked Devices
WORLD
  • Axis
  • Billboard
  • GetWorld
  • SetWorld
  • Arrange
  • Ticker
  • Layout
  • Group
  • World Z Sort
  • YesNo
  • Switch
  • Spread
  • Filter Pass
  • Set Pass
  • Hierarchy Container
  • Scene Port
  • Content Container
  • Template Port
  • Container Info
  • Camera
  • Paths
  • Cloner

Advanced and Development

  • Advanced and Development Index
  • Command Line Options
  • Ventuz IP Ports
  • Ventuz Machine Service
  • TUIO
  • .NET Scripting
  • HLSL Shader Programming
  • Ventuz API and SDK
  • Ventuz Extension API
  • Ventuz VIO API
  • Ventuz File Format (VFF)
  • Ventuz Stream Out API
  • Lens Calibration File for FreeD
  • E2E Node Overview
  • Unreal Integration
  • Notch Integration
Remoting
  • Remoting Index
  • Remoting Overview
  • How To Control and Customize Ventuz
  • Remoting 4
  • Remoting 4 via Websockets
  • Remoting 4 via HTTP
  • Director Remoting
  • Deprecated Remoting

Misc

  • Presets
« Previous: 2D Layers
» Index «
Next: E2E Layer »

Layer Photoshop Import


Table of Contents

  1. How To Use
  2. Properties
  3. Common Layer Properties
    1. Blending
    2. Mask
      1. + Mask
      2. Texture Property
      3. 1D Gradient
      4. Mask Vignette
      5. Mask Border
    3. Layout
    4. Mapping
    5. Effects
      1. Mask
    6. Available Effects
      1. Effect Group
      2. Color Correction
      3. Filters
      4. Distortion
      5. Note:

Layer Photoshop ImportLoads a complete PSD File, including individual Photoshop layers and properties.


Ventuz offers a Layer Node that is able to import *.PSD Files created in Adobe Photoshop (or other tools that can export to the PSD format) and handle its layers as individual Ventuz Layers keeping the original Transparency and Blending Mode properties.

This enables a very streamlined workflow, where you can create and design your graphics or mockups inside Photoshop, and reuse them directly inside Ventuz Designer Layer Editor - without the need to export and recreate the Photoshop layers inside Ventuz Designer.

How To Use


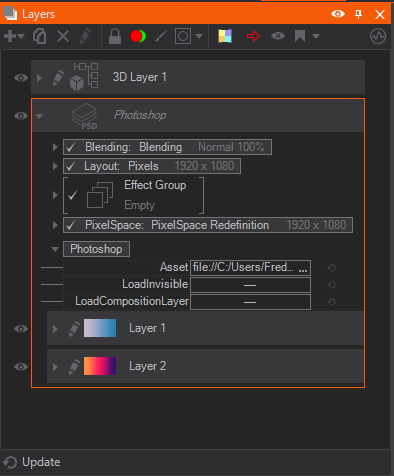
You simply need to add a new Layer of the Type Photoshop Import. It will create a Photoshop Layer Group - a special Layer Group that can read out PSD files and create Layers based on the original layers into that file. For each layer it creates a Texture Layer and copies the Opacity, Blending and Layer Mask to the new layer. Alternatively, you can Drag and Drop the PSD file into the Layer Editor.
After import the created layers can be edited like any other Texture Layer, and the Photoshop Import Layer like any other Layer Group. Both the PSD Layer Group and the individual layers features the same properties as any other layer inside Ventuz, they support effects and their layout, blending, etc can be edited like any normal Ventuz layer.
Note that Text Layers will rasterized before import and the text itself is not editable anymore. The Layer behaves like any normal Layer. The order of the Layers will be shown in opposite direction to the Photoshop Layer Editor, because of the render direction within Ventuz.

Properties


  • Asset: Here you can define the PSD File you would like to import. After import you will see all layers of the PSD converted into Ventuz Layers. When creating the Layers from the PSD File Ventuz creates Textures with the Pixel Information of each Layer. They are saved as .vzt-Files into the Textures Folder and they can be found in a Folder named ImportedPSD_[File Name]. The properties of the Photoshop layers will be converted into Ventuz Layer Properties as good as possible and can be found in each layer's properties.
  • LoadInvi: (Load Invisible) A checkbox that switches Load Invisible On or Off. When OFF, it will skip any invisible layer while loading the PSD. Only the Visibility Property of a Photoshop layer takes effect on this option - a layer is not invisible when its opacity is zero or when it contains fully transparent pixels only.
  • LoadCo: (Load Composition) A checkbox that turns Load Composition On or Off. When ON, an extra layer with the result of the Photoshop Composition is created inside Ventuz, this is very useful when you need the original Photoshop composition to use it as a reference.
  • Update: Reloads the PSD file and lets you choose what to do with the existing layers.

Common Layer Properties

Blending


Blending operations, including modes, opacity and masking, can be switched ON or OFF for each individual layer by Clicking  on the check mark close to the Blending caption. If the check mark is shown, the blending operation, including opacity, mode and mask, is calculated for the current layer. If a dash is shown in front of the Blending options, the blending operations are not calculated.

The properties available allow editing the Blending Mode with the same standard Blending Modes used by most compositing software packages like Photoshop, Blending Opacity, where 100% means totally opaque, and some controls that allow connecting or disconnecting layers, like Blending Blocked.

Mask

This option enables Layer masking, i.e. using the Color or Alpha values of a texture to set which areas of the current layer are opaque and transparent. This allows creating “cutout” areas and effects that can be combined with the Blending options above. Masks can be directly imported with the PSD file and will be part of the Loader or you use Ventuz own possibilities of Masking.

Ventuz features different types of Masks and Mask presets like:

+ Mask

Uses a texture as the mask source, there are many preset options available like Loader, Checker, Checker Blue, Checker Dots, Lines, Dimple and Noise. For an in-depth description of all the options available check

Texture Property

Texture Property adds an external texture, that can be edited in the Content Editor, so it . It can be an Empty Texture Property, or some additional presets are available to create a connection to Movie Files, Live Video, Gradient Texture or Texture Loaders.

1D Gradient

Opens the new Ventuz Gradient Editor to create a Gradient image that will be used as Layer mask. Check the Gradient Editor Section of this User Guide for reference.

Mask Vignette

This creates a vignette type mask on the Layer, a soft mask that affects mostly the areas closer to the Layer edges. The Vignette properties allow creating softer or harsher edges and controlling the Vignette shape. The available presets are Default ( a standard Vignette), Horizontal and Vertical.

Mask Border

This creates a mask on the borders of the Layer, properties allow creating softer or harsher borders and controlling the their shape and thickness. The available presets are Default (a standard border effect), Round 2% (a rounded corners border) and Square 2% (a transparent outline with straight corners).

Layout

Layout parameters control the texture size and position in many different modes - modes can be selected just by clicking on the small down arrow beside the Mode name. The available Layout Modes are Full Size (default 1:1 size), Percentage (Position and Size expressed as a percentage of full resolution), Pixels (Position and Size expressed as pixel values), Aspect (Forces the Layer to get a certain Aspect Ratio) and Offscreen Render Target (doesn't show layer in final composition).

Mapping

Mapping parameters control how the texture is mapped onto the Layer surface, regardless of its source. Ventuz supports various Mapping modes each one featuring its own parameters to control the texture position, size tiling, etc.. The available Mapping Modes are Stretch (Stretches the Texture to match the Layer Aspect ratio), Fit (Keeps original Texture Aspect ratio), Crop (Underscans the textures keeping aspect ratio), Polar (Maps using Polar Coordinate System) and Kaleidoscope (maps the tecture using a kaleidoscope pattern)

Effects

This section includes all the Image Post-Processing effects, or IPP effects for short, that you can apply to any layer. All of these effects are rendered in real time, but use them wisely, some combinations could have a huge impact on your scene real-time performance.

Mask

This Dropdown menu allows selecting a Mask for the effect, so the areas that will be affected by the effect. The options are similar to the ones available for the Layer (see above), and the only difference is the Mask Self option that masks the effect using the Layer Color information.

Available Effects

Effect Group

Creates a group of effects that will be applied together at once. It works exactly the same as the Effects Stack, so the same Effects can be added, moved, deleted and enabled inside of the Group in the same way you operate with the Effects Stack.

Color Correction

These effects are used to correct the color values of the layer. The available Color Correction IPP Effects are Grayscale (simple Grayscale effect), Color Grading (a standard color correction effect working with the RGB primaries), Color Correction (similar to Color Grading, but using the HSL/HSV Color model) and Gain (quick Gain color correction effect).

Please refer to the IPP Color Correction Effects section of the User Manual for more info.

Filters

These effects filter the pixel values of each layer, changing their position, adding new elements,or even changing the opacity of some of them.
The available Filter IPP Effects are Mosaic creates a set of tiles colored according to the original color values), Blur (averages each pixel color values with the surrounding pixel values) Glare (a smooth halo around the brightest areas of the layer), Crash Zoom (often called "God Rays"), RGB Noise (a video noise-like effect), Feedback (a trail effect by blending with previous frames), Posterize RGB (rounds up/down pixel color values), Posterize HSV (Posterize effect based on the HSV color mode, Edge Detection (detects the outline of shapes in the Layer), and Color Difference Keyer (similar to a Chroma Keyer, but using different math).

Please refer to the IPP Filter Effects section of the User Manual for more info.

Distortion

These IPP Effects work mostly by changing the relative position of pixels in the layer.
The available Filter IPP Effects are Drop Shadow (2D shadow effect based on Layer Alpha), Lens Distortion (replicates artifacts created by lens spatial aberrations), Distortion (a standard distortion effect, combining most of the options available in the rest of IPP distortion effects), RGB Distortion (offsets and scales Layer RGB channels individually), 2D Displacement (displaces the Layer pixels according to the Luminance information of an external file), Noise Distortion (uses a randomly animated texture to create a fake Noise Displacement effect), Polar Distortion (transposes the x and Y pixel coordinates in the original image to a Polar Coordinate system) and Kaleidoscope Distortion (Kaleidoscope pattern effect). Please refer to the IPP Distortion Effects section of the User Manual for more info.


Note:

Imported PSD Adjustment Layers will be visible in Ventuz as own layers, but they don't have effect on the other layers by default. You need to merge Layers with the Adjustment Layer and Layers with effects need to be rasterized. Alternatively, you can try to use the Ventuz Effects.

See also:
  • Common Layer Properties

« Previous: 2D Layers
» Index «
Next: E2E Layer »
Copyright 2025 Ventuz Technology