C# / VB Scripts
Table of Contents
 | C# Script | A content node that can host a piece of C# source code in order to extend Ventuz with custom functionality. |
 | VB Script | A content node that can host a piece of Visual Basic source code in order to extend Ventuz with custom functionality. |
BE AWARE OF THE FACT THAT FAULTY SCRIPTS CAN FREEZE OR CRASH THE WHOLE VENTUZ APPLICATION!
E.g. unhandled exceptions in background threads will crash Ventuz. There are no mechanisms in .Net to safeguard such cases: https://msdn.microsoft.com/en-us/library/ms228965%28v=vs.110%29.aspx
Although some fairly complex scenes can be created using the existing Node functionality, there are certain effects that cannot be achieved by simply using Nodes and Bindings. For other cases, it is simply easier to add a small piece of code to the Ventuz scene that performs additional computations than implementing that functionality with a lot of nodes.
As Ventuz is a 64 bit application it cannot use 32 bit DLLs in the Script nodes!
Currently C# 12.0 and VB 16 features are supported in Ventuz Scripting.
Each Script node provides three Compiler Options properties. These properties affect the result of the internal compiler output and they cannot be bound. The compiler creates a DLL from the source code and links it dynamically to the main Ventuz application.
The SharedResource property defines if the assembly compiled from the Script code should be shared with exact copies of this Script node. A shared resource (assembly) gives two advantages: 1. Copies of Script nodes do not require additional compilations (this was the case before Ventuz 8) which reduces the start-up time of scene. 2. Script copies can communicate via static class members.
To allow two Script nodes to share the same assembly resource they must be exact copies. This means that the source code must match, the custom input/output properties must match and the fixed node properties must match.
The Optimized property specifies if the compiler should perform code optimizations for the resulting assembly. The property UnsafeCode defines if the unsafe keyword and thus pointer operations are allowed in the C# script source code. Visual Basic .Net does not support unsafe code!
Each Script node can be given a number of additional input and output properties by the author via the Custom Model mechanism. Each of these properties is reflected in the script source code, thus providing a connection between the source code and the Ventuz scene.
Script Editor
By double-clicking on a Script node, the Script Editor is opened. The dock window on the left shows the Input and Output properties added to this node by the author of the script. By pressing the Plus drop-down button, new properties for float values, strings, methods, events and so on can be created. The dock window also contains a tab for references to assemblies (i.e. DLLs) that can be used in the script.
The main area of the Script Editor is of course assigned to the source code text. The editor offers many comforts of professional IDEs like context highlighting and auto-completion. While changing the code, the Script Editor tries to detect syntax errors on the fly and will list them in the Error List at the bottom of the Script Editor.
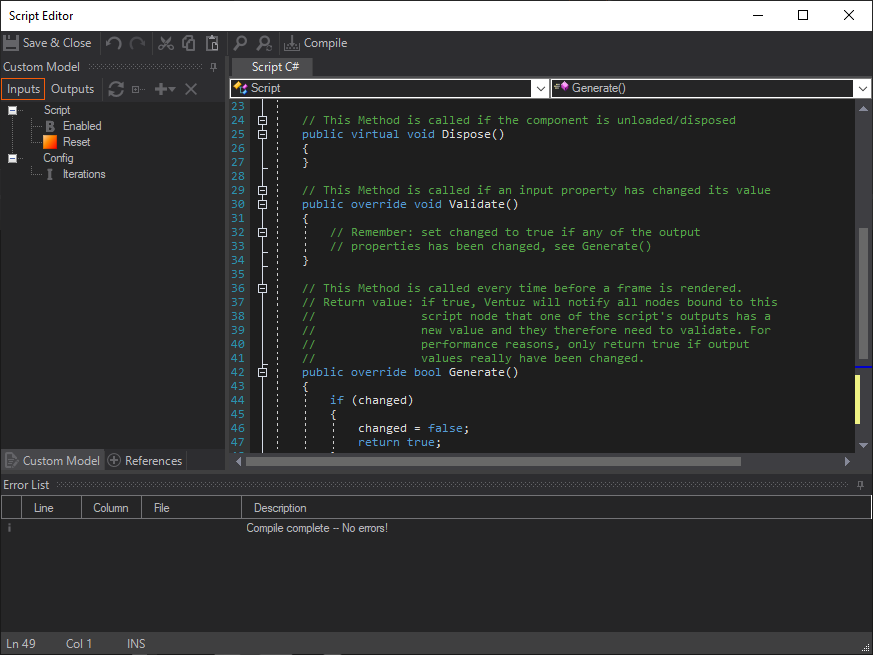
The code can also be explicitly compiled by pressing the Compile (F5) button in the menu bar at the top of the Script Editor. In order to be able to execute a script, the code has to compile without errors.
The Script Editor usually does a fairly good job of detecting problems. However, there are errors that the syntax highlighter will not be able to detect but the compiler will. Do not assume that just because the syntax highlighter does not detect any errors there are none!
By pressing Save & Close, the changes will be saved, the code compiled and the editor closed.
Script Structure
When a script node is dragged to the Content Editor, a source code skeleton which contains all mandatory member functions is generated automatically. The following will discuss the C# script code only, the Visual Basic version being exactly the same except for the obvious language differences.
using System;
using System.Collections;
using System.Collections.Generic;
using System.Linq;
using Ventuz.Kernel;
using Ventuz.Vx;


public class Script : ScriptBase, System.IDisposable
{
    // This member is used by the Validate() method to indicate
    // whether the Generate() method should return true or false
    // during its next execution.
    private bool changed;

    // This Method is called if the component is loaded/created
    public Script()
    {
	// Note: Accessing input or output properties from this method
	// will have no effect as they have not been allocated yet.
    }

    // This Method is called if the component is unloaded/disposed
    public virtual void Dispose()
    {
    }

    // This Method is called if an input property has changed its value
    public override void Validate()
    {
	// Remember: set changed to true if any of the output
	// properties has been changed, see Generate()
    }

    // This Method is called every time before a frame is rendered.
    // Return value: if true, Ventuz will notify all nodes bound to this
    //               script node that one of the script's outputs has a
    //               new value and they therefore need to validate. For
    //               performance reasons, only return true if output
    //               values really have been changed.
    public override bool Generate()
    {
        // return true, if output values have been changed
        if (changed)
        {
            changed = false;
            return true;
        }

        return false;
    }
}
For the content of the following discussion, it is assumed that the reader is familiar with the concepts of Bindings and Validation as well as with the C# programming language itself.
Any reader proficient in C# should be familiar with the concepts of construction and disposing. The constructor (i.e. Script()) is called when the node is created (usually as part of loading the scene) while Dispose() is called when the node is destroyed (usually as part of closing the scene). It is the authors responsibility to de-allocate unmanaged resources and close critical resources like file handles or net sockets in the Dispose method. For more information, please refer to the MSDN documentation on garbage collection in general and disposing in particular.
The Validate() and Generate() methods however directly mirror the way the standard Ventuz nodes are implemented internally. Since re-performing a nodes functionality every frame is too expensive for realtime applications (imagine a mesh node allocating its memory and recomputing vertex positions every frame), a node should perform as much of its computations only as a reaction to input properties changing. As long as the input properties keep the same values, there is little need to do any computation. One exception are nodes like the Mover node which react on time progressing, another exception are nodes which react on external sources of information (e.g. a TCP connection).
To support this "caching" mechanism, the script's Validate() method is called whenever one of the input properties changes. This is the place to perform the majority of computation and update the output values or store the results in internal variables.
In contrast, the Generate() method is called every frame, therefore computation should be kept to a minimum. There is however one very important task the Generate() has to perform and that is to cause nodes bound to the scripts output properties to validate themselves. Assigning a value to a scripts output property will only change the value but not trigger the bound nodes Validate() method. Unless the Generate() method returns true, bound nodes will not be invalidated.
The values of output properties can be updated at any place in the script including the Validate() method. However, properties bound to those outputs are only notified of the change if the Generate() method returns true.
Obviously, the Generate() method should only return true if and only if the values of output properties have really changed, for very much the same performance considerations as above. The script skeleton therefore has declared a boolean member called changed. If the Validate() method updates output properties, it simply should set changed to true and the default implementation of Generate() will do the right thing.
Accessing Properties
Input and Output Properties that have been added to the Script node via the Custom Model dialog are accessible from the script code by their (case-sensitive) names. If an input property Amount and an output property Sum has been added, the script code might look like this:
public override void Validate()
{
    // Read value of input property
    float len1 = this.Amount;

    // Do some arbitrary logic or code (here we check if the
    // input variable is larger than 12)
    if ( len1 > 12.0f )
    {
        // Assign a new value to the output.
        this.Sum = len1 * 10;

        // Set changed to true so Generate will return true during
        // it's next call.
        changed = true;
    }
}
Output properties of type Array cannot be set component-wise! The complete array must be set at the same time. E.g.: MyFloats_out[8] = 2.3f; is not possible and results in a compiler error!
Properties of type Object have been introduced to provide a possibility to exchange complex data structures between Script nodes. Note that these objects must be of a type from the .Net Framework as they have to be known in all scripts. User-defined classes/structs only work between scripts that are based on a shared assembly (see SharedResource above).
Adding an Input Method property to the script and then double-click on the entry will generate a method declaration with the name of the method with the prefix On. If an Input Method Reset is added the corresponding method in the script code is called OnReset(int arg). The return type of the Method is a boolean - if true the Script-Node will execute the Validate() method in the same frame, even if no input property changed.
public bool OnMethod(int arg)
{
	// ... some arbitrary code

	// since this returns true the script node will execute the Validate() method in this frame
	return true;
}
To trigger Events that have been added via Custom Model the name of the Event must be called from the script code. To trigger the Event Activate, the script code should look like this:
public override bool Generate()
{
    // ... some arbitrary code before the call

    Activate();

    // ... some arbitrary code after the call
}
Note that Methods and Events can receive and send integer arguments so e.g. the Activate event code can look like this: Activate(12).
Controlling Keyframe Animation Nodes
Besides getting Input and setting Output properties of the Script Node it is also possible to control Keyframe Animation Nodes with a Script Node. This functionality can be accessed with the IScriptedAnimation Interface. To access this you can add an Output of type Animation to the Script Node. Use it to access the Animation Control Interface.
The following sample code gets the Animation Control and logs its current status in a String Output Property - the used properties are explained afterwards:
public override bool Generate()
{
    IScriptedAnimation animation = Animation;

    if (animation.IsConnected)
    {
        animation.GetStatus(out int connection, out int state);

        if (connection == 0)
            Status = string.Format("Idle on state={0}", state);
        else if (connection > 0)
            Status = string.Format("Playing connection {0} forward, targeting state={1}", connection, state);
        else if (connection < 0)
            Status = string.Format("Playing connection {0} backward, targeting state={1}", -connection, state);
    }

    //... the usual Generate routines
}
There are several members to examine the Animation: States provides you with an IEnumerable of AnimationStates that have an ID, a Name and a boolean determining whether or not the state is a soft state IsSoftState. Connections will return an IEnumerable of AnimationConnections. They provide you with an ID, a Name and the IDs of the States they are connected to via FromStateID and ToStateID.
GetStatus returns false if there is no Animation node connected to the Control Property. The out int connection and out int state will be set to the IDs of the current state and connection. If the animation is currently hold on a state, connection will be set to 0. Note that connection is negative if the transition is driven from the ToState to the FromState.
IsConnected returns true only if there is an animation bound to the Control Property.
This sample code reads out the Template Data of a State once the according Method was triggered, alters the Values of its channels and then drives a transition to that state.
public bool OnSetDataAndPlay(int arg)
{
    IScriptedAnimation animation = Animation;

    if (animation.IsConnected)
    {
        Remoting4.Templates.TemplateData data = animation.CreateData(2);

        data.Data.Number = 23;

        animation.Play(2, null, data);
    }
}
CreateData will get the Template Data Channels and their current values of the given state. This is returned as a Remoting4.Templates.TemplateData object. Its dynamic Data object can be used to change the Template's Data Channel Values. Note that when working with dynamic objects you should prepare to catch exceptions when trying to access non-existent properties on the object.
Play will start the transition with the given ID or Name and duration. If a TemplateData object is passed it will be used to set the Data Channels of the animation. If a Data Marker is used in the Transition, this will be taken into account. Note that the transition will be played regardless of the current state and the allowed directions of the connection. Instead of playing a connection, you can also use the Jump method to directly jump to another state. Lastly you can set the TemplateData without changing the Animation's Status with the SetData Method.
Extended Scripting (External DLLs)
While it is possible to use external DLLs or dynamically load .net assemblies via C# language constructs (P/Invoke; .Net Reflection), the Script Editor provides the possibility to select external .Net DLLs and use them from within the script. To add external DLLs go to the References section of the Script Editor and click on the Frameworks, LAC or PAC Assemblies folder. Clicking Add References will bring up the browser to select external DLLs. To remove a DLL click on it and select Remove Reference. Framework assemblies are those coming with the Dotnet installations. LAC assemblies are coming from the Local Assembly Cache subfolder inside the Ventuz installation folder. If you want to use a DLL from different Ventuz projects, you have to copy it to this folder. Note that this requires administrative rights! PAC represents the Project Assembly Cache. These DLLs have to be stored in the Scripts subfolder of the according Ventuz Project. Only PAC assemblies are included into a VZA or VPR export!
If an external custom DLL was updated and it is referenced from a script, it is necessary to restart Ventuz to make sure that the script references the newest version of the external DLL and the changes have been taken into account. This is a .net Runtime restriction and we cannot do anything about it.
Automation
In addition to reading and writing input and output properties of the Script node itself it is possible to load scenes and resources, configure loaded scenes and de/activate them on ScenePorts. The script provides access to Scene Data properties and methods and allows setting of input properties, reading output properties and triggering methods. All not locked and not bound ScenePorts can also be accessed to host and de/activate scenes. These scenes can be loaded and validated (asynchronously) from within the script. The possibilities are similar to those of the Remoting API.
The class Script contains the member Scene which provides methods and properties for the described functions above through the IScriptScene interface. The full documentation of all methods and properties can be found in the separate Ventuz Remoting API Help File in the Ventuz installation folder.
It is important to know that there are some commands on the IScriptScene interface which are processed asynchronously in a non-blocking manner. These commands are:
- LoadScene() if the loadAsync flag is set to true. The duration of this command is undetermined but the loading status can be queried by the GetLoadValidateProgress() method.
- ReleaseScene() if the releaseAsync flag is set to true. The duration of this command is undetermined.
- Set(), Invoke(), SetScene(), SetPortActive() commands are processed in the next possible frame to assure the correctness of the node validation process.
The following example shows how to initiate asynchronous loading and validation of a scene from a script (you need to add the Ventuz.Remoting2 namsespace! ):
IScriptScene newScene = null;
float lastProgress = 0.0f;
SceneStatus lastStatus = SceneStatus.None;
float Progress = 0;

public bool OnLoadScene(int arg)
{
    // reset parameter
    Progress = 0;                   // output property on this Script node
    lastProgress = 0;
    lastStatus = SceneStatus.None;
    changed = true;

    // schedule async scene loading
    newScene = this.Scene.LoadScene("MyTicker", true, false);

    return false;
}

public override bool Generate()
{
    // check load/validation status
    if ( newScene != null )
    {
        // get load/validation status for newScene
        SceneStatus status;
	Progress = this.Scene.GetLoadValidateProgress(newScene, out status);

	if ( lastProgress != Progress )
	{
            // if anything changed set output property
	    lastProgress = Progress;
	    changed = true;
	}

	if ( status == SceneStatus.Ready && lastStatus != status )
	{
            // load/validation done - trigger event on this Script node to inform about success
	    lastStatus = status;
	    Loaded();
	}
    }

    // return true, if output values have been changed
    if ( changed )
    {
        changed = false;
        return true;
    }

    return false;
}
Logging messages
It is possible to write Log messages to the Designer Message View window and the Ventuz Log files. To do so use the VLog class and its static log methods like Info(...), Warning(...) or Error(...):
VLog.Info("Info only");
VLog.Info("Module name", "Info text");
VLog.Info("Module name", "Info text", VPopup.Never);
Debugging with external Debugger
It is possible to attach an external Debugger to the Ventuz Script nodes. This provides the user with the full functionality of the attached Development Environment. Supported Debuggers are:
- Visual Studio 2022
- any other JIT debugger for .net 8.0 and higher.
Enable Debug for the selected Script node by pressing the respective button at the bottom of the Property Editor. The state of the Debug option is not saved with the node. After re-loading a scene, the Debug option is always off.
A programmatic break-point can be triggered by calling the method BREAK(). This will automatically attach one of the available Debuggers if not already done.
| C# |
|---|
public bool OnMethod1(int arg)
{
	BREAK();
	return false;
}
| VB |
|---|
Public Function OnMethod1(ByVal arg As Integer) As Boolean
	BREAK
	Return False
End Function
Do not edit code in the text editor of the Debugger as changes will not be transferred back to the script node. Only edit the script's code inside the Ventuz Script Editor! If the script source code is modified inside Ventuz, it gets recompiled into a new assembly and loaded (linked) into the Ventuz process. Since the .net Runtime does not provide any way to unload an assembly, all previous versions of a script are kept in memory (see http://msdn.microsoft.com/en-us/library/ms173101%28v=VS.100%29.aspx)! As soon as the code has been modified and recompiled in Ventuz, the code displayed within the Debugger as well as bound breakpoints become invalid as they still refer to the old assembly!
If a Debugger is attached to the Ventuz process, the script can print text to the Debug output.
Console.WriteLine("This is a message from the Script");The Debugger can be detached from the Ventuz process by simply closing it.
The DEBUG symbol is defined if the Debug option is enabled! Compiler directives such as #if or ConditionalAttribute are interpreted as expected.
#if DEBUG
  // ...
#else
  // ...
#endif
[Conditional("DEBUG")]
private void Print( string message, params object[] args )
{
  Console.WriteLine( message, args );
}
Using External Editor to build Scripts
Introduction
This feature requires an installation of Visual Studio 2022 or higher. The free Community Edition of Visual Studio is sufficient. Get it here: https://visualstudio.microsoft.com/downloads/
This feature currently does NOT work with Visual Studio Code!
Besides the Internal Script Editor it is possible to use Microsoft Visual Studio to build a Script node source for C# or VB.
After adding a new Script node to the scene select Edit->Visual Studio at the bottom of the Property Editor or in the context menu of the Script node.
You then will be asked to specify a location and name for the Visual Studio solution and project. Subsequently Visual Studio will be opened with a new 'Script Project'.
A basic (C#) Script Project contains following essential files:
- Script.cs: this file contains the Script class which will be hosted by the according Script node in Ventuz and is called during scene validation. This file will be compiled in Ventuz.
- ScriptBase.cs: this file defines the Custom Model of the Script node and thus the Input/Output Properties, Methods and Events. This file will not be compiled in Ventuz - it is just a definitions file.
- Generated/ScriptBase.Generated.cs: this file contains an auto-generated base class of the Script class. It is only required to allow compilation in Visual Studio. Do not modify this file as modifications are ignored for the final compilation in Ventuz.
You can add further folders and source code files to the VS project. They will be taken into account on Ventuz side. This allows for a 'natural' workflow in VS and you are not limited to a single source file anymore. A Script node can also reference an already existing VS project; you can select it via the ScriptProjectFile Input Property. This way you can use the same source file in multiple Script nodes in Ventuz and you do not need to propagate changes to each Script node manually.
Referencing Assemblies
You can extend your VS Script functionality by adding References to further assemblies. These can be Dotnet Framework assemblies or the Ventuz specific LAC or PAC assemblies (see Extended Scripting (External DLLs)).
Note that Visual Studio might use absolute paths to referenced assemblies. This will break the functionality of the Script if moved to a different location. To overcome this limitation you would need to manually modify the according entry in the VS project file.
Custom Model Definition
Based on the Custom Model definition in ScriptBase.cs the according Script node will get Input & Output properties, Methods and Events. These class members must be marked with certain attributes in the source code to allow the parser on Ventuz side to recognize them as Custom Model items. Currently two attributes are used:
Ventuz.Kernel.Script.ScriptCustomModel(Ventuz.Kernel.Script.ScriptItemTypes)
Ventuz.Kernel.CModel.VCategory(string)
With the first you define the type of the Custom Model item: Input, Output, Method or Event. The second is used to categorize the items in the Property Editor. The ScriptCustomModel attribute is mandatory. Members missing this attribute will be ignored on Ventuz side and you'll get a warning when updating the node.
Custom Model items of type Method require dedicated callback methods in the Script class of the Script.cs file. The method name must match a naming convention to allow an assignment to the according EventHandler: e.g. an EventHandler with name MyMethod1 requires following callback method definition:
public bool OnMyMethod1(int arg)
{
	// your code comes here:
	// ...
	return false;
}
Usage in Ventuz
If your script source compiles in Visual Studio click 'Update' on the according Script node to transfer the script source to Ventuz. This will update all source codes, assembly references and input/output properties based on the Custom Model definition. If more than one Script node references the same Visual Studio project, you will be asked if all of these Script nodes should be updated. In Ventuz every Script node needs to compile the sources again event though they might have been already compiled in Visual Studio.
It is possible to edit the source of a Script node referencing a VS project inside Ventuz with the Internal Script Editor. If the editor is closed all changes will by applied to the according files of the VS project. Vice versa it is possible to start the development of a Script node with the Internal Editor and continue in Visual Studio; just click Edit->Visual Studio on the node and a Visual studio project will be created from the current state of the node.
Limitations
Currently there are some limitations in the workflow with Visual Studio that you should be aware of:
- Ventuz does not import assemblies from a Visual Studio project to the Ventuz project, you need to add them to the LAC or PAC first to use them in the Ventuz Runtime.
- New VS Script projects cannot be added from Ventuz to an existing VS solution. But you could manually add a Ventuz conform VS project to an existing solution and reference it from a Script node.
- Renaming Custom Model items in a Visual Studio project will remove bindings on the according Script node as it is not possible to know the old name of a Property/Method/Event in Ventuz.
- A VS Script project is not exported to VZA; you have to recreate it from the current state of the Script node after import.
- Attaching the VS Debugger to the Ventuz Instance is done using the steps described in Debugging with external Debugger. VS Breakpoints are ignored.