Navigation

Ventuz Introduction

  • Introduction
  • Getting Started
  • Ventuz Editions
  • Ventuz Products
  • Realtime Rendering
  • Frequently Asked Questions
  • Common Mistakes
  • Deploying a Ventuz Presentation
  • Scene Performance and Tweaks

Quick Guides

  • Quick Guide Index
  • Business Logic
  • 3D Art
  • 2D Art
  • Programming
  • System Engineer

General

  • Index
  • What's New
  • Ventuz System Requirements
  • Configuration Editor
  • Device Configuration
  • Machine Configuration
  • Render Setup Editor
  • Introduction to Compositions, Screens and Outputs
  • Explanation of Compositions, Screens and Outputs
  • Live Runtime Control
  • Project and Show Management
  • Web Configuration Editor
  • Communication Protocol Overview
  • GPI Configuration for Runtime or Director
  • Introduction to the Ventuz Video Engine
  • Supported Formats
  • Supported Hardware
  • Color Management and HDR Workflow
  • Multisampling / Anti-Aliasing
  • Input Subsystem
  • Ventuz Proprietary Files
  • Migrating Configs & Content to Ventuz 8
  • Migrating Content to Ventuz 7
  • Migrating Content to Ventuz 6
  • Migrating Content to Ventuz 5
  • Summary Shortcuts
  • Terminology
  • Manual Index

Ventuz Designer

  • Designer Indices
Introduction
  • Designer Introduction Index
  • Designer Overview
  • Realtime Rendering
  • Project Browser
  • Designer Interface
  • Designer Options
  • Working with Nodes
  • Hierarchy and Content Editors
  • 2D Workflow
  • 3D Workflow
  • PBR Workflow
  • Animation Workflow
  • Best Practices
  • Reading Data in Ventuz
  • Display Images and Movies
  • Scene Performance and Tweaks
  • Deploying a Ventuz Presentation
  • Render to Disk
  • Multi Screen and Output Setup
  • Explanation of Compositions, Screens and Outputs
  • Workflow of using Multi Screens
  • Multi GPU
  • Previs
User Interface
  • Designer User Interface Index
  • Designer Interface
  • Renderer Window
  • Layer Editor
  • Property Editor
  • Property Groups
  • Hierarchy Editor
  • Content Editor
  • Find and Replace
  • Toolbox
  • Animation Editor
  • Shader Editor
  • Text Editor
  • Message View
  • Scene Tree
  • Stage Editor
  • Container Outline
  • Watches Editor
  • Scene Control Window
  • Performance Statistics
2D Workflow
  • 2D Workflow Index
  • 2D Workflow
  • Layer Editor
  • Common Layer Properties
  • IPP Effects
  • Color Correction FX
  • Distortion FX
  • Filter FX
  • Hierarchy and Content Editors
  • Display Images and Movies
3D Workflow
  • 3D Workflow Index
  • 3D Workflow
  • Hierarchy and Content Editors
  • Renderer Window
  • Camera Navigation
  • Manipulate Objects with Gizmos
  • In-Scene Editing
  • Layer Editor
  • Property Editor
  • Hierarchy Editor
  • Working with Nodes
  • Isolated Objects
  • Containers
  • Text Rendering
  • Character Sets
  • Geometry Import
  • Color Management and HDR Workflow
  • Display Images and Movies
  • Particle System
  • Creating Realistic Reflections
  • Unreal Integration
  • Notch Integration
  • E2E Node Overview
Logic Workflow
  • Logic Workflow Index
  • Hierarchy and Content Editors
  • Content Editor
  • Hierarchy Editor
  • Working with Nodes
  • Property Editor
  • Containers
  • Project and Scene Data
  • Reading Data in Ventuz
  • Display Images and Movies
  • Input Subsystem
  • Multitouch
  • TUIO Protocol
  • Open Sound Control
  • Unreal Integration
  • Notch Integration
  • E2E Node Overview
Animation Workflow
  • Animation Workflow Index
  • Animation Workflow
  • Animation Editor
  • Content Editor
  • Hierarchy Editor
  • Property Editor
  • Animation and State Engine
  • Templates
  • Template Engine
  • Scene Transitions
  • Unreal Integration
  • Notch Integration
Project Structure
  • Project Structure Index
  • Annotations
  • Project Documentation
  • Projects and Scenes
  • Project Properties
  • Project Maintenance
  • Project and Scene Data
  • Scene Management
  • Scene Statistics
  • Scene Tree
  • Performance Statistics
How Tos
  • Designer How to Index
  • How to Run Ventuz
  • How to Work with Designer
  • Ventuz Designer Drag&Drop Workflow
  • How to work with Shadows
  • How to Build Content for Multiple Screens
  • How to Use Emoijs
  • How to Build a Template
  • How To Build a Custom Scene Transition
  • How to Use the Color Difference Keyer
  • How To Enable HDR Video Output
  • How To Work with the HDR Layer
  • How Create Lens Flares and Bloom
  • How to Create Visuals Loader Node
  • How to Remote Control with a Phone
  • How to use Head Mounted Displays
  • How to work with 3D Reference Layers
  • How to create a Firework Particle System
  • How to use DDS with new Block Compression modes
  • How To use Stream Out
  • How to use the Substance Integration
  • How To Integrate Unreal
  • How To Integrate Notch
  • How To use the Vertex Integration
  • How To Control and Customize Ventuz
  • How to use the Companion with Director
  • How to build Previs scenes with Designer
  • How to migrate from Ventuz 6 to Ventuz 7
Reference
  • Available Nodes
  • Animation Nodes
  • Material&Color Nodes
  • Data Nodes
  • E2E Nodes
  • Geometry Nodes
  • Interaction Nodes
  • IO Nodes
  • Layers
  • Light Nodes
  • Logic Nodes
  • Previs Nodes
  • Render Option Nodes
  • Slides Nodes
  • Sound Nodes
  • Text Nodes
  • Texture Nodes
  • VR Nodes
  • World Nodes
  • Summary Shortcuts
  • Layer Editor Shortcuts
  • Hierarchy Editor Shortcuts
  • Content Editor Shortcuts
  • Animation Editor Shortcuts
  • Director Shortcuts

Ventuz Director

  • Index
  • What's New in Director
  • Introduction
  • Environment
  • Show
  • User Interface
  • Assets
  • Taking Action
  • Property Editor
  • Shot Box
  • Project Data
  • Pages
  • Playlist
  • Transitions
  • Timeline
  • Content References
  • Topology
  • Channels
  • Macros
  • Designing Templates
  • Scene Transitions
  • Plug-Ins
  • Shortcuts
  • Command Line Options
  • Application Settings
  • Glossary
  • GPI Configuration

Ventuz Runtime & Configuration

  • Runtime Index
  • Configuration Editor
  • Machine Configuration
  • Device Configuration
  • Project and Show Management
  • Live Runtime Control
  • Web Configuration Editor
  • Render Setup Editor
  • Warping and Soft-Edging Editor
  • Multi Screen and Output Setup
  • How to migrate from Ventuz 6 to Ventuz 7
  • Machine Clustering
  • Supported Hardware
  • Director Mode
  • How to Configure Audio
  • How to Use Live Options
  • How To Play Out On Multiple Screens
  • How To Render on a Machine Cluster
  • How to Use Head Mounted Displays
  • How to Setup Spout with Ventuz
  • How to Use Newtek NDI
  • How to Use a Mixed Frame Rate Cluster
  • How to Use Tracking

Multi Output & Display Setups

Introduction
  • Introduction to Compositions, Screens and Outputs
  • Explanation of Compositions, Screens and Outputs
  • Machine Clustering
  • Support for multiple GPU's
Editors
  • Configuration Editor
  • Device Configuration
  • Render Setup Editor
  • Warping and Soft-Edging Editor
  • Designer Stage Editor
Workflows
  • How to Build Content for Multiple Screens
  • How To Play Out On Multiple Outputs
  • How To Render on a Machine Cluster
  • How to build Previs scenes with Designer

How To

Designer
  • Designer How to Index
  • How to Run Ventuz
  • How to Work with Designer
  • Ventuz Designer Drag&Drop Workflow
  • How to work with Shadows
  • How to Build Content for Multiple Screens
  • How to Use Emoijs
  • How to Build a Template
  • How To Build a Custom Scene Transition
  • How to Use the Color Difference Keyer
  • How To Work with the HDR Layer
  • How To Enable HDR video output
  • How Create Lens Flares and Bloom
  • How to Create Visuals Loader Node
  • How to Remote Control with a Phone
  • How to use Head Mounted Displays
  • How to work with 3D Reference Layers
  • How to create a Firework Particle System
  • How to use DDS with new Block Compression modes
  • How to use the Substance Integration
  • How To Integrate Unreal
  • How To Integrate Notch
  • How To build and playback Ventuz Content in Vertex
Runtime & Configuration
  • Runtime How Tos Index
  • How to Configure Audio
  • How to Use Live Options
  • How To Play Out On Multiple Screens
  • How To Render on a Machine Cluster
  • How to use Head Mounted Displays
  • How to setup Spout with Ventuz
  • How to use Newtek NDI
  • How to use a Mixed Frame Rate Cluster
  • How to use Tracking
  • How To Integrate Unreal
  • How To Integrate Notch
  • How To build and playback Ventuz Content in Vertex
  • Multi Screen and Output Setup
  • How To Enable HDR video output
Director
  • How To Control Multiple Graphics Independently From Each Other
  • How to use the Companion with Director

Ventuz Node Reference

Available Nodes Overview
  • All Designer Nodes
ANIMATION
  • Mover
  • Alternator
  • Simple Control
  • Timeline Control
  • Anmation Rig
  • Keyframe Animation
  • Animation Group
COLOR/MATERIAL
  • Alpha
  • Fog
  • Ground Fog
  • Sky Box
  • Color to RGBA
  • HSLA to Color
  • RGBA to Color
  • Color Transformer
  • HLSL Shader
  • Color
  • Material
  • Color Picker
  • Substance Material
DATA
  • Database
  • Excel
  • JSON
  • RSS Feed
  • Resource Linker
  • Text File
  • XML
E2E
  • E2E Axis
  • E2E Data
  • E2E Control
  • E2E Layer
  • E2E Provider
  • E2E Node Overview
GEOMETRY
  • Rectangle
  • Rounded Rectangle
  • Gradient Rectangle
  • Overlay Rectangle
  • Cube
  • Circle
  • Sphere
  • Cylinder
  • Cone
  • Torus
  • Chart
  • Random Points
  • Mesh Loader
  • Geometry Import (Live)
  • Volume
  • Get Bounding Box
  • Arrow
  • Particle System
  • Path Renderer
  • Geometry Renderer
INTERACTION
  • Interaction Rect
  • Touch Button
  • Touch Excluder
  • Touch Marker
  • Touch Paint
  • Touch Pattern
  • Touch Proxy
  • Touch Ripples
  • Touch Transformations
  • Web Browser
  • Touch Teleport
  • Touch Simulator
INPUT/OUTPUT (I/O)
  • GPI
  • Joystick
  • Keyboard
  • MIDI
  • Mouse
  • Network
  • Open Sound Control
  • Serial
  • Timecode
  • DMX
  • HTTP
  • RamDiskWriter
LAYER
  • 3D Layers
  • 3D Layer Reference
  • Composition Layer
  • 2D Layers
  • PSD Import Layer
  • E2E Layer
  • Mixer Layer
  • Others
LIGHT
  • Light Sources
LOGIC
  • Array Processing
  • Convert To Text
  • Cluster Synchronization
  • Counter
  • Data Portals
  • Date Time
  • Directory
  • Dispatcher
  • Enumeration
  • Expressions
  • Invert
  • Log
  • Loop Breaker
  • Math Effects
  • Matrix Operations
  • Scene Event
  • Script
  • String Operations
  • System ID
  • Render Setup Relation
  • Text Splitter
  • Timer
  • Toggle
  • Transition Info
  • URL
  • Value Switch
  • Value Buffer
  • Variables
  • Visual Indexer
PREVISUALIZATION
  • Introduction to Previs
  • Previs Screen
  • Previs Canvas
  • Compositon List
  • Rendersetup Objects
  • Composition Projector
  • Previs Screen Render Options
RENDER OPTIONS
  • Alpha Blending
  • Color Write
  • Alpha Testing
  • Clip Plane
  • Filter
  • Mask
  • Mirror
  • Effect
  • Render Cube Map
  • Draw Modes
  • Stencil
  • ZTesting
SOUND
  • Audio Clip
  • Sound
  • Volume Control
  • Audio Analysis
SLIDES
  • Slide Manager
  • Slide
  • Slide Port
  • Pivot
TEXT
  • Text Effects
  • Text Layouts
  • Text Rendering
TEXTURE
  • Background
  • Hatch
  • Image
  • Texture
  • SVG Loader
  • Gradient Texture
  • Live Video
  • Movie Stream
  • Movie Frame
  • Movie Clip
  • Texture Loader
  • Snapshot
  • Snapshot Framebuffer
  • Texture Saver
  • Video Source Selector
  • VIO Input
  • Spout Receiver
  • NDI Receiver
  • Substance Loader
  • QR Code
VR/AR
  • Tracked Devices
  • Draw Tracked Devices
WORLD
  • Axis
  • Billboard
  • GetWorld
  • SetWorld
  • Arrange
  • Ticker
  • Layout
  • Group
  • World Z Sort
  • YesNo
  • Switch
  • Spread
  • Filter Pass
  • Set Pass
  • Hierarchy Container
  • Scene Port
  • Content Container
  • Template Port
  • Container Info
  • Camera
  • Paths
  • Cloner

Advanced and Development

  • Advanced and Development Index
  • Command Line Options
  • Ventuz IP Ports
  • Ventuz Machine Service
  • TUIO
  • .NET Scripting
  • HLSL Shader Programming
  • Ventuz API and SDK
  • Ventuz Extension API
  • Ventuz VIO API
  • Ventuz File Format (VFF)
  • Ventuz Stream Out API
  • Lens Calibration File for FreeD
  • E2E Node Overview
  • Unreal Integration
  • Notch Integration
Remoting
  • Remoting Index
  • Remoting Overview
  • How To Control and Customize Ventuz
  • Remoting 4
  • Remoting 4 via Websockets
  • Remoting 4 via HTTP
  • Director Remoting
  • Deprecated Remoting

Misc

  • Presets
« Previous: How To Enable HDR video output
» Index «
Next: How to use the Companion with Director »

How To Control Multiple Graphics Independently From Each Other

Table of Contents

  1. Introduction
  2. Creating the Layout scene
  3. Layout Scenes
  4. Template Settings
    1. Preparing an Animated Template
    2. Preparing Non-Animated Templates
  5. Building the Topology
  6. Creating Channel rules
  7. Tips&Tricks
    1. Override Channel rules
    2. Shortcuts and Hotkeys

In this How To you will learn to operate several graphics simultaneously from the Director. Oftentimes you want to have more than one graphic on-air from one machine. We will show you how to define the layout of the graphics and adjust the Director's UI according to the needs of your show.

Even though this is a Director How to it is required to build a template inside the Designer first. And in this Template scene we need to prepare the Template to be able to work in a multi channel show. So if you dont have a Template scene yet head over to this How to and learn how to build one.

Introduction

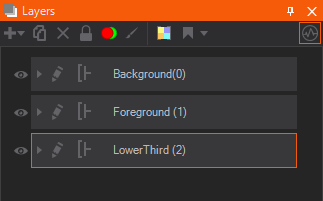
A multi channel show can be very helpful in larger productions to prevent content from being confused with other content and to make sure it is displayed correctly. For example: you can create unique Channels different elements such as the background, lower third, foreground and so on. This How to will guide you trough the necessary steps to successfully deploy a multi channel Show.

Creating the Layout scene

In order to use multiple channels, we need to make a Layout Scene. Follow the instructions in the upcoming section and create a layout scene with two ports instead of the example shown with three.

Layout scene creation

Layout Scenes

A Layout is a scene loaded by the project in front of the first 'user-scene' on Level 1. Layouts are placed on Level 0 and can be used to create multiple ports the Director can cue and take templates to (see Director Multichannel), do more complex setups or do global data processing.

Layouts are usually very simple scenes holding at least one unlocked Layer Port. Generally, Port Ordinal 0 (the default port) is not locked. A Layout scene is a normal scene: one can use all nodes, add properties to Project and Scene Data and insert layout related content. The possibilities of Layouts are numerous:

  • A Split Layout with two ports (left and right) by using two Layer Nodes and adjust the Layout.
  • A layered scene Layout: imagine three Ports: Background, Content and Overlay!
  • An effect-layout making a standard set of Effects!

Layout scenes opened in the Designer via Scene Tree Editor are marked with a special icon in the scene tab!

Since Ventuz 7 and the introduction of Compositions the Layout Scene technically needs a Composition. If you don't add a Composition to the Layout Scene, Ventuz will automatically creates a Default Composition. This will ensure, that the loaded scenes are usable with the default Rendersetup or a custom Render Setup with the default composition. If you create a Layout Scene with Compositions and Scene Layer in it, Ventuz wont add automatically a Default Composition.

With creating a Layout Scene with multiple Compositions, each containing a Scene Layer, the Render Setup enables you to flexible layout and map your rendering. The arrangement of your scenes in the Layer Ports is therefore later flexible changeable. Especially, when you are using the Channels of the Director to control the loaded content, this is very powerful. The final layout of the production is not needed to know when creating the Layout Scene.

The configuration of Layouts is done in the Project Properties. The Layout section in the Project Properties dialog provides possibilities to create and edit Layouts.

Layout Configuration

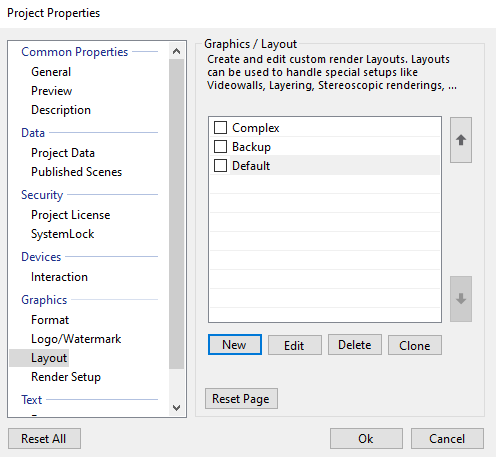
A Layout setup is created by  clicking the New button. In the General tab, a name for the Layout and the actual Layout scene file can be chosen. The fields Description and Icon can be used to help other users who work on the same project.

The Machine Tags property is a list of comma-separated three-character-codes. They are used to determine which Layout will be used on the current machine. Each machine has a Machine Tag that is defined in its Ventuz Configuration. Once the Runtime is started it will search for that tag in the Layouts - if no tag is given or it is not present in any Layout, the default layout will be used: Every entry in the Layout list has a check-box. The checked Layout is selected as the Runtime Layout which is automatically used if a scene is exported as Presentation (VPR) or the Ventuz Runtime is started in Director mode and no tagged Layout is used. Layout scenes are also loaded when the project is opened even if these are not set as active loadout scenes. This ensures that turning them on or switching them is fast.

Template Settings

Now we need to open the Template we made and fill some Properties with information. This has to be done in either one of the following ways depending on if the Template has a Animation or not.

Preparing an Animated Template

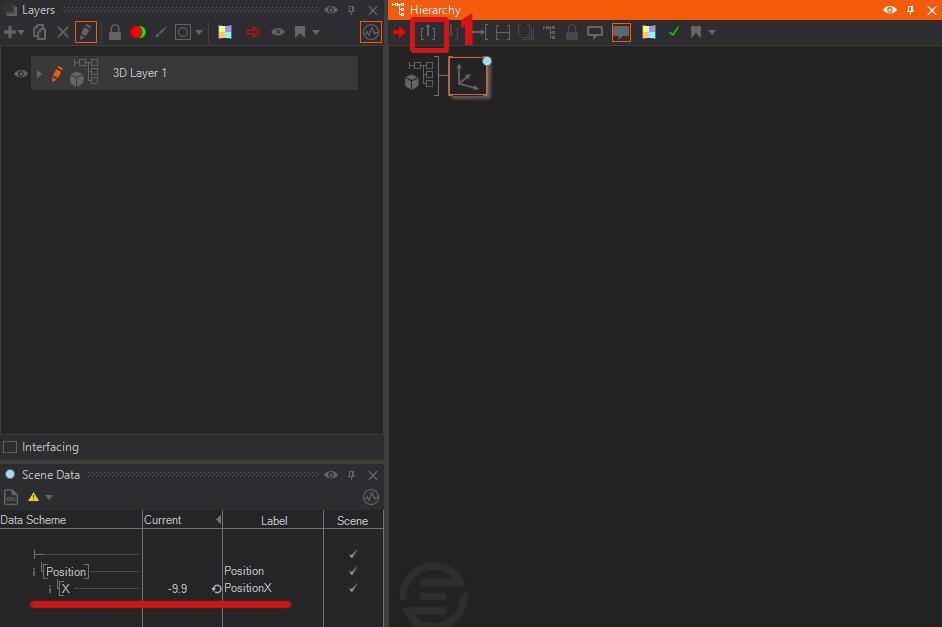
After opening your scene in the Designer you need to find the Animation node. Then look at the Animation Editor and select the Logic View. Now click on the yellow present state 1.

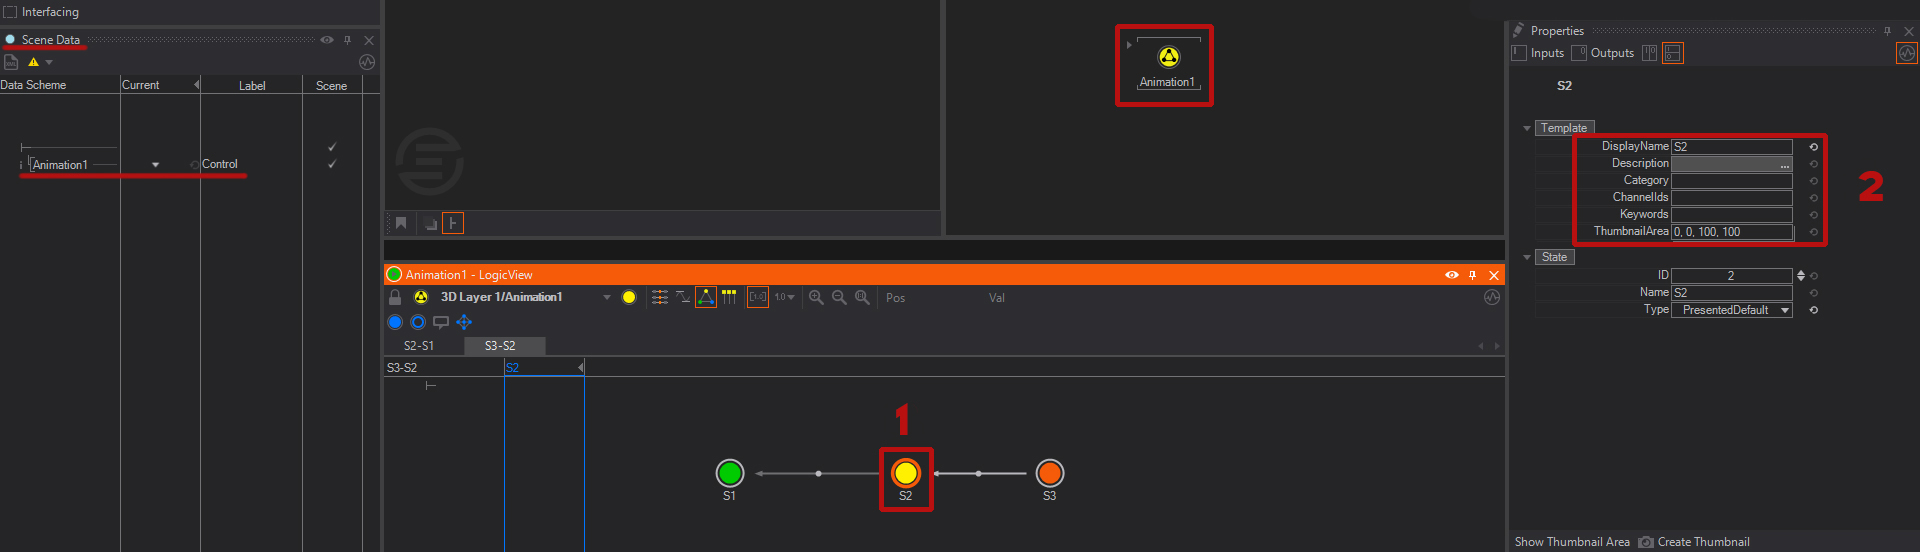
  1. After clicking on the state you will find the shown properties in the Property Editor. If there are no properties, the Animation Control was not added to the scene Data.
    • Display Name: Is the name that is going to be displayed in the Template Window inside the Director.
    • Description: Can be used to the describe the function of the Template. This will be shown as tooltip when hovering over the Template in the Director.
    • Category: Every Template can be inside of one Category. This can be seen in the Director. It is also possible to assign multiple Templates to one Category.
    • Channel ID: Enables the ability to sort Templates by ChannelID inside the Director. Can also be used to restrict its use in combination with channel rules.
    • Keywords: Enables the ability to sort Templates by Keywords inside the Director. Can also be used to restrict its use in combination with channel rules.
    • Thumbnail Area: Determines the are which will be captured when pressing on the Create Thumbnail Button. Can be unfolded by  clicking on the property to manipulate the area in which the Thumbnail will be taken from. The area can be made visible by  clicking on the Show Thumbnail Area which makes it visible inside the Renderer Window.

As a simple example, we are only going to give the Template a name, a keyword and create a Thumbnail.

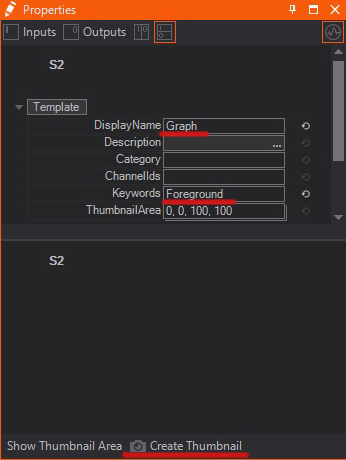
This Keyword is important later when we are creating the channel rules. Keywords allow the content to work on specific assigned channel. To create a Thumbnail  click the Create Thumbnail button on the bottom of the Properties Editor and leave the Thumbnail Area settings as they are.

Now your Thumbnail is prepared and we can start building the Topology.

Preparing Non-Animated Templates

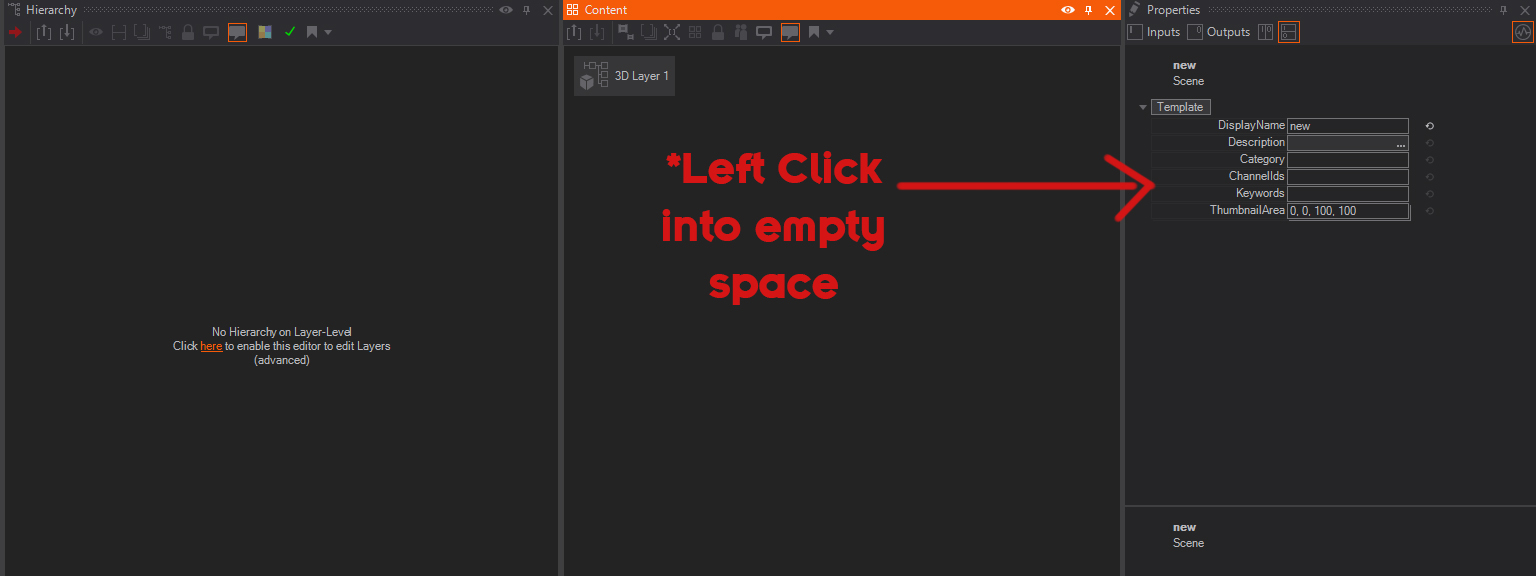
When working with a static template such as a plain background image, there is no animation and therefore no state where to edit the properties. To reach the Template Data, as they are described in the section above, you need to add a minimum of one property of the node that is inside the Template scene and add it to the Scene data. After that you can access the Template Data by going above the Layer level and clicking on a empty spot inside the Content Editor. Now you should see the Template Data inside the Property Editor.

Building the Topology

One of the fundamental design principles of the Director is the separation of content and the actual rendering system via Channels. A Channel is a stream of content; Specifically templates being cued, that is filled with values and then taken to air. Where that content is rendered is not part of the show but part of the Topology.

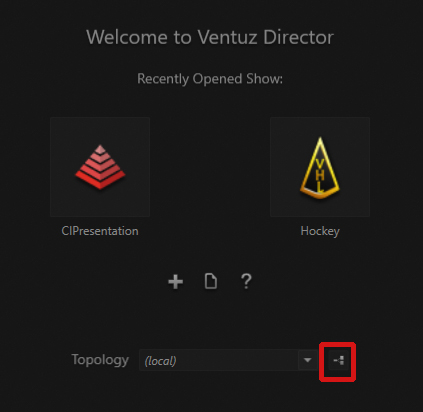
In order to build a new topology for a multi channel show start the Director and hit the small Topology Editor button.

After opening the Editor the first you will probably see is the Topology itself. To navigate inside the Editor hold the middle mouse button to move around, to select things and into empty space to add new things to the Topology. Before you can start building the actual topology you need to know what all this different elements are actually representing.

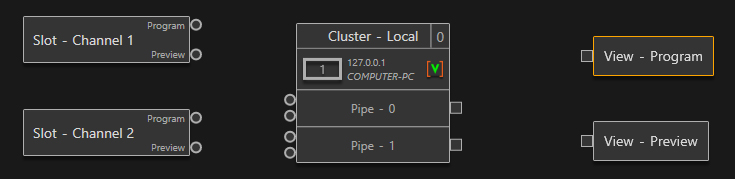
  • 1: This "Slot" represents one channel. Every slot has two outputs. One for the Preview and one for the Program.
    • Preview as the name suggests is a preview window for the Template
    • Program is the window which shows the content that is currently on air
  • 2: These dots are the connection to the pipe and are called Ports. Every pipe will only have one output. The input can have multiple ports. How these are changed will be explained further down in this document.
  • 3: The output Ports of the Pipe.
  • 4: A View Element, which represents the rendering windows inside the Director. These can be individually named depending on your preferences.
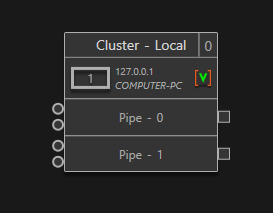
  • 5: This is the Cluster element which breaks down to the Name at the top, the actual Machine which is represented by a rectangular box with their IP-address and name, the status of the VMS connection, and the pipes.

Now that you know what these elements are lets build a new Topology for our multi channel show. First  click the small + in the bottom left corner to create a new Topology, so we dont work in the default local one. Give it a name and  click ok. There are two ways to add the different elements we need. The first one would be the small menu bar in the bottom left.

Or by  clicking empty space inside the Editor.

Add a Local Machine, and change the Pipes to Dual. As you will see these Pipes only have one Port. To change that  click in empty space again and click on Properties. Here you can change the number of input Ports every Pipes will have. To not make it more complicated change it to 2.

This is what you should see now.

To add a Slot  click in empty space and under Add you will also find the Slot. Add two of them and for the sake of clarity name them Channel 1 and Channel 2. Also add two View elements.

In order to connect those correctly we first need to connect the View elements to determine which Pipe will be handling the rendering of the Program and Preview. To connect an element with another  click and hold on a Port and drag it over to the View element.

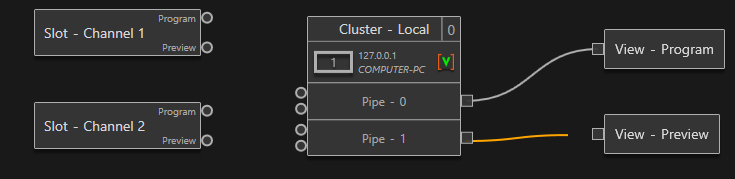
Now connect the Slot Ports with the respective Pipe.

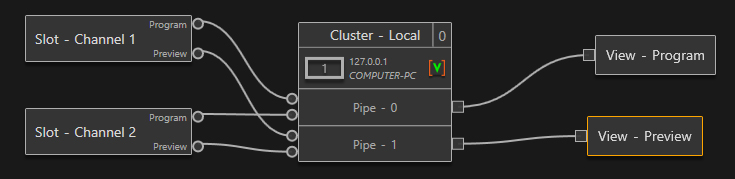
The Topology set and ready to go. Now you can open your show and move on in this guide. Your Topology should be already selected.

Creating Channel rules

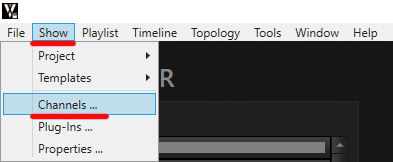
With channel rules you can assure that only the templates can be cued in the the correct channel. To set these rules open your show with the Topology we just build and click on Show and then on Channels.

By default there are no Channel Rules applied

So let us change the first channel rule, you can either double  click or single  click on the channel and  click Edit. Now we are going to add 2 new rules to it.

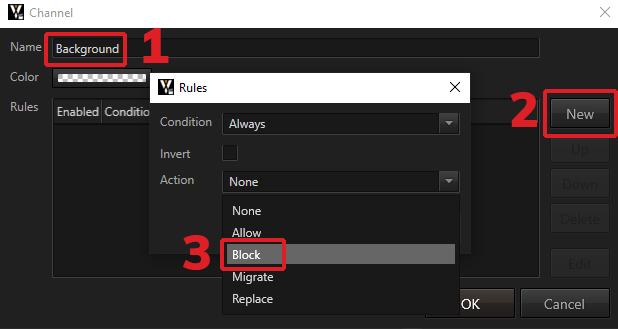
  • 1. Change the Name of the Channel to Background
  • 2.  Click new to create a new rule, the condition stays on Always
  • 3. Change the Action to Block

This will now block every Template from being qued.
To allow Templates with the Keyword "Background" in it we need to create another rule.

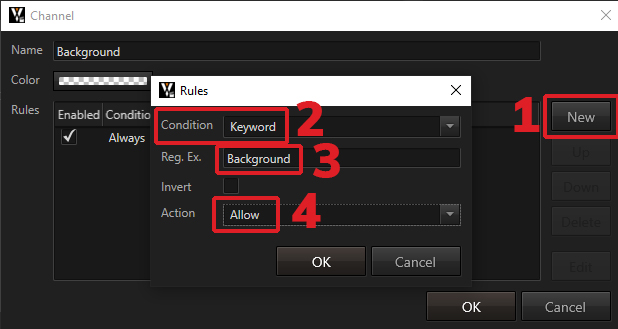
  • 1. Create a new rule
  • 2. Change the condition to Keyword
  • 3. Type in the Keyword
  • 4. Change the Action to Allow

Now every Template with the Keyword "Background" in it will be allowed in this Channel. Repeat this steps for youre second Channel with the Keyword set to "Foreground", and you are all set to go live with your first multi Channel show. It is important to know that the order of the rules are important. Ventuz Director handles the rules from top to bottom. In our case, we first block all entries then we allow a specific keyword. The second rule is the exception of the first rule. If we would swapped the order of the rules, we would allow one keyword (which is allowed anyways, in the case of no rules) and the second rule would block all keywords.

Tips&Tricks

This section will teach you some valuable Tips and Tricks to optimize your Workflow in the Ventuz Director.

Override Channel rules

It is possible to override existing Channel rules while operating without the need of changing them. To do this, simply hold the ALT key while dragging a Template in the Channel. Now the rules are ignored and you can que Templates that usually wont be allowed in there.

Shortcuts and Hotkeys

Here is a list of all Shortcuts and a explanation how you create custom Hotkeys: Shortcuts and Hotkeys

See also:
  • Designing Templates
  • Template Data
  • Layout Scene
  • Shortcuts and Hotkeys
  • Director Channels
  • Pipes
  • Ports
  • Ports
  • Topology
  • Topology Editor
  • VMS-Ventuz Machine Service
  • Hierarchy Editor
  • Content Editor
  • Animation Editor
  • Properties Editor
  • How to Build a Template

« Previous: How To Enable HDR video output
» Index «
Next: How to use the Companion with Director »
Copyright 2025 Ventuz Technology