Navigation

Ventuz Introduction

  • Introduction
  • Getting Started
  • Ventuz Editions
  • Ventuz Products
  • Realtime Rendering
  • Frequently Asked Questions
  • Common Mistakes
  • Deploying a Ventuz Presentation
  • Scene Performance and Tweaks

Quick Guides

  • Quick Guide Index
  • Business Logic
  • 3D Art
  • 2D Art
  • Programming
  • System Engineer

General

  • Index
  • What's New
  • Ventuz System Requirements
  • Configuration Editor
  • Device Configuration
  • Machine Configuration
  • Render Setup Editor
  • Introduction to Compositions, Screens and Outputs
  • Explanation of Compositions, Screens and Outputs
  • Live Runtime Control
  • Project and Show Management
  • Web Configuration Editor
  • Communication Protocol Overview
  • GPI Configuration for Runtime or Director
  • Introduction to the Ventuz Video Engine
  • Supported Formats
  • Supported Hardware
  • Color Management and HDR Workflow
  • Multisampling / Anti-Aliasing
  • Input Subsystem
  • Ventuz Proprietary Files
  • Migrating Configs & Content to Ventuz 8
  • Migrating Content to Ventuz 7
  • Migrating Content to Ventuz 6
  • Migrating Content to Ventuz 5
  • Summary Shortcuts
  • Terminology
  • Manual Index

Ventuz Designer

  • Designer Indices
Introduction
  • Designer Introduction Index
  • Designer Overview
  • Realtime Rendering
  • Project Browser
  • Designer Interface
  • Designer Options
  • Working with Nodes
  • Hierarchy and Content Editors
  • 2D Workflow
  • 3D Workflow
  • PBR Workflow
  • Animation Workflow
  • Best Practices
  • Reading Data in Ventuz
  • Display Images and Movies
  • Scene Performance and Tweaks
  • Deploying a Ventuz Presentation
  • Render to Disk
  • Multi Screen and Output Setup
  • Explanation of Compositions, Screens and Outputs
  • Workflow of using Multi Screens
  • Multi GPU
  • Previs
User Interface
  • Designer User Interface Index
  • Designer Interface
  • Renderer Window
  • Layer Editor
  • Property Editor
  • Property Groups
  • Hierarchy Editor
  • Content Editor
  • Find and Replace
  • Toolbox
  • Animation Editor
  • Shader Editor
  • Text Editor
  • Message View
  • Scene Tree
  • Stage Editor
  • Container Outline
  • Watches Editor
  • Scene Control Window
  • Performance Statistics
2D Workflow
  • 2D Workflow Index
  • 2D Workflow
  • Layer Editor
  • Common Layer Properties
  • IPP Effects
  • Color Correction FX
  • Distortion FX
  • Filter FX
  • Hierarchy and Content Editors
  • Display Images and Movies
3D Workflow
  • 3D Workflow Index
  • 3D Workflow
  • Hierarchy and Content Editors
  • Renderer Window
  • Camera Navigation
  • Manipulate Objects with Gizmos
  • In-Scene Editing
  • Layer Editor
  • Property Editor
  • Hierarchy Editor
  • Working with Nodes
  • Isolated Objects
  • Containers
  • Text Rendering
  • Character Sets
  • Geometry Import
  • Color Management and HDR Workflow
  • Display Images and Movies
  • Particle System
  • Creating Realistic Reflections
  • Unreal Integration
  • Notch Integration
  • E2E Node Overview
Logic Workflow
  • Logic Workflow Index
  • Hierarchy and Content Editors
  • Content Editor
  • Hierarchy Editor
  • Working with Nodes
  • Property Editor
  • Containers
  • Project and Scene Data
  • Reading Data in Ventuz
  • Display Images and Movies
  • Input Subsystem
  • Multitouch
  • TUIO Protocol
  • Open Sound Control
  • Unreal Integration
  • Notch Integration
  • E2E Node Overview
Animation Workflow
  • Animation Workflow Index
  • Animation Workflow
  • Animation Editor
  • Content Editor
  • Hierarchy Editor
  • Property Editor
  • Animation and State Engine
  • Templates
  • Template Engine
  • Scene Transitions
  • Unreal Integration
  • Notch Integration
Project Structure
  • Project Structure Index
  • Annotations
  • Project Documentation
  • Projects and Scenes
  • Project Properties
  • Project Maintenance
  • Project and Scene Data
  • Scene Management
  • Scene Statistics
  • Scene Tree
  • Performance Statistics
How Tos
  • Designer How to Index
  • How to Run Ventuz
  • How to Work with Designer
  • Ventuz Designer Drag&Drop Workflow
  • How to work with Shadows
  • How to Build Content for Multiple Screens
  • How to Use Emoijs
  • How to Build a Template
  • How To Build a Custom Scene Transition
  • How to Use the Color Difference Keyer
  • How To Enable HDR Video Output
  • How To Work with the HDR Layer
  • How Create Lens Flares and Bloom
  • How to Create Visuals Loader Node
  • How to Remote Control with a Phone
  • How to use Head Mounted Displays
  • How to work with 3D Reference Layers
  • How to create a Firework Particle System
  • How to use DDS with new Block Compression modes
  • How To use Stream Out
  • How to use the Substance Integration
  • How To Integrate Unreal
  • How To Integrate Notch
  • How To use the Vertex Integration
  • How To Control and Customize Ventuz
  • How to use the Companion with Director
  • How to build Previs scenes with Designer
  • How to migrate from Ventuz 6 to Ventuz 7
Reference
  • Available Nodes
  • Animation Nodes
  • Material&Color Nodes
  • Data Nodes
  • E2E Nodes
  • Geometry Nodes
  • Interaction Nodes
  • IO Nodes
  • Layers
  • Light Nodes
  • Logic Nodes
  • Previs Nodes
  • Render Option Nodes
  • Slides Nodes
  • Sound Nodes
  • Text Nodes
  • Texture Nodes
  • VR Nodes
  • World Nodes
  • Summary Shortcuts
  • Layer Editor Shortcuts
  • Hierarchy Editor Shortcuts
  • Content Editor Shortcuts
  • Animation Editor Shortcuts
  • Director Shortcuts

Ventuz Director

  • Index
  • What's New in Director
  • Introduction
  • Environment
  • Show
  • User Interface
  • Assets
  • Taking Action
  • Property Editor
  • Shot Box
  • Project Data
  • Pages
  • Playlist
  • Transitions
  • Timeline
  • Content References
  • Topology
  • Channels
  • Macros
  • Designing Templates
  • Scene Transitions
  • Plug-Ins
  • Shortcuts
  • Command Line Options
  • Application Settings
  • Glossary
  • GPI Configuration

Ventuz Runtime & Configuration

  • Runtime Index
  • Configuration Editor
  • Machine Configuration
  • Device Configuration
  • Project and Show Management
  • Live Runtime Control
  • Web Configuration Editor
  • Render Setup Editor
  • Warping and Soft-Edging Editor
  • Multi Screen and Output Setup
  • How to migrate from Ventuz 6 to Ventuz 7
  • Machine Clustering
  • Supported Hardware
  • Director Mode
  • How to Configure Audio
  • How to Use Live Options
  • How To Play Out On Multiple Screens
  • How To Render on a Machine Cluster
  • How to Use Head Mounted Displays
  • How to Setup Spout with Ventuz
  • How to Use Newtek NDI
  • How to Use a Mixed Frame Rate Cluster
  • How to Use Tracking

Multi Output & Display Setups

Introduction
  • Introduction to Compositions, Screens and Outputs
  • Explanation of Compositions, Screens and Outputs
  • Machine Clustering
  • Support for multiple GPU's
Editors
  • Configuration Editor
  • Device Configuration
  • Render Setup Editor
  • Warping and Soft-Edging Editor
  • Designer Stage Editor
Workflows
  • How to Build Content for Multiple Screens
  • How To Play Out On Multiple Outputs
  • How To Render on a Machine Cluster
  • How to build Previs scenes with Designer

How To

Designer
  • Designer How to Index
  • How to Run Ventuz
  • How to Work with Designer
  • Ventuz Designer Drag&Drop Workflow
  • How to work with Shadows
  • How to Build Content for Multiple Screens
  • How to Use Emoijs
  • How to Build a Template
  • How To Build a Custom Scene Transition
  • How to Use the Color Difference Keyer
  • How To Work with the HDR Layer
  • How To Enable HDR video output
  • How Create Lens Flares and Bloom
  • How to Create Visuals Loader Node
  • How to Remote Control with a Phone
  • How to use Head Mounted Displays
  • How to work with 3D Reference Layers
  • How to create a Firework Particle System
  • How to use DDS with new Block Compression modes
  • How to use the Substance Integration
  • How To Integrate Unreal
  • How To Integrate Notch
  • How To build and playback Ventuz Content in Vertex
Runtime & Configuration
  • Runtime How Tos Index
  • How to Configure Audio
  • How to Use Live Options
  • How To Play Out On Multiple Screens
  • How To Render on a Machine Cluster
  • How to use Head Mounted Displays
  • How to setup Spout with Ventuz
  • How to use Newtek NDI
  • How to use a Mixed Frame Rate Cluster
  • How to use Tracking
  • How To Integrate Unreal
  • How To Integrate Notch
  • How To build and playback Ventuz Content in Vertex
  • Multi Screen and Output Setup
  • How To Enable HDR video output
Director
  • How To Control Multiple Graphics Independently From Each Other
  • How to use the Companion with Director

Ventuz Node Reference

Available Nodes Overview
  • All Designer Nodes
ANIMATION
  • Mover
  • Alternator
  • Simple Control
  • Timeline Control
  • Anmation Rig
  • Keyframe Animation
  • Animation Group
COLOR/MATERIAL
  • Alpha
  • Fog
  • Ground Fog
  • Sky Box
  • Color to RGBA
  • HSLA to Color
  • RGBA to Color
  • Color Transformer
  • HLSL Shader
  • Color
  • Material
  • Color Picker
  • Substance Material
DATA
  • Database
  • Excel
  • JSON
  • RSS Feed
  • Resource Linker
  • Text File
  • XML
E2E
  • E2E Axis
  • E2E Data
  • E2E Control
  • E2E Layer
  • E2E Provider
  • E2E Node Overview
GEOMETRY
  • Rectangle
  • Rounded Rectangle
  • Gradient Rectangle
  • Overlay Rectangle
  • Cube
  • Circle
  • Sphere
  • Cylinder
  • Cone
  • Torus
  • Chart
  • Random Points
  • Mesh Loader
  • Geometry Import (Live)
  • Volume
  • Get Bounding Box
  • Arrow
  • Particle System
  • Path Renderer
  • Geometry Renderer
INTERACTION
  • Interaction Rect
  • Touch Button
  • Touch Excluder
  • Touch Marker
  • Touch Paint
  • Touch Pattern
  • Touch Proxy
  • Touch Ripples
  • Touch Transformations
  • Web Browser
  • Touch Teleport
  • Touch Simulator
INPUT/OUTPUT (I/O)
  • GPI
  • Joystick
  • Keyboard
  • MIDI
  • Mouse
  • Network
  • Open Sound Control
  • Serial
  • Timecode
  • DMX
  • HTTP
  • RamDiskWriter
LAYER
  • 3D Layers
  • 3D Layer Reference
  • Composition Layer
  • 2D Layers
  • PSD Import Layer
  • E2E Layer
  • Mixer Layer
  • Others
LIGHT
  • Light Sources
LOGIC
  • Array Processing
  • Convert To Text
  • Cluster Synchronization
  • Counter
  • Data Portals
  • Date Time
  • Directory
  • Dispatcher
  • Enumeration
  • Expressions
  • Invert
  • Log
  • Loop Breaker
  • Math Effects
  • Matrix Operations
  • Scene Event
  • Script
  • String Operations
  • System ID
  • Render Setup Relation
  • Text Splitter
  • Timer
  • Toggle
  • Transition Info
  • URL
  • Value Switch
  • Value Buffer
  • Variables
  • Visual Indexer
PREVISUALIZATION
  • Introduction to Previs
  • Previs Screen
  • Previs Canvas
  • Compositon List
  • Rendersetup Objects
  • Composition Projector
  • Previs Screen Render Options
RENDER OPTIONS
  • Alpha Blending
  • Color Write
  • Alpha Testing
  • Clip Plane
  • Filter
  • Mask
  • Mirror
  • Effect
  • Render Cube Map
  • Draw Modes
  • Stencil
  • ZTesting
SOUND
  • Audio Clip
  • Sound
  • Volume Control
  • Audio Analysis
SLIDES
  • Slide Manager
  • Slide
  • Slide Port
  • Pivot
TEXT
  • Text Effects
  • Text Layouts
  • Text Rendering
TEXTURE
  • Background
  • Hatch
  • Image
  • Texture
  • SVG Loader
  • Gradient Texture
  • Live Video
  • Movie Stream
  • Movie Frame
  • Movie Clip
  • Texture Loader
  • Snapshot
  • Snapshot Framebuffer
  • Texture Saver
  • Video Source Selector
  • VIO Input
  • Spout Receiver
  • NDI Receiver
  • Substance Loader
  • QR Code
VR/AR
  • Tracked Devices
  • Draw Tracked Devices
WORLD
  • Axis
  • Billboard
  • GetWorld
  • SetWorld
  • Arrange
  • Ticker
  • Layout
  • Group
  • World Z Sort
  • YesNo
  • Switch
  • Spread
  • Filter Pass
  • Set Pass
  • Hierarchy Container
  • Scene Port
  • Content Container
  • Template Port
  • Container Info
  • Camera
  • Paths
  • Cloner

Advanced and Development

  • Advanced and Development Index
  • Command Line Options
  • Ventuz IP Ports
  • Ventuz Machine Service
  • TUIO
  • .NET Scripting
  • HLSL Shader Programming
  • Ventuz API and SDK
  • Ventuz Extension API
  • Ventuz VIO API
  • Ventuz File Format (VFF)
  • Ventuz Stream Out API
  • Lens Calibration File for FreeD
  • E2E Node Overview
  • Unreal Integration
  • Notch Integration
Remoting
  • Remoting Index
  • Remoting Overview
  • How To Control and Customize Ventuz
  • Remoting 4
  • Remoting 4 via Websockets
  • Remoting 4 via HTTP
  • Director Remoting
  • Deprecated Remoting

Misc

  • Presets
« Previous: Template Engine
» Index «
Next: Unreal Integration »

Scene Transition

Table of Contents

  1. General Concept
  2. Technical Setup
  3. Cue and Take Process
    1. Control and Information
    2. Timing
  4. Director
  5. Limitations

General Concept

With Scene Transitions (or Transition Scenes), Ventuz can seamlessly blend two Scenes or Templates. The Transition Scene holds the current on-air Scene, and the cued Scene in a Scene Port. Because of this, it is possible to blend the two Scenes together to enable Ventuz to make both Scenes visible at the same time.

To use Transitions, every Template in Director has a tab with Transition, to add a built-in Transition or custom Transitions. The Transition is always added to the cued Template and will be placed between the (default) Layout Scene and the Template Scene when cued. Because the Scene Transition holds both Scenes, the engine has to validate and render both. When both Templates are in the same Scene, the Scene is loaded twice to perform the Transition.

Please Note: during a transition, Ventuz will render both Scenes at the same time; Please ensure that all systems that will be using these transitions can handle the extra load of two scenes running simultaneously

Technical Setup

The Transition Scene is a standard Ventuz Scene with a specific configuration, to work as Transition Scene:

  • Every Transition consists of 2 Scene Port Layers. The first to hold the Program Pipe (or Pipe0) and the second the Preview Pipe (or Pipe1).
  • The Main Animation is in Template mode and has a Begin State and a Present State that is connected to the Begin State.
  • The Scene is saved with .trans at the end of the name. For example: CustomTransition.trans.vzs This naming scheme is mandatory for Ventuz to recognize the Scene as a Transition.
    • The default Scene Transition (File --> New from preset --> Scene Transition) is pre configured with these settings.

In General, every animation between these two Ports is possible. For a detailed description see the: How To Build a Scene Transition.

The Animation section of a the Transition Scene behaves the same way as a standard Template does. Data channels added to the Animation Data are accessible when the Transition is cued and useful for creating custom Transitions. The default duration is determined by the duration between the Begin and Present state and is changeable when cued.

Cue and Take Process

This graphics shows the process of a cue and take with a Transition in the Scene Tree window, with an break-down below:

  • 01: Standard Cue of Template 1.
  • 02: Take Template 1 and Cue Template 2 (so far, this is the normal process).
  • 03: Now the Blend Over Transition is added to the cued Template 2. The blend.trans Scene is placed in the Program Pipe and holds the on-air Template 1 and the cued Template 2. Since the Transition blends between both Templates, it must hold the on-air Template as well as the new one. Please keep in mind, that this process is happening when the Transition is cued. So two performance heavy Scenes can have impact on the rendered Program Pipe's output.
  • Take!
  • 04: After the Take is done and the Transition's animation done, the blend.trans Transition Scene is released and only Template 2 is on air.

Control and Information

With the Transition Info Node the status and state of the Transition Scene is available. This node is useful when building custom logic to trigger events that depend on the progress of the Transition.

The Audio Incoming and Outgoing channel within the Transition Scene can control the Audio output channel in the Template Scene, where it can control the audio level of a bound movie clip node.

Timing

The timing of Templates together with the Transition is shown below:

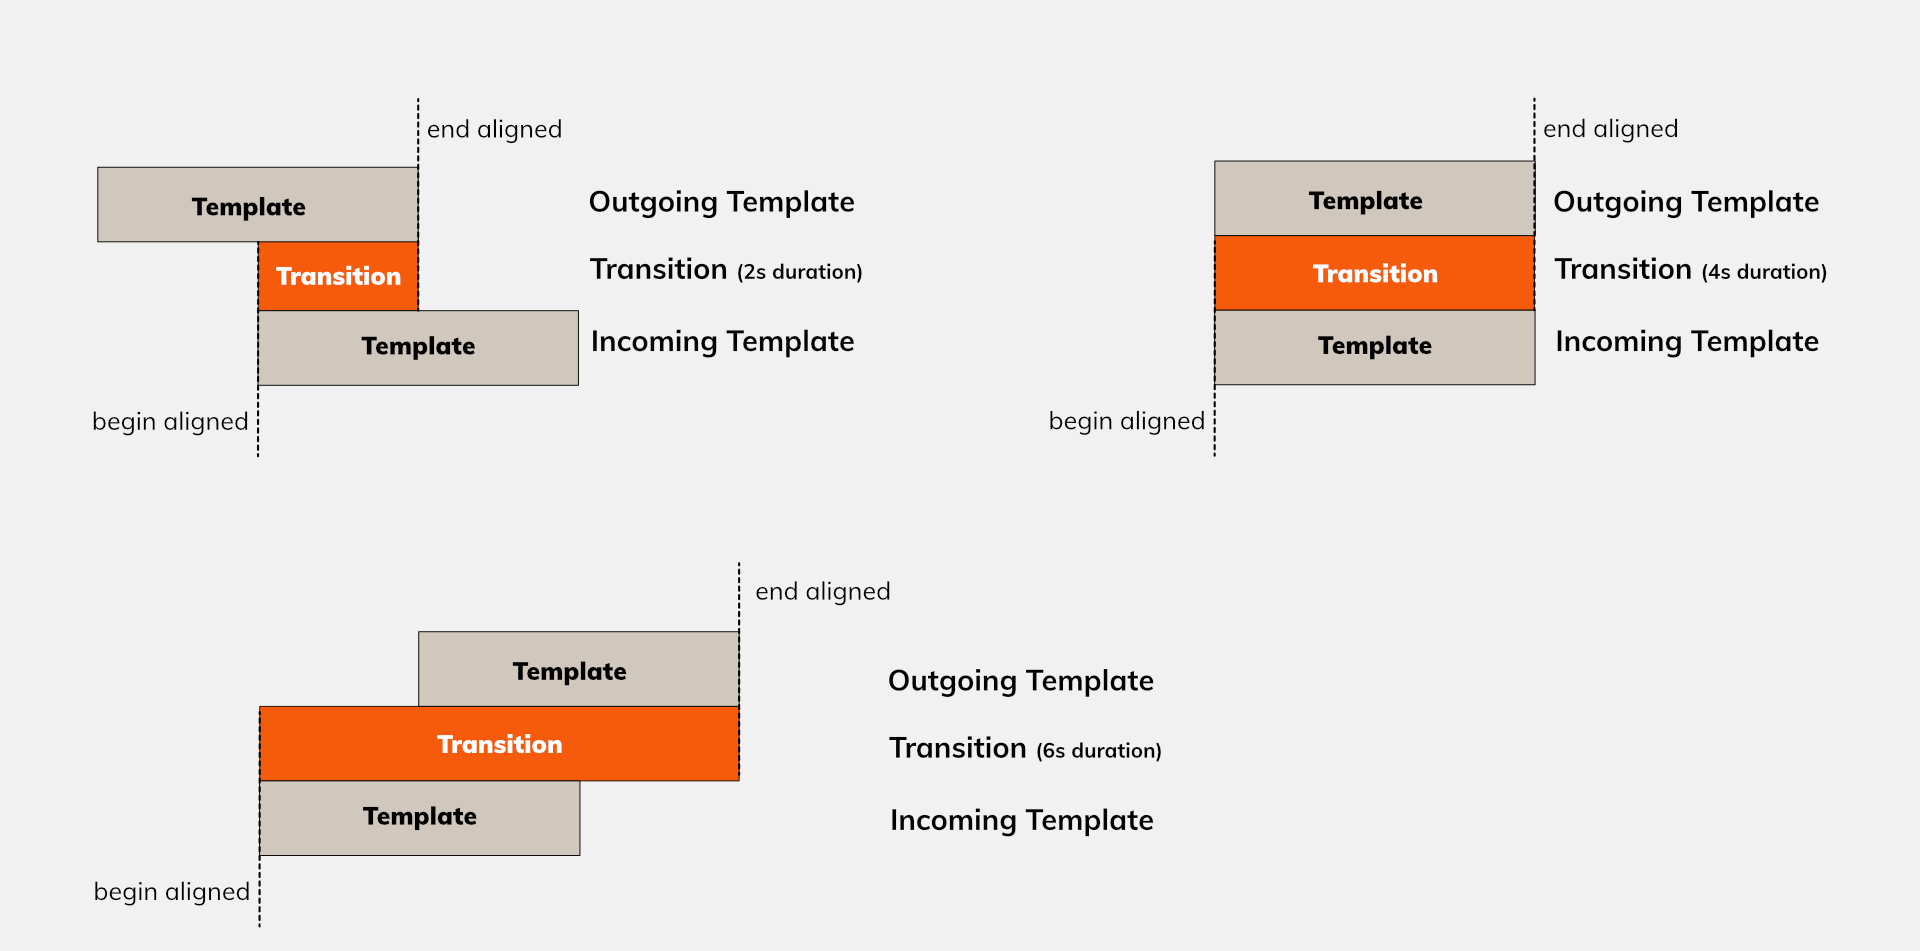
Depending on the length of the Template animation, the Transition will align relatively different.

Director

The Director has built-in Transitions in a separate Transition window. To use custom Transitions, they must be part of the Published Scenesin the same way Templates are. If there is a new .trans Scene in the directory, Director will ask to add it. To add it manually, you can find it in top menu bar: Show -> Project -> Published Scenes.

All Transitions are selectable in the Transitions window and added by dragging onto the cued Template's animation tab. The duration and all Transition Data can be changed for all Transitions and if used.

Limitations

  • In general, it is important to check the performance of your templates when using heavy Templates before a production. Ventuz validates and renders both Scenes for blending. If the Transition scene contains complex animations, keep them in mind as well, performance-wise.
  • Transitions are placed between the (default) Layout Scene and the Template Scene. Therefore bindings between these need a custom Transition scene, which includes the binding. It is also possible to use a Data Portal to send the data from the Layout Scene to all other Scenes.
  • Be aware, the Transition Scene affects the Program Pipe when cued. It is possible to have a poorly designed Transition Scene, (e.g. the Program Port is not visible on Begin State) that can affect your Program Pipe's rendering when it is cued. Before a production, it is advised to deactivate them in the Published Scenes configuration.

See also:
  • How To Build a Scene Transition
  • Transition Info Node
  • How To Build a Template
  • Main Animation
  • Scene Port
  • Data Portals
  • Transitions in Director

« Previous: Template Engine
» Index «
Next: Unreal Integration »
Copyright 2025 Ventuz Technology