Introduction to Animation Workflows
Table of Contents
This page will guide you through the different types of animation in Ventuz and will give you an overview of when to use which workflow. Take your time for each section to fully understand it, its usage and its purposes, before going on to the next section. There are a lot of other resources on these topics as well - they are linked in the respective sections - so make sure to check them out as well if you need more details on a topic or feature. And lastly try out everything for yourself! Reading about stuff is good, but playing around with stuff is a lot better and will help you a lot with learning.
Introduction
There are a lot of different ways for you to animate properties of your nodes. They have different levels of effort and can be used to achieve different levels of complexity in controls. Most of the ways work via Bindings from any kind of Animation Node to the target property. So all of these methods take place in the Content Editor only - even if the Animation Nodes are finally bound to Hierarchy Nodes.
- Floating Point Animations are very fast to use as they are embedded in a property's representation in the Properties Editor. They are the least flexible kind of animation and might be hard to maintain when used excessively.
- Movers have more flexible use cases and - as a separate node - are visualized in the Content Editor.
- Math Effects can be used for generic animations. Either they animate from one set value to another based on the state of the scene, or you can use them to smoothly change a value by interpolating from its old to its new state.
- Lastly Keyframe Animations open the full potential of Ventuz Animation Workflow and thus have several use cases which we will cover in this document.
- We will also take a quick look at how to produce vertex animations using Baked Mesh Animations and Skinned Animations.
After discussing all kinds of animations we will also have a look at how to maintain the animations in your scene properly, explaining all visualization features in Ventuz as well as showing best practices when incorporating animations in your scenes.
Floating Point Animations
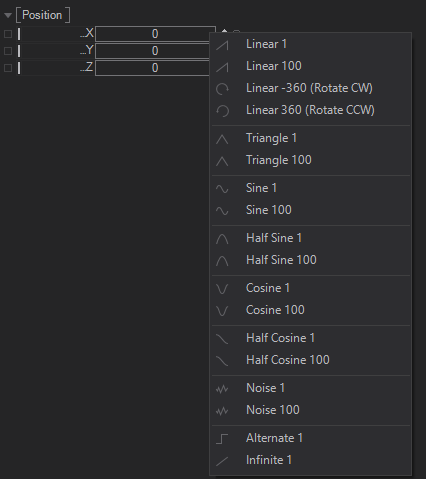
Floating Point Animations are created and adjusted in the Properties Editor. This kind of animation is used for generic, constantly looping animations and especially useful in the Material System and Particle System where you often want to have simple, animated inputs. There are different types of animations and you can choose from several presets with pre-adjusted parameters to speed up processes. Animating rotations is best done with the Linear -360 and Linear 360 presets, that generate values from 0 to 360 and then start over which is perfect for seamless full rotations. The other presets can be used more generically - for positions, scalings, brightness and anything you can imagine.
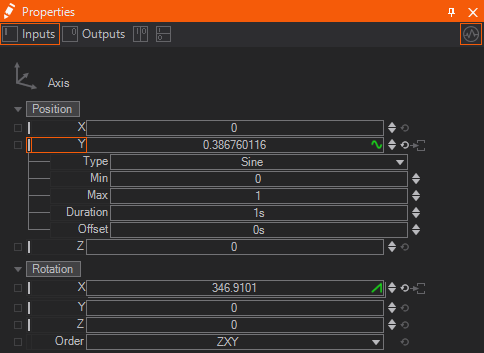
When hovering over a floating point property you will see a small icon at the right side of the box (visible in the X-Position property in the image below):
When clicking that icon you will see a list of available curve presets. A detailed description of them is located in the Mover Nodes reference page, since they have the same types of curves.
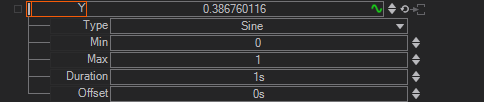
Once selected you can adjust the parameters as well as the curve type by right-clicking the property.
More detailed information on the Floating Point Animations can be found on their documentation page.
Movers
Generic looping and non-looping animations are best done using the Mover Node. It is adjusted and integrated in your logic very quickly, easily maintainable and has some flexibility to it that enables usage in quite some cases. In contrast to the Floating Point Animations its inputs can be bound to the scene logic as well. Thus it offers - besides others - a One Shot mode that can react to events in your scene.
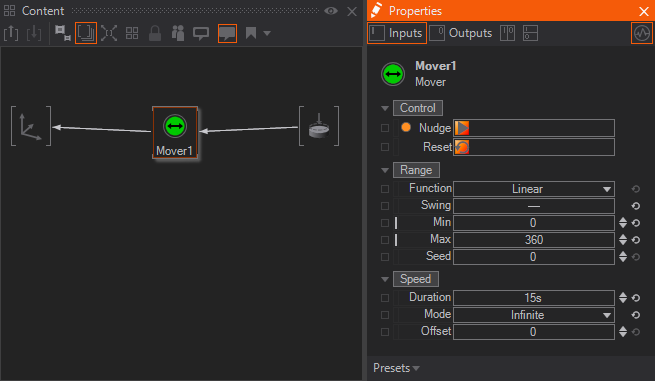
To use the Mover you can drag and drop it from the Toolbox from the Animation category to the Content Editor. Now adjust the animation Function, whether it should Swing forth and back, its Maximum and Minimum values, Duration and an Offset to change the nature of your generic animation. You can then drag and drop the target property onto the Mover Node in the Content Editor.
In order to create an animation that starts only when a specific event occurs you will need to bind the Nudge method to it and set the Mode to either OneShot or Infinite. In Infinite mode the animation will loop until the Reset method is fired.
For a more detailed description of the Mover Node have a look at its reference page.
Math Effects
Math Effects Nodes are a group of nodes that all work in similar ways. They all interpolate from the current value to a given target value. The interpolation can be triggered through two ways:
- Change the target value. This technique can be used to smooth any abrupt or jittering value changes (e.g. direct input from a sensor of some sort).
- Change the UseTarget2 flag. This is best used for simple animations between two states of an object - e.g. to animate a touch button when it is pressed (see image below).
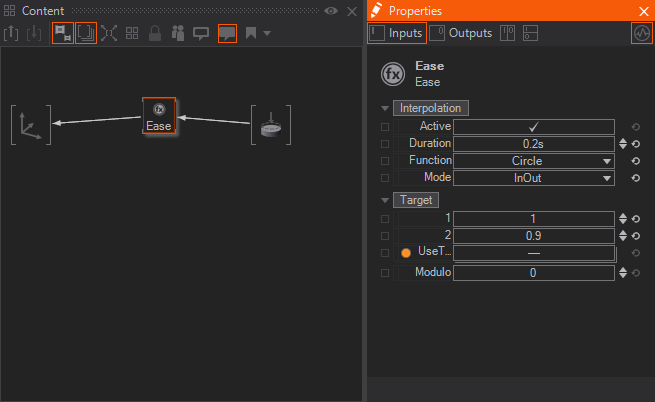
Similar to the Mover Node you can drag and drop one of the Math Effects Nodes from the Logic category of the Toolbox to your Content Editor. The Math Effects nodes are a stack of nodes, so either drag the stack itself and then select the node you want to place or click on the stack and drag and drop the wanted node - both ways are valid and there is no difference in doing one or the other.
The most important Math Effects nodes are:
- Ease Node: Provides a set of easing functions - going from linear over quadratic to bounce.It can be used in most of the above cases and creates similar effects to those of some other Math Effects.
- Ease Morph Node: Does not interpolate on a time base like the other Math Effects but instead uses a Morph value to determine the current output. This can be used e.g. to animate between two states based on the output of an interactive Slider.
- Decay: Does not interpolate with a set duration but rather with a rate (change per second), using the Attack input for an increasing change and a Decay for a decrease.
- Oscillator: Has a more natural approach to the oscillation around the target value than the Bounce function of the Ease Node. Due to its indeterministic nature it has some downsides like the lack of Multi-Machine Reliability.
For a more detailed description of all Math Effects go to their reference page.
Keyframe Animations
Keyframe Animations are the most flexible of Ventuz animations. On the downside it requires higher effort to integrate into your scene. They offer a Keyframe Animation Editor for controlling the animation curves of several properties at once and a State Engine to create non-linear transitions between multiple states of your scene or object. It is best used for animating the scene's overall business logic and whenever the generic functions of the other methods do not fit the need of an animation.
The Keyframe Animation Node is located in the Animation category of the Toolbox and can be dragged into the Content Editor. Depending on your use case it integrates into your scene in different ways:
- Simple and Timeline Control are best used whenever you want to animate several properties of different nodes in the same context.
- State Engine is best used for the scene's overall logic - the state engine reacts to events and triggers corresponding transitions to other states. This opens the world to interactive animations or even a Template Based Workflow.
- Nested Animations are an addition to the State Engine and enable you to modularize and reuse small portions of your animations throughout the scene. Whenever you use the State Engine you should consider using Nested Animations as well.
Keyframe Animation Editor
The Keyframe Animation Editor can be accessed by switching to the Animation Window Layout. Your scene can hold multiple keyframe animations, represented by Nodes in Content Editor. The Keyframe Animation Editor always shows the currently selected Keyframe Animation Node. If no Keyframe Animation Node is selected it shows the Main Animation instead. You can switch the shown animation using the dropdown in the top left corner of the editor.
The Keyframe Animation Editor consists of several views - to switch views use the four buttons in the top-middle of the animation editor:
- The Time View displays the keyframes of all channels without visualizing their values. This is best used to adjust timings of your animation and work with Nested Animations
- The Diagram View displays all selected channels' keyframe times and values as well as their interpolations. This can be used to adjust the curves of single channels.
- The Logic View shows the States of the keyframe animation. This is used to create the logic and transitions between the states of your scene.
- The Data View shows the Data Model of the animation. This is used in conjunction with Templates - so this view can be neglected for this introduction.
To animate a property of any node with a Keyframe Animation Node you can bind it to the Animation Node in the Content Editor or drop it in the List of Channels on the left of the Animation Editor. To add a keyframe to a channel you need to select it, click at the desired time in the Time View or Diagram View and either hit INS or click the  icon in the top bar of the Animation Editor. Depending on the desired way to control the animation you will use one method or the other listed below to integrate the created animation into your scene. To review your animation in the Animation Editor you can either scrub by dragging around the Time View or by hitting SPACE in the Time View to play the animation from the currently selected point in time.
In order to learn how to work with these views in more detail visit the respective sections on the Animation Editor Reference Page.
Main Animations vs Keyframe Animation Nodes
Each scene in Ventuz has a Main Animation. It is present on all Levels of the Scene. So you can directly bind properties from your Layer Level (topmost level of the scene) and from within each Layer and Container without having to Expose Properties. This best used to very quickly build an animation in your scene that should be either controlled from outside (using the Template Engine or should automatically playback from start to end of a Slice when the Scene is loaded.
As the Main Animation does not have a representation in the Content Editor it is not possible to bind its Control Property to Animation Control Nodes in the scene or other Keyframe Animation Nodes to create Nested Animations. If you need to use these concepts you should use a Keyframe Animation Node instead of a Main Animation.
Simple Control and Timeline Control
The Animation Control Nodes can be used to animate over any Slice in the Keyframe Animation. While Simple Control accepts a percentage as an Input (100% being the last keyframe on that slice), the Timeline Control accepts the absolute time.
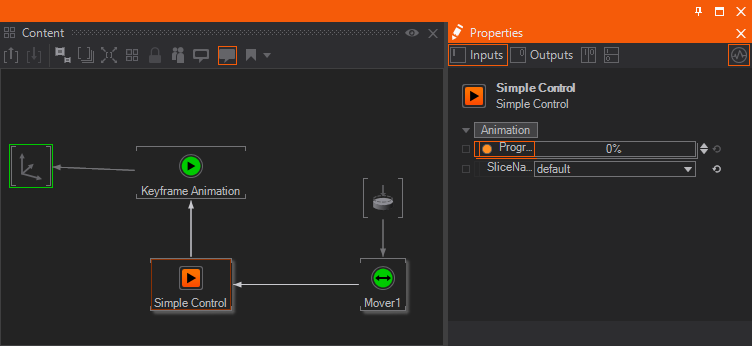
To use an Animation Control you need to bind the Control Property to the Controller output of the Animation Control Node. Select the desired Slice and animate the Progress property in any way of your choice. In the example above the Touch Button produces a Single Tap Event, that Nudges the Mover, which then changes the Progress proeprty of the Simple Control linearly to animate through the time line of the Keyframe Animation.
State Engine
The State Engine can be used to deeply integrate your animation into the scenes business logic in an easy way. To achieve this you use three elements of the State Engine:
States correspond to specific states of the scene. Each state defines a set of Keyframes for every channel - meaning that whenever the animation reaches that state it will look the same. In the Logic View they are represented by circles. To create a State you can double-click anywhere in the Logic View. You can also add States in the Time View with the
Transitions define what an animation from one State to another looks like. They are defined on the Keyframe Animation's Slices - each State has any number of representations on the Slices. The Animation between two such representations define a transition. They are represented by lines in the Logic View. To create a Transition you can drag from one State to another.
Methods define when a Transition triggers. They can be fired from Events inside your scene. Depending on the current State and its Transitions the State Engine finds the proper animation and plays it. They are displayed as small circles and other icons at the ends of a Transition. You can create a new Method with the  Custom Model Icon below the list of Methods on the right. Then you can assign it to one or several transitions by dragging and dropping their name onto a Transition's end. Methods can also be placed on top of a State instead - when it is triggered at any point in time, the State Engine will immediately jump to that State without animating anything.
Note that Methods will only be visible once you have added at least one State to the animation.

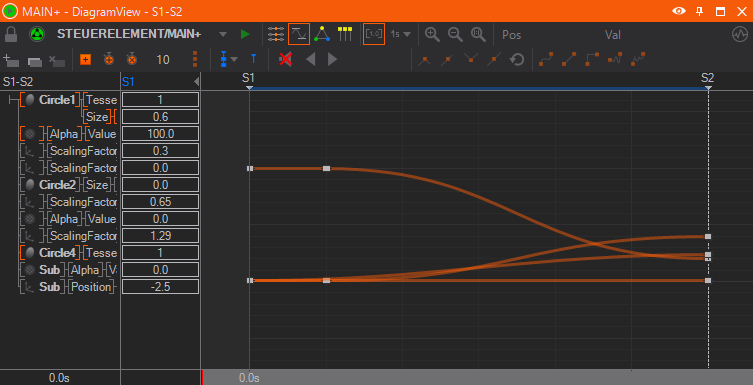
Here is a rather complex example of a State Engine:
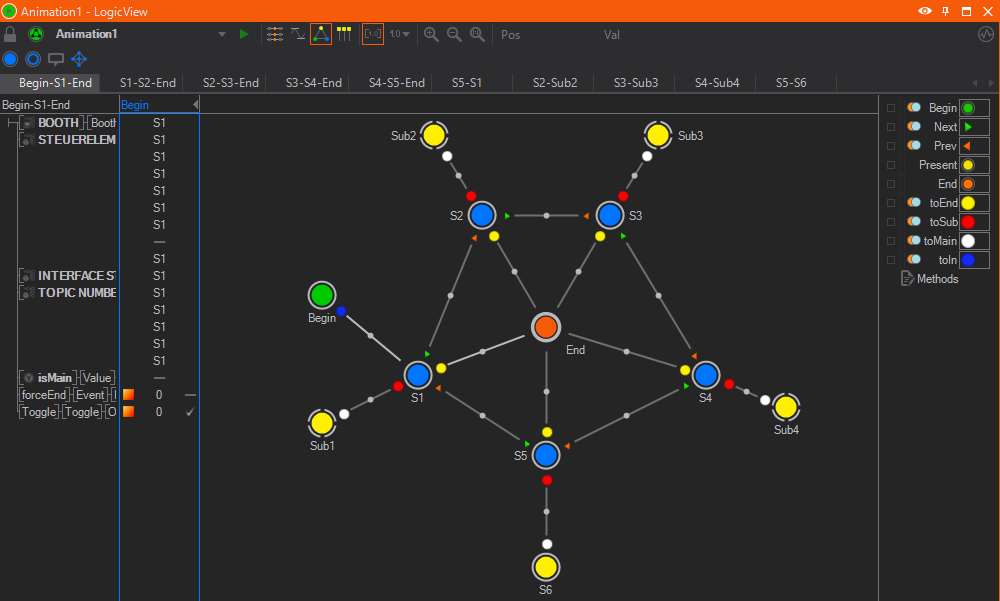
In the example above you could for instance assume that the animation is currently in State S1. The user interacts with a Touch Button on the presentation and as a result the Method ToSub is triggered. The State Engine searches for ToSub on each Transition that is connected to S1 and finds the one to the State Sub1. Now it looks up that Transition in the animation's time line. Double-clicking a Transition in the Logic View will open the representation in either the Time View or Diagram View - whatever was open last:
![]()
Before going on to the next section you should strengthen your knowledge and get some practice with the State Engine - as it is a very complex concept and in parts it is a lot different from those of other software. Try building your own small State Engine, e.g. for a small turntable showing a product from three different perspectives and the user can go from one perspective to another using simple Keyboard Input.
Nested Animations
When building a more complex Keyframe Animation you will notice two things:
- The animation becomes highly chaotic and it is hard to maintain an overview.
- Some parts of the animation are the same but for different objects. Changes to these parts need to be repeated for each affected object which takes a lot of time.
Nested Animations are a solution to both of these problems. They are an extension of the State Engine that enables you to use multiple Keyframe Animation Nodes for your animation. The basic idea is that one Keyframe Animation can control another one. This way you can nest your animations in a Parent Animation and even nest that one in another Keyframe Animation. When the Parent Animation is played it will play any Transitions of the Nested Animations with it - the parent animation is agnostic of the exact behavior of the nested animation. It just tells it which transition to play (or which state to stay on). So you can easily control the timing and speed of the nested animation without having to care about the exact curves or values of each animation channel.
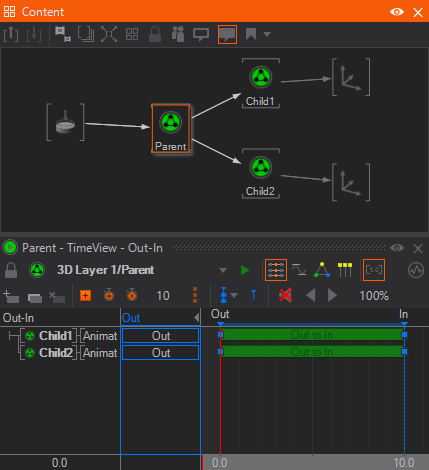
To start you will build your Child Animation first using a State Engine. You do not need to worry about Methods though and only need to create the corresponding States and Transitions and animate them as desired. Then create a second Parent Animation - best is if this Keyframe Animation does nothing else than controlling other Animations rather than animating properties of nodes directly. Now to nest the Child Animation into the Parent Animation you can drag and drop the Control Property of the Child Animation onto the representation of the Parent Animation in the Content Editor. You will see a new Channel in the Time View of the Animation Editor. You can add Keyframes to that channel like to any other channel as well. You can define how the Child Animation should behave between two keyframes easily. First right-click the left keyframe. In the upcoming drop down menu you can choose what the Child Animation will do up until the next keyframe. You can either choose a Transition or a State. When choosing a Transition the timing of the Child Animation is ignored completely and instead the transition will take as long as it takes the Parent Animation to play from the current to the next keyframe.
Make sure to use this technique together with Containers and Interfaces in order to use its full potential! Learning these two techniques of building scenes in Ventuz will highly improve their maintainability!
The trick of this technique lies in the usage in conjunction with Containers and Interfaced Containers:
You can create a separate Container for each animated object - now the containers will not expose each property that has to be animated. Instead you create a Keyframe Animation Node inside that container and only expose its Control Property. That can now be bound to the Parent Animation that lies outside of all respective Containers. If you use the same object multiple times (e.g. a single bar of a bar chart) you can even use Interfacing and thus replicate the animation of any bar easily to all other bars!
Make sure to practice Nested Animations a lot since they will deeply affect the structures of your scenes and presentations and make your life a lot easier when adding business logic to your animations.
Baked Mesh Animations
After visiting all possible kinds of property animations we will have a look at Vertex Animations or Mesh Animations. Ventuz is capable of two ways of importing Vertex Animations from a file.
You can bake your Mesh Animation into the exported 3D File. Ventuz will import the Animation together with all other information of the geometry. Using it is quite simple once you are proficient with the Mover Node. Import the geometry using a Geometry Import Node. This is a hierarchy node that can be found in the Geometry category of the Toolbox. Place it somewhere and select the desired file with its File Property ( click the ... three dots in the file property). This will create a hierarchy tree that corresponds to the imported geometry. At the end of each branch you will most likely see a Geometry Renderer Node that is in charge of bringing the geometry or a subset of it on screen.
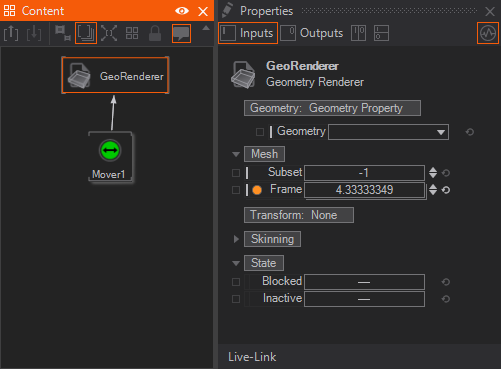
The Geometry Renderer has a Frame property that can be used to animate over each baked frame of the animation. Now it boils down to animating a property of a node again. So use a Mover like in the example above or a Floating Point Animation or Keyframe Animation, whatever fits your logic best.
The same applies for geometries that were imported using the Live Import.
Skinned Animations
Creating a Skinned Animation is similar to using a Mesh Animation and can be achieved by Ventuz by using a File Format that supports skinned animations - currently this is glTF only. Once you have imported such a file using the Geometry Import Node (see above section for a bit more details and the reference page for a lot more details on that) you can now use the Animation Rig Node to create the logic of the Skinned Animations. The Geometry Import Node will already have created an Animation Rig Node and a *.vzrig file from your imported geometry. If not you can place another Animation Rig Node from the Animation category in your Toolbox in your Content Editor.
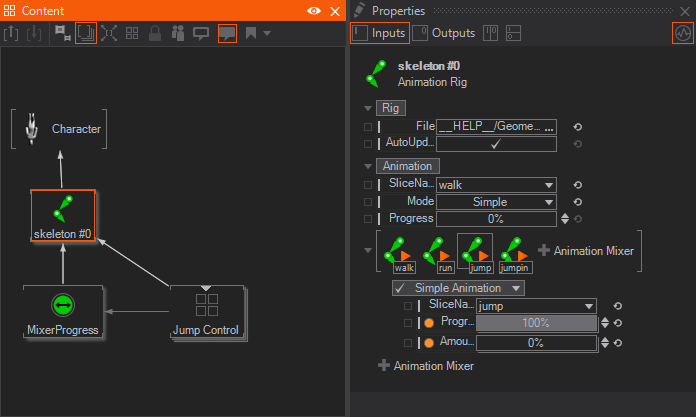
The rig of the imported geometry can contain several Slices and with the Animation Rig Node you can select which ones to play and even weigh them to crossfade between two or more slices. The Slice Name property changes which slice to play as a base. Now animate the Time or Progress properties (respectively for each of the two Modes) using one of the techniques described in this document. To blend into another animation you can add an Animation Mixer to the Property Group List. Again you can choose between Time mode and Simple mode and select the desired Slice to play. The Amount property changes the weight of the played slice. Lastly animate the Time or Progress property respectively.
For more information on the Animation Rig Node visit its Reference Page and have a look at its Help Scene inside the Ventuz Designer (press F1 while hovering any Animation Rig Node).
Maintaining Animations
This section is a collection of thoughts on how to keep your scene maintainable even with heavy animation logic. Some of these tips do not only apply to animations but to your scenes in general.
Besides using Nested Animations and Containers and Interfaces (as is usual) there are some ways to keep your animations maintainable.
To gain an overview of your scene and which Nodes are animated you can look for the  Decoration in the top-right corner of any Hierarchy Node. When you have selected a Channel in a Keyframe Animation you can see a green frame around the nodes that are bound to that animation channel.
Keep in mind to also use Annotations in your State Engine. They are not only usable in the Animation Editor but also in the Hierarchy Editor and Content Editor which may help labelling your Keyframe Animation Nodes as well.
Lastly a note about Axes: Use distinct Axes for different purposes even for the same object or set of objects. A good practice is to use one Axis for manual positioning of an object in your scene, another one for any data logic and a last one for your animations. This way it is easy to adjust any portion of the transformation of your objects without affecting the other ones in unwanted ways.
Conclusion
This concludes the introduction to Animation Workflows! Although it is a mighty documentation it barely scratched the surface of each discussed feature! So once you have got a feeling for each described feature make sure to check out their reference pages as well! Also have a look at the Help Scenes of the discussed nodes inside the designer. As mentioned, practicing is also a good way to consolidate your knowledge about all these methods. Design a presentation that has a greater business logic behind its animations to really get a feel for how these features all play together with each other and even with others that were not discussed on this page. The more often you take on complex problems the easier it gets to solve them and lastly it is all routine.