#= In-Scene Editing (2D)
Table of Contents
Overview
In Scene Editing is a feature to manipulate and layout Layers. You can use the In Scene Editing (short ISE) to layout the layers on the composition. You will have handles to control the individual layer layouts, and together with "Guides" your laying out your scene has never been easier.
Guides can be created for individual compositions. While you can also copy and paste whole Guide Sets, Groups and individual Guide Lines
Editing
To enter, or turn on ISE, click inside of the render window and either press SHIFT + Tab or click the 2D - In Scene Edit Mode button in the tool bar.
| Toolbar Button |
|---|

|
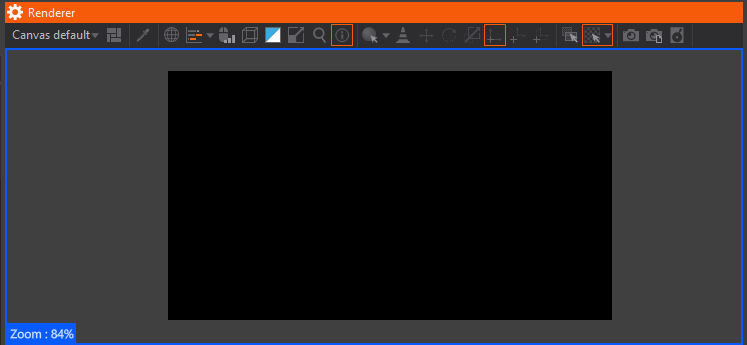
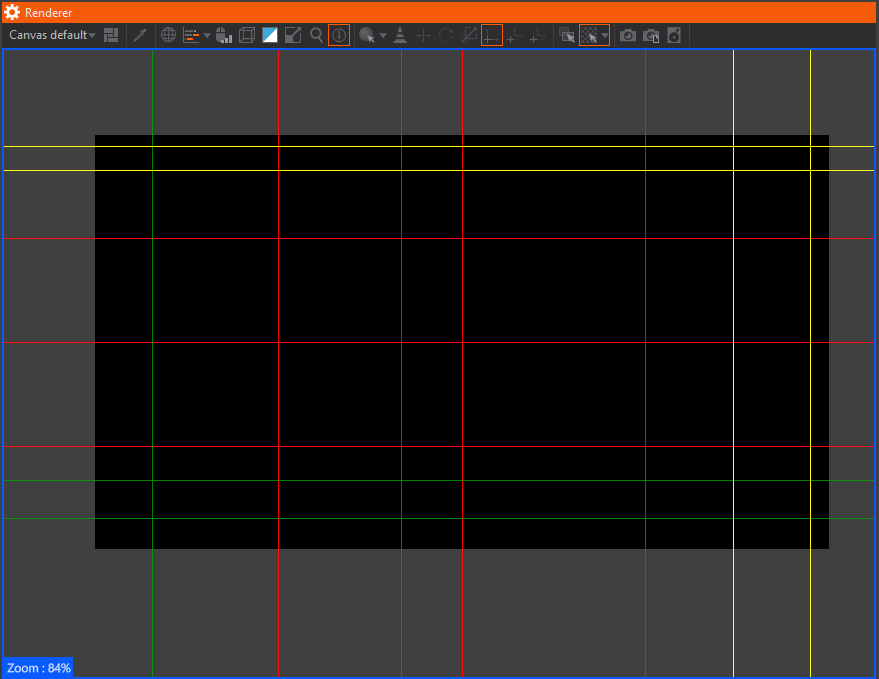
When Ventuz is in ISE Mode, blue border will appear around the Renderer View. By default, the Zoom will be set to 84% - as shown below:
In the Renderer Tab, when hovering over a Layer or a Guide in Edit Mode, the tooltip will show the Layer Name.
When clicking & dragging on a Layer or Guide:
- Coordinates W/H in percentage or pixels.
- Size W/H in percentage or pixels.
- Guide Line position in percentage or pixels.
- TRS information for render objects like Mesh, Text etc (applies to the "Edit Mode").
The values will be in percentage or pixels depending on the selected layout mode for each layer.
You can switch the tooltip on and off by click the tooltip button:
| Toolbar Button |
|---|

|
Layer Selection
There are several ways to select a layer while your in In Scene Editing mode:
Auto Selection
Enable the 'Layer Auto Select' by clicking the button:
| Toolbar Button |
|---|

|
- Hovering over a layer, the layer will be highlighted with orange dotted line.
- Click to select the highlighted layer.
- To select a layer that is behind or obscured by a different layer, hover over the boundary of the layer you want to select, while holding ALT, click .
- If there are multiple layers behind each other, this method will cycle through each layer the cursor is over each click .
Without "Layer Auto Select" you can translate a layer from anywhere inside the Render Window. With "Layer Auto Select" you need to be inside the active layer to translate.
Layer Scale and Translate
While ISE Mode is active, the selected layer will be indicated with an orange dotted frame. Handles will be available to modify its Scale and or Position. Click & drag any of the handles to modify the scale of the selected layer. Per default, the scaling will happen in percentage. To change this, need to select a different Layout in the Layout Properties.
![]()
Click & drag the center handle to translate the layer, either in percentage or pixels - based on your layout selection.
![]()
As you can see by the images above, while translating and even scaling you will see white snap-lines. If you translate the layer horizontally or vertically, you can have the translation snapped to the automatically created snap-lines, or custom guideline(s).
Snapping and Guides
A very powerful feature of the 2D layer editing is the snapping in conjunction with the guides.
Snap
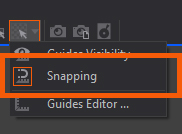
Snapping can be toggled by using the drop down menu for the In Scene Editing button, and select the appropriate Snap button (which is enabled by default):
| Toolbar Button |
|---|
|
A snap will happen for simple translate or scale for the selected layer. There default snapping lines:

This means, that each of the "red lines" will snap to another layers "red lines": left, right, top, bottom and center lines.
Snapping will ignore the contents of a Layer and use the center and sides as the snap regions.
Note: The "red lines" are just for visual representation of the snapping here, they are not visible in the Renderer Window.
Guides will work in screen preview as well. You can still 2D edit while in the screen preview, but rotations (for layers, compositons and guides) will also taken into account!
Guides Editor and Lines
Not only you can snap the layers to other layers, it is also possible to make use of Guide Lines.
You can create and edit the Guides by using the Guides Editor.
Guides are a project-level feature and can be used in any scene inside of your project.
Guide Lines are based on Compositions. Different Guide Line Sets or Guide Line Groups must exist for each Composition.
Guides Editor
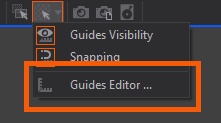
To show the Guides Editor use the View -> Guides from the top bar or use the drop down menu in the toolbar for "2D - In Scene Edit Mode" click Guides Editor button:
| Toolbar Button |
|---|
|
In a new project, Guides Editor will be empty:
![]()
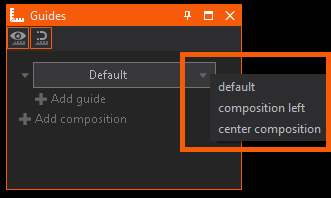
To create Guide Lines, click the + Add composition get started. Per default the Default composition will be used. If multiple compositions exist and you want to assign a different composition, click open the drop down menu and select the desired composition:
Create a new Guide Line by click + Add Guide. A new Group and a new Guide Line will be created.
Ensure to have the Guide Lines set to Visible by clicking the Eye button in the Guides Editor Window. Active will be indicated by an orange frame around the button - as shown below!
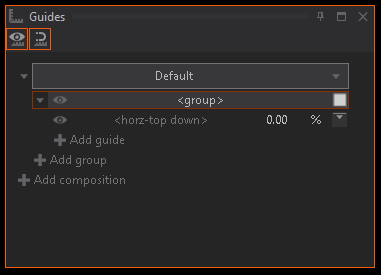
The above screenshot shows:
Default is used as used composition, for <group>, with one <horiz-top down> guide line at 0.00 % with top alignment.
You can collapse individual Compositions, and Groups to keep the editor organized!
Visibility can be switched on and off for individual groups and lines! (Eye Icon)
Groups
Each group can have its own color. It is possible to have several groups within one composition. To rename a group double click the <group> name and assign a different name. To assign a different color to the group, click the color-box to bring up a color palette. The 'Guide Lines within this group will be colored with the selected color.
Guide Lines Position and Alignment
Change the Position of the Guide Line by changing the value next to the Guide Line name. click the % to switch between % percentage and px pixel. This Value is relative to the composition.
To change the alignment for the Guide Line between left, middle, right or top, center, bottom click the alignment icon  .
.
You can switch between horizontal and vertical alignment, just click the alignment icon.
Find below the different icons for the alignment:
| Vertical | |
|---|---|
| | Top aligned - guide position will be aligned from the top of composition |
 | Center aligned - guide position will be aligned from the center of composition - positive direction down |
 | Bottom aligned - guide position will be aligned from the bottom of composition positive direction up |
| Horizontal | |
|---|---|
 | Left aligned - guide position will be aligned from the top of composition |
 | Middle aligned - guide position will be aligned from middle of composition - positive direction right |
 | Right aligned - guide position will be aligned from the right of composition - positive direction left |
While Center/Middle alignment value changes will move the Guide Line Down(Center) or Left(Middle) for positive values - Bottom/Right alignment will move the Guides Up(Bottom) Left(Right)- according to the brighter triangle direction indicated in the icons above!
Snapping to Guide Lines will happen only when guides are visible! - Snapping to 2D Layers will be still active since this can be turned on and off with the snapping button in the Toolbar!
Interactive Guide Lines
You can translate the Guide Lines not only by changing the values. While you are in In-Scene Edit Mode you can drag&drop the Guide Line at the outer areas of the render view (Gray Area). You will see the mouse cursor transform to an arrow when hover over with the mouse:

Copy and Paste Sets/Groups/Lines
You can copy and paste whole composition Guide Lines, Guide Line groups, and individual Guide Lines.
Select the element inside the Guides Editor window you want to copy (composition, group, or single guide line) by click on that particular element and press Ctrl + C (copy) and use Ctrl + V to paste it back into the Guides Editor window.
If you select a different composition in the window, it will paste its content into that. The same is true for Guide Lines.
Take note that you can paste the buffer into an notepad++ or similar editor!
It is also possible to have multiple guides sets using the same composition. If for any reason you copy a guide set that contains a composition that doesn't exist or has a different name, it will be indicated with red text as seen below:
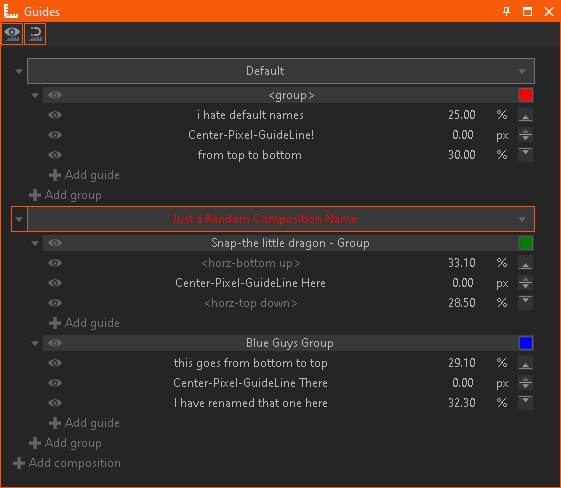
To fix this, assign a composition using the drop down, or change the name to an existing composition.
Guide Line Sets
Guides file / Location and Structure
The Guide Lines themselves are saved as a .json file within the project structure and can be found in the Design folder:
e.g.:%public%\documents\ventuz8\Content\Projects\YOUR_PROJECT\Design\guides.json
Ventuz will check only for the guides.json, so can simply create a copy of that file, rename it, and have therefore different sets available.
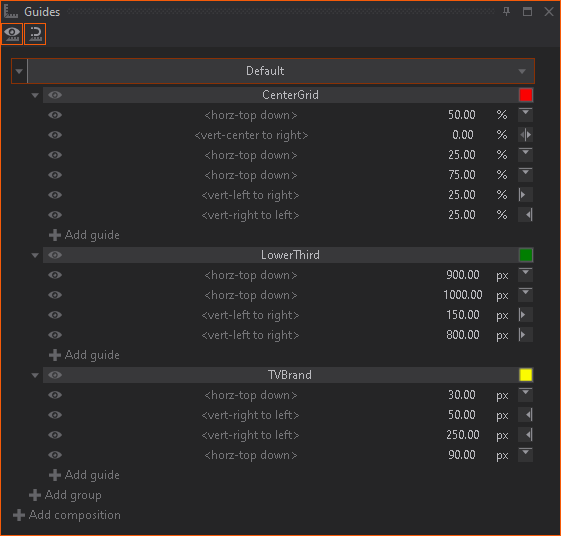
Example file structure
As you can see by the file name extension, it is based on json formatting.
Find below the json for this example:
{
  "Transient": true,
  "Guides": [
    {
      "Transient": false,
      "Groups": [
        {
          "Transient": false,
          "Invisible": false,
          "Name": "CenterGrid",
          "Color": "Color01",
          "Lines": [
            {
              "Name": null,
              "Position": 50,
              "Invisible": false,
              "Relation": "Near",
              "RelationMode": "Percentage",
              "Orientation": "Vertical"
            },
            {
              "Name": null,
              "Position": 0,
              "Invisible": false,
              "Relation": "Center",
              "RelationMode": "Percentage",
              "Orientation": "Horizontal"
            },
            {
              "Name": null,
              "Position": 25,
              "Invisible": false,
              "Relation": "Near",
              "RelationMode": "Percentage",
              "Orientation": "Vertical"
            },
            {
              "Name": "",
              "Position": 75,
              "Invisible": false,
              "Relation": "Near",
              "RelationMode": "Percentage",
              "Orientation": "Vertical"
            },
            {
              "Name": null,
              "Position": 25,
              "Invisible": false,
              "Relation": "Near",
              "RelationMode": "Percentage",
              "Orientation": "Horizontal"
            },
            {
              "Name": null,
              "Position": 25,
              "Invisible": false,
              "Relation": "Far",
              "RelationMode": "Percentage",
              "Orientation": "Horizontal"
            }
          ]
        },
        {
          "Transient": false,
          "Invisible": false,
          "Name": "LowerThird",
          "Color": "Color02",
          "Lines": [
            {
              "Name": null,
              "Position": 900,
              "Invisible": false,
              "Relation": "Near",
              "RelationMode": "Pixels",
              "Orientation": "Vertical"
            },
            {
              "Name": null,
              "Position": 1000,
              "Invisible": false,
              "Relation": "Near",
              "RelationMode": "Pixels",
              "Orientation": "Vertical"
            },
            {
              "Name": null,
              "Position": 150,
              "Invisible": false,
              "Relation": "Near",
              "RelationMode": "Pixels",
              "Orientation": "Horizontal"
            },
            {
              "Name": null,
              "Position": 800,
              "Invisible": false,
              "Relation": "Near",
              "RelationMode": "Pixels",
              "Orientation": "Horizontal"
            }
          ]
        },
        {
          "Transient": false,
          "Invisible": false,
          "Name": "TVBrand",
          "Color": "Color06",
          "Lines": [
            {
              "Name": "",
              "Position": 30,
              "Invisible": false,
              "Relation": "Near",
              "RelationMode": "Pixels",
              "Orientation": "Vertical"
            },
            {
              "Name": "",
              "Position": 50,
              "Invisible": false,
              "Relation": "Far",
              "RelationMode": "Pixels",
              "Orientation": "Horizontal"
            },
            {
              "Name": "",
              "Position": 250,
              "Invisible": false,
              "Relation": "Far",
              "RelationMode": "Pixels",
              "Orientation": "Horizontal"
            },
            {
              "Name": "",
              "Position": 90,
              "Invisible": false,
              "Relation": "Near",
              "RelationMode": "Pixels",
              "Orientation": "Vertical"
            }
          ]
        }
      ],
      "IgnoreGlobal": false,
      "CompositionName": null
    }
  ]
}