Navigation

Ventuz Introduction

  • Introduction
  • Getting Started
  • Ventuz Editions
  • Ventuz Products
  • Realtime Rendering
  • Frequently Asked Questions
  • Common Mistakes
  • Deploying a Ventuz Presentation
  • Scene Performance and Tweaks

Quick Guides

  • Quick Guide Index
  • Business Logic
  • 3D Art
  • 2D Art
  • Programming
  • System Engineer

General

  • Index
  • What's New
  • Ventuz System Requirements
  • Configuration Editor
  • Device Configuration
  • Machine Configuration
  • Render Setup Editor
  • Introduction to Compositions, Screens and Outputs
  • Explanation of Compositions, Screens and Outputs
  • Live Runtime Control
  • Project and Show Management
  • Web Configuration Editor
  • Communication Protocol Overview
  • GPI Configuration for Runtime or Director
  • Introduction to the Ventuz Video Engine
  • Supported Formats
  • Supported Hardware
  • Color Management and HDR Workflow
  • Multisampling / Anti-Aliasing
  • Input Subsystem
  • Ventuz Proprietary Files
  • Migrating Configs & Content to Ventuz 8
  • Migrating Content to Ventuz 7
  • Migrating Content to Ventuz 6
  • Migrating Content to Ventuz 5
  • Summary Shortcuts
  • Terminology
  • Manual Index

Ventuz Designer

  • Designer Indices
Introduction
  • Designer Introduction Index
  • Designer Overview
  • Realtime Rendering
  • Project Browser
  • Designer Interface
  • Designer Options
  • Working with Nodes
  • Hierarchy and Content Editors
  • 2D Workflow
  • 3D Workflow
  • PBR Workflow
  • Animation Workflow
  • Best Practices
  • Reading Data in Ventuz
  • Display Images and Movies
  • Scene Performance and Tweaks
  • Deploying a Ventuz Presentation
  • Render to Disk
  • Multi Screen and Output Setup
  • Explanation of Compositions, Screens and Outputs
  • Workflow of using Multi Screens
  • Multi GPU
  • Previs
User Interface
  • Designer User Interface Index
  • Designer Interface
  • Renderer Window
  • Layer Editor
  • Property Editor
  • Property Groups
  • Hierarchy Editor
  • Content Editor
  • Find and Replace
  • Toolbox
  • Animation Editor
  • Shader Editor
  • Text Editor
  • Message View
  • Scene Tree
  • Stage Editor
  • Container Outline
  • Watches Editor
  • Scene Control Window
  • Performance Statistics
2D Workflow
  • 2D Workflow Index
  • 2D Workflow
  • Layer Editor
  • Common Layer Properties
  • IPP Effects
  • Color Correction FX
  • Distortion FX
  • Filter FX
  • Hierarchy and Content Editors
  • Display Images and Movies
3D Workflow
  • 3D Workflow Index
  • 3D Workflow
  • Hierarchy and Content Editors
  • Renderer Window
  • Camera Navigation
  • Manipulate Objects with Gizmos
  • In-Scene Editing
  • Layer Editor
  • Property Editor
  • Hierarchy Editor
  • Working with Nodes
  • Isolated Objects
  • Containers
  • Text Rendering
  • Character Sets
  • Geometry Import
  • Color Management and HDR Workflow
  • Display Images and Movies
  • Particle System
  • Creating Realistic Reflections
  • Unreal Integration
  • Notch Integration
  • E2E Node Overview
Logic Workflow
  • Logic Workflow Index
  • Hierarchy and Content Editors
  • Content Editor
  • Hierarchy Editor
  • Working with Nodes
  • Property Editor
  • Containers
  • Project and Scene Data
  • Reading Data in Ventuz
  • Display Images and Movies
  • Input Subsystem
  • Multitouch
  • TUIO Protocol
  • Open Sound Control
  • Unreal Integration
  • Notch Integration
  • E2E Node Overview
Animation Workflow
  • Animation Workflow Index
  • Animation Workflow
  • Animation Editor
  • Content Editor
  • Hierarchy Editor
  • Property Editor
  • Animation and State Engine
  • Templates
  • Template Engine
  • Scene Transitions
  • Unreal Integration
  • Notch Integration
Project Structure
  • Project Structure Index
  • Annotations
  • Project Documentation
  • Projects and Scenes
  • Project Properties
  • Project Maintenance
  • Project and Scene Data
  • Scene Management
  • Scene Statistics
  • Scene Tree
  • Performance Statistics
How Tos
  • Designer How to Index
  • How to Run Ventuz
  • How to Work with Designer
  • Ventuz Designer Drag&Drop Workflow
  • How to work with Shadows
  • How to Build Content for Multiple Screens
  • How to Use Emoijs
  • How to Build a Template
  • How To Build a Custom Scene Transition
  • How to Use the Color Difference Keyer
  • How To Enable HDR Video Output
  • How To Work with the HDR Layer
  • How Create Lens Flares and Bloom
  • How to Create Visuals Loader Node
  • How to Remote Control with a Phone
  • How to use Head Mounted Displays
  • How to work with 3D Reference Layers
  • How to create a Firework Particle System
  • How to use DDS with new Block Compression modes
  • How To use Stream Out
  • How to use the Substance Integration
  • How To Integrate Unreal
  • How To Integrate Notch
  • How To use the Vertex Integration
  • How To Control and Customize Ventuz
  • How to use the Companion with Director
  • How to build Previs scenes with Designer
  • How to migrate from Ventuz 6 to Ventuz 7
Reference
  • Available Nodes
  • Animation Nodes
  • Material&Color Nodes
  • Data Nodes
  • E2E Nodes
  • Geometry Nodes
  • Interaction Nodes
  • IO Nodes
  • Layers
  • Light Nodes
  • Logic Nodes
  • Previs Nodes
  • Render Option Nodes
  • Slides Nodes
  • Sound Nodes
  • Text Nodes
  • Texture Nodes
  • VR Nodes
  • World Nodes
  • Summary Shortcuts
  • Layer Editor Shortcuts
  • Hierarchy Editor Shortcuts
  • Content Editor Shortcuts
  • Animation Editor Shortcuts
  • Director Shortcuts

Ventuz Director

  • Index
  • What's New in Director
  • Introduction
  • Environment
  • Show
  • User Interface
  • Assets
  • Taking Action
  • Property Editor
  • Shot Box
  • Project Data
  • Pages
  • Playlist
  • Transitions
  • Timeline
  • Content References
  • Topology
  • Channels
  • Macros
  • Designing Templates
  • Scene Transitions
  • Plug-Ins
  • Shortcuts
  • Command Line Options
  • Application Settings
  • Glossary
  • GPI Configuration

Ventuz Runtime & Configuration

  • Runtime Index
  • Configuration Editor
  • Machine Configuration
  • Device Configuration
  • Project and Show Management
  • Live Runtime Control
  • Web Configuration Editor
  • Render Setup Editor
  • Warping and Soft-Edging Editor
  • Multi Screen and Output Setup
  • How to migrate from Ventuz 6 to Ventuz 7
  • Machine Clustering
  • Supported Hardware
  • Director Mode
  • How to Configure Audio
  • How to Use Live Options
  • How To Play Out On Multiple Screens
  • How To Render on a Machine Cluster
  • How to Use Head Mounted Displays
  • How to Setup Spout with Ventuz
  • How to Use Newtek NDI
  • How to Use a Mixed Frame Rate Cluster
  • How to Use Tracking

Multi Output & Display Setups

Introduction
  • Introduction to Compositions, Screens and Outputs
  • Explanation of Compositions, Screens and Outputs
  • Machine Clustering
  • Support for multiple GPU's
Editors
  • Configuration Editor
  • Device Configuration
  • Render Setup Editor
  • Warping and Soft-Edging Editor
  • Designer Stage Editor
Workflows
  • How to Build Content for Multiple Screens
  • How To Play Out On Multiple Outputs
  • How To Render on a Machine Cluster
  • How to build Previs scenes with Designer

How To

Designer
  • Designer How to Index
  • How to Run Ventuz
  • How to Work with Designer
  • Ventuz Designer Drag&Drop Workflow
  • How to work with Shadows
  • How to Build Content for Multiple Screens
  • How to Use Emoijs
  • How to Build a Template
  • How To Build a Custom Scene Transition
  • How to Use the Color Difference Keyer
  • How To Work with the HDR Layer
  • How To Enable HDR video output
  • How Create Lens Flares and Bloom
  • How to Create Visuals Loader Node
  • How to Remote Control with a Phone
  • How to use Head Mounted Displays
  • How to work with 3D Reference Layers
  • How to create a Firework Particle System
  • How to use DDS with new Block Compression modes
  • How to use the Substance Integration
  • How To Integrate Unreal
  • How To Integrate Notch
  • How To build and playback Ventuz Content in Vertex
Runtime & Configuration
  • Runtime How Tos Index
  • How to Configure Audio
  • How to Use Live Options
  • How To Play Out On Multiple Screens
  • How To Render on a Machine Cluster
  • How to use Head Mounted Displays
  • How to setup Spout with Ventuz
  • How to use Newtek NDI
  • How to use a Mixed Frame Rate Cluster
  • How to use Tracking
  • How To Integrate Unreal
  • How To Integrate Notch
  • How To build and playback Ventuz Content in Vertex
  • Multi Screen and Output Setup
  • How To Enable HDR video output
Director
  • How To Control Multiple Graphics Independently From Each Other
  • How to use the Companion with Director

Ventuz Node Reference

Available Nodes Overview
  • All Designer Nodes
ANIMATION
  • Mover
  • Alternator
  • Simple Control
  • Timeline Control
  • Anmation Rig
  • Keyframe Animation
  • Animation Group
COLOR/MATERIAL
  • Alpha
  • Fog
  • Ground Fog
  • Sky Box
  • Color to RGBA
  • HSLA to Color
  • RGBA to Color
  • Color Transformer
  • HLSL Shader
  • Color
  • Material
  • Color Picker
  • Substance Material
DATA
  • Database
  • Excel
  • JSON
  • RSS Feed
  • Resource Linker
  • Text File
  • XML
E2E
  • E2E Axis
  • E2E Data
  • E2E Control
  • E2E Layer
  • E2E Provider
  • E2E Node Overview
GEOMETRY
  • Rectangle
  • Rounded Rectangle
  • Gradient Rectangle
  • Overlay Rectangle
  • Cube
  • Circle
  • Sphere
  • Cylinder
  • Cone
  • Torus
  • Chart
  • Random Points
  • Mesh Loader
  • Geometry Import (Live)
  • Volume
  • Get Bounding Box
  • Arrow
  • Particle System
  • Path Renderer
  • Geometry Renderer
INTERACTION
  • Interaction Rect
  • Touch Button
  • Touch Excluder
  • Touch Marker
  • Touch Paint
  • Touch Pattern
  • Touch Proxy
  • Touch Ripples
  • Touch Transformations
  • Web Browser
  • Touch Teleport
  • Touch Simulator
INPUT/OUTPUT (I/O)
  • GPI
  • Joystick
  • Keyboard
  • MIDI
  • Mouse
  • Network
  • Open Sound Control
  • Serial
  • Timecode
  • DMX
  • HTTP
  • RamDiskWriter
LAYER
  • 3D Layers
  • 3D Layer Reference
  • Composition Layer
  • 2D Layers
  • PSD Import Layer
  • E2E Layer
  • Mixer Layer
  • Others
LIGHT
  • Light Sources
LOGIC
  • Array Processing
  • Convert To Text
  • Cluster Synchronization
  • Counter
  • Data Portals
  • Date Time
  • Directory
  • Dispatcher
  • Enumeration
  • Expressions
  • Invert
  • Log
  • Loop Breaker
  • Math Effects
  • Matrix Operations
  • Scene Event
  • Script
  • String Operations
  • System ID
  • Render Setup Relation
  • Text Splitter
  • Timer
  • Toggle
  • Transition Info
  • URL
  • Value Switch
  • Value Buffer
  • Variables
  • Visual Indexer
PREVISUALIZATION
  • Introduction to Previs
  • Previs Screen
  • Previs Canvas
  • Compositon List
  • Rendersetup Objects
  • Composition Projector
  • Previs Screen Render Options
RENDER OPTIONS
  • Alpha Blending
  • Color Write
  • Alpha Testing
  • Clip Plane
  • Filter
  • Mask
  • Mirror
  • Effect
  • Render Cube Map
  • Draw Modes
  • Stencil
  • ZTesting
SOUND
  • Audio Clip
  • Sound
  • Volume Control
  • Audio Analysis
SLIDES
  • Slide Manager
  • Slide
  • Slide Port
  • Pivot
TEXT
  • Text Effects
  • Text Layouts
  • Text Rendering
TEXTURE
  • Background
  • Hatch
  • Image
  • Texture
  • SVG Loader
  • Gradient Texture
  • Live Video
  • Movie Stream
  • Movie Frame
  • Movie Clip
  • Texture Loader
  • Snapshot
  • Snapshot Framebuffer
  • Texture Saver
  • Video Source Selector
  • VIO Input
  • Spout Receiver
  • NDI Receiver
  • Substance Loader
  • QR Code
VR/AR
  • Tracked Devices
  • Draw Tracked Devices
WORLD
  • Axis
  • Billboard
  • GetWorld
  • SetWorld
  • Arrange
  • Ticker
  • Layout
  • Group
  • World Z Sort
  • YesNo
  • Switch
  • Spread
  • Filter Pass
  • Set Pass
  • Hierarchy Container
  • Scene Port
  • Content Container
  • Template Port
  • Container Info
  • Camera
  • Paths
  • Cloner

Advanced and Development

  • Advanced and Development Index
  • Command Line Options
  • Ventuz IP Ports
  • Ventuz Machine Service
  • TUIO
  • .NET Scripting
  • HLSL Shader Programming
  • Ventuz API and SDK
  • Ventuz Extension API
  • Ventuz VIO API
  • Ventuz File Format (VFF)
  • Ventuz Stream Out API
  • Lens Calibration File for FreeD
  • E2E Node Overview
  • Unreal Integration
  • Notch Integration
Remoting
  • Remoting Index
  • Remoting Overview
  • How To Control and Customize Ventuz
  • Remoting 4
  • Remoting 4 via Websockets
  • Remoting 4 via HTTP
  • Director Remoting
  • Deprecated Remoting

Misc

  • Presets
« Previous: Explanation of Compositions, Screens and Outputs
» Index «
Next: Multi GPU »

Multi-Screen/Output Workflow

Table of Contents

  1. Introduction
  2. Basic Principles
  3. Break down of elements
    1. Content
    2. Composition
    3. Previs Canvas
    4. Screens
    5. Render Setup Editor
  4. Conclusion

With the latest addition and changes we made to the way Ventuz can handle outputs and to the possibility to previsualize content, there is a need for a more general overview of the workflow. The concept seems to be complicated in first, but you will realize that these changes will offer you an absolute stunning and unique way to get your content to the lit pixel! You will find even more detailed information about each topic, node and so on in the user manual and we will link whenever possible to the relevant pages.

Introduction

We will get you closer to the concept behind Ventuz- its new ways of using layout features, its new Nodes, previsualization and mapping. This includes using single screen, multiscreen, traditional single GPU- and MultiGPU systems (MGPU).

Basic Principles

The traditional way would be to just setup the project and its dimensions, create the content in the Ventuz Designer and then use the Configuration Editor, better, the Render Setup Editor inside, to setup the machines and map the outputs to the screens. Yes this is still possible but we added a lot more features and have slightly different terms.

Per default we have our Content created with the designer, even without knowing it, this Content has been put on a so called (default)Composition. If it comes to the part where we want to Output the Content we would need to assign a Screen to show the Content on. Keep in mind this Screen is Machine/GPU.

This diagram show the traditional workflow of a content which is mapped in the Render Setup Editor to 2 Cluster, which have one part of a videowall connected:

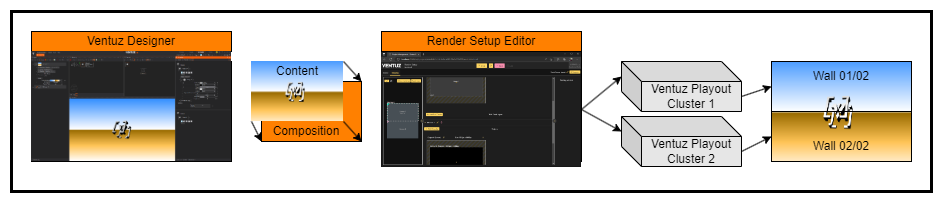
All the mapping and assignment in this case will happen in the Render Setup Editor. There you can simply map the content directly to machine(s) their Output(s) and therefore physical screen(s). You can cut the content and split it up to be assigned to different physical screens and so on and so forth.

Another way, which is now possible in Ventuz is to have a previsualization scene, short previs scene, created. This way you would create a 3D Environment in the Ventuz Designer and position your Screens in the 3D World. By doing so will have some benefits like you would not need to do the layout in the Render Setup Editor. Also you can use the combination of Compositions, Canvas and Previs Nodes to your advantage since the layout happens more in a visual way:

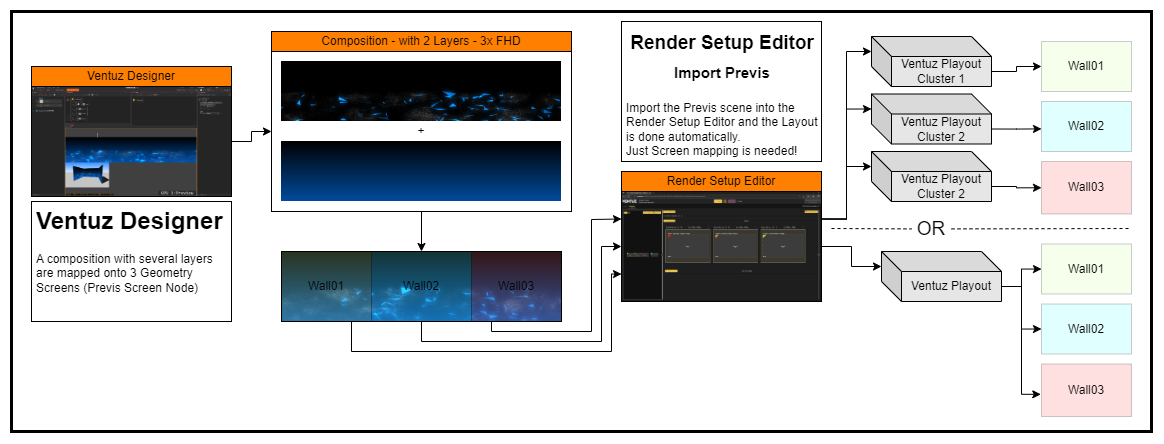
As you can see by the above diagram, you would only need to previsualize a scene, create the Screens, assign the Composition to the according Screens. As soon as you enter the Render Setup Editor you can import the previs-scene and the Render Setup Editor automatically layout the Screens for you. In our example from above the Render Setup Editor has imported 3 separate screens (Wall01...Wall03) and switches to the Mapping View. Here you just need to assign or map the Screens to the machines or their outputs.

We have thrown the term (default)Composition in the room.

As we have seen we have still the option to use the traditional workflow available. But from now on you can see the Content in a more wider aspect of things. You can *Composite* your Content together and show the resulting Composition on individual physical screens or outputs and also in different resolutions. Also you could Cut out parts of the Composition and so on.

Break down of elements

Lets try to break down each element which can be used in any of the possible workflow and explain it in detail, we start at the Ventuz Designer part:

Content

Content can consist of any kind of visual stuff. Can be a 3D Layer or 2D Layer basically anything you have created visually. You can throw together 3D Models, have a nice Background, something that is really appealing. We define content as anything that is visual here.

Composition

The composition is a combination of all visual elements which are, for example, several 2D and 3D Layers. A Composition can be either set to have automatic dimensions and will therefore adjust itself to the needed output depending on the chain behind - like the project resolution or the resolution of the mapped output.

You can also manually set the composition design size resolution and in combination with a Previs Canvas, position the Previs Screen cut more easily.

Since you use a Previs Screen, this screen will automatically be available for the Render Setup Editor and is ready to be mapped to a machine or output.

The Composition(s) in this case will be used on a Previs Canvas:

Previs Canvas

The Previs Canvas lets you put all the Composition(s) together and set their positions. Think about a real Canvas where you arrange all your visual elements on. One Composition can be made of a house of a tree, the other Composition is the mountains in the background, the lake in the foreground... All these Compositions can be put on a Canvas, arranged and scaled to form the whole picture.

In Ventuz you are able to do the same. So we have a Composition with the nice blue background and the nexus particle. That one spans the whole 2 Screens - the whole wall. Now we have another Mesh which we want to position on only one of the Screens/Walls. So we take the Composition which has the mesh and position that one on the Canvas. You can use different modes to blend these Compositions, based on Alpha for example.

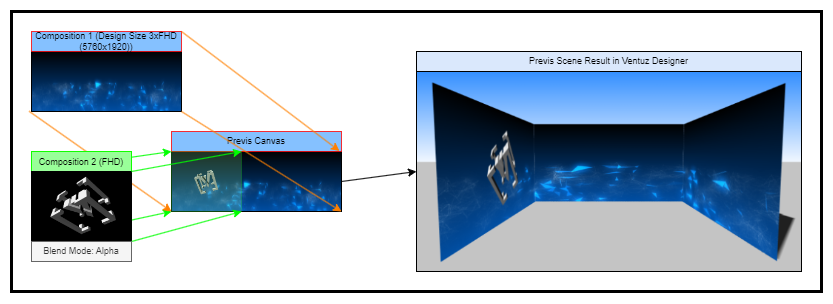
You see the Previs Canvas can be used to arrange multiple compositions which then get applied to Previs Screens:

Screens

Not the real ones, lets talk about the Previs Screens. These Screens have a Composition bound to them and previsualize then. As seen above, you can have multiple Compositions blend. This is the most common use case. Another thing to understand in the whole chain is how to work with the Previs Screens and make use of manual rectangles. What is needed often is to have a Composition shown on an array of LED-Tiles. So in case your LED-Wall is made of several tiles which are arranged in a pattern. Usually your LED-Tiles have given pixels - in the below example we have 220x220 pixels for each physical LED-Tile. We have arranged them in a shape of a 'V'. You could create your content in a Composition, apply it to a Previs Canvas and then arrange the 'V' shape by using a Screen with manual rectangles, which represent your physical LED-Wall-Tiles.
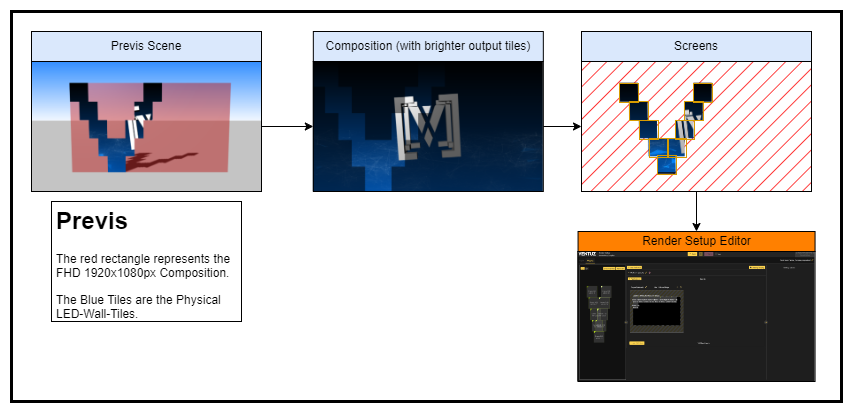
Render Setup Editor

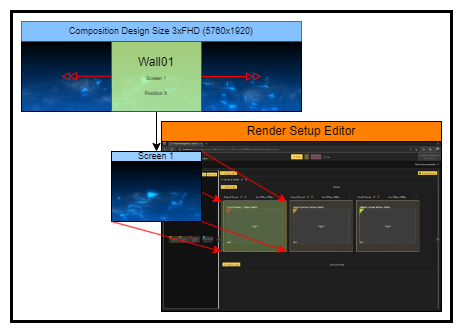
At the first glance it looks overwhelming to have so many small Previs Screens rectangles which result and show up in the Render Setup Editor as 9 Screens. The idea behind is now to have all the screen-tiles arranged and mapped to a single Output. Thank to the drag&drop operation this is done very quickly. All you would do is drag and drop the screens onto an output, while later working with the LED-Controller, you would map the according Cuts to the desired LED-Tile.

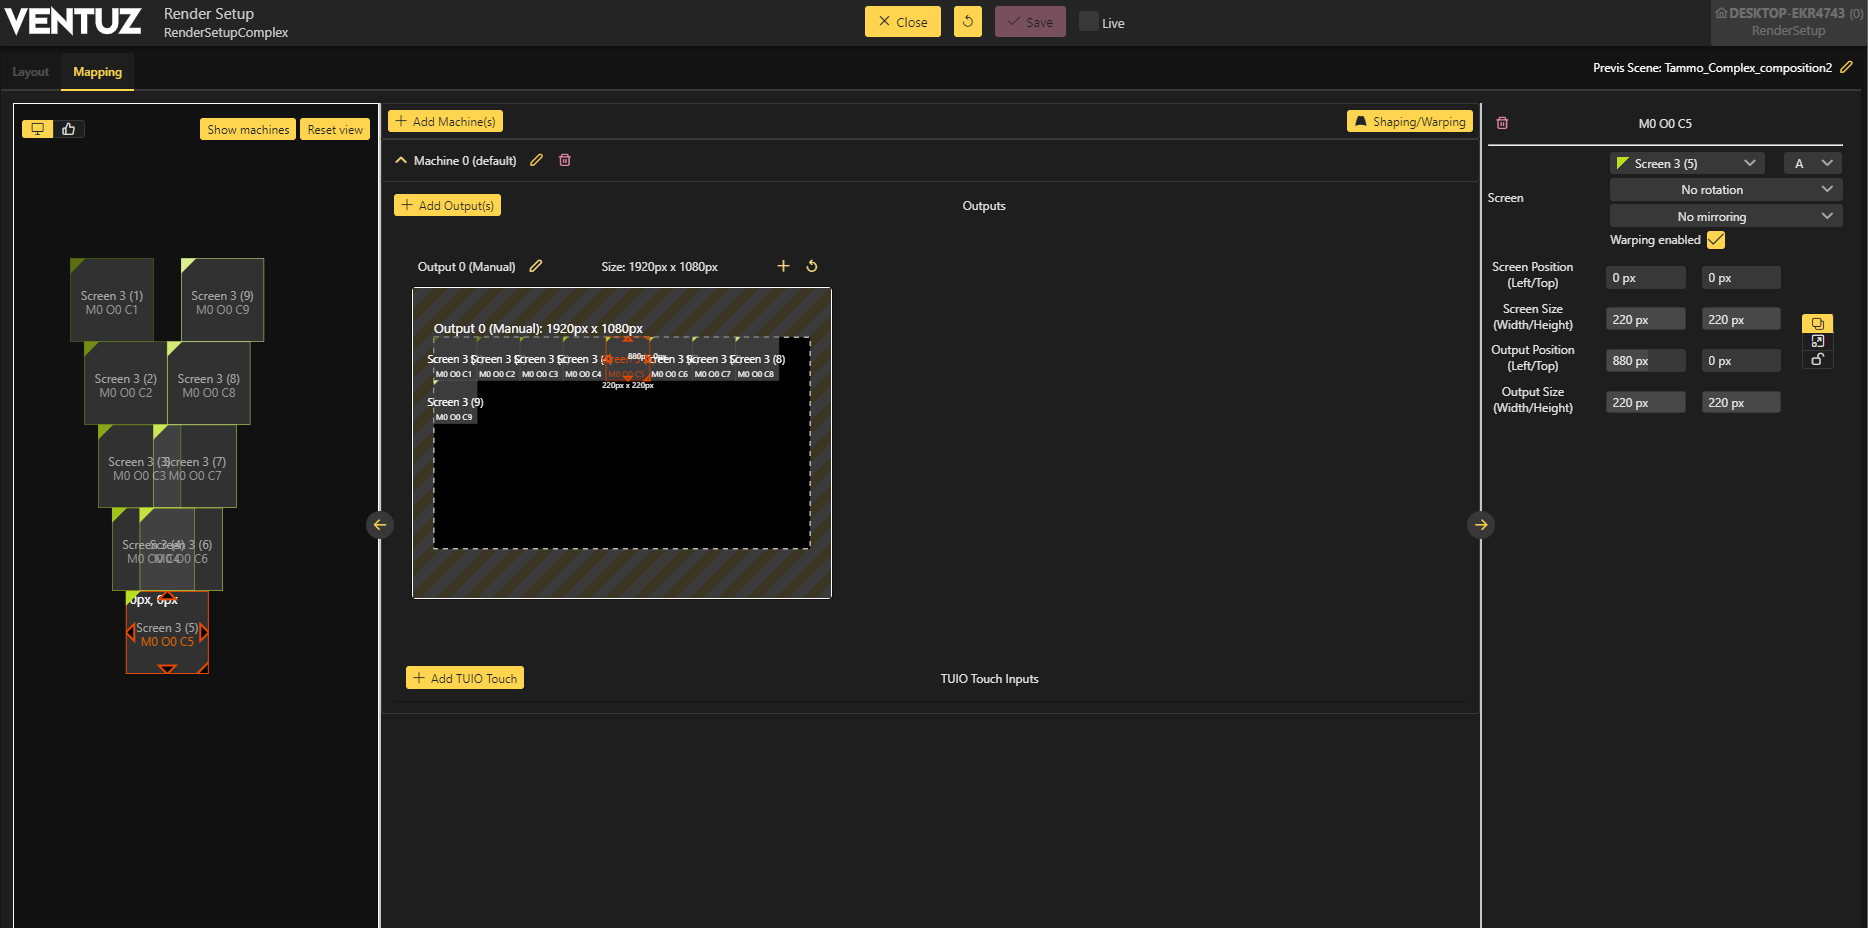
The below diagram shows an example of such a mapping workflow. Keep in mind the single output is set up for full hd (1920x1080px) and the LED Tiles just use 220x220px each, therefore there is some space in the output left. One could fill up the rest of the unused output space with other content from other Screens. This way you can assign several Screens to the Output and use all the available resolution from the output.

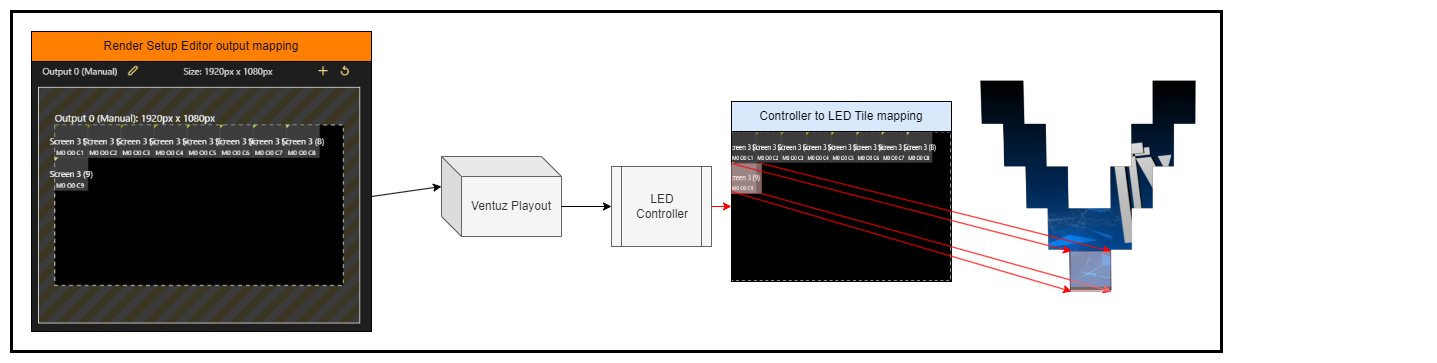
Aside from that you can use these Cuts and distribute them onto different Outputs or Machines.

Conclusion

You have several ways of using the Ventuz Output Chains. The one way would be to follow the traditional route to configure and map everything inside the Render Setup Editor. The other would be to have Previs Screens used, not only to have a real previsualization, but to safe the time for resolution value configuration and setup. Its very easy and straight forward to import the previs scene in the end and you would skip the layout part. The layout was already done and solved during the previsualization phase in this case. You have an absolute high flexibility by mapping content, assign it to screens and distribute it to several outputs and or machines.

See also:
  • Render Setup Editor
  • Composition Layer
  • Screen
  • Previs Canvas
  • Introduction To Ventuz Previs
  • Introduction to Compositions Screens and Outputs
  • Composition List
  • Previs Nodes

« Previous: Explanation of Compositions, Screens and Outputs
» Index «
Next: Multi GPU »
Copyright 2025 Ventuz Technology