Navigation

Ventuz Introduction

  • Introduction
  • Getting Started
  • Ventuz Editions
  • Ventuz Products
  • Realtime Rendering
  • Frequently Asked Questions
  • Common Mistakes
  • Deploying a Ventuz Presentation
  • Scene Performance and Tweaks

Quick Guides

  • Quick Guide Index
  • Business Logic
  • 3D Art
  • 2D Art
  • Programming
  • System Engineer

General

  • Index
  • What's New
  • Ventuz System Requirements
  • Configuration Editor
  • Device Configuration
  • Machine Configuration
  • Render Setup Editor
  • Introduction to Compositions, Screens and Outputs
  • Explanation of Compositions, Screens and Outputs
  • Live Runtime Control
  • Project and Show Management
  • Web Configuration Editor
  • Communication Protocol Overview
  • GPI Configuration for Runtime or Director
  • Introduction to the Ventuz Video Engine
  • Supported Formats
  • Supported Hardware
  • Color Management and HDR Workflow
  • Multisampling / Anti-Aliasing
  • Input Subsystem
  • Ventuz Proprietary Files
  • Migrating Configs & Content to Ventuz 8
  • Migrating Content to Ventuz 7
  • Migrating Content to Ventuz 6
  • Migrating Content to Ventuz 5
  • Summary Shortcuts
  • Terminology
  • Manual Index

Ventuz Designer

  • Designer Indices
Introduction
  • Designer Introduction Index
  • Designer Overview
  • Realtime Rendering
  • Project Browser
  • Designer Interface
  • Designer Options
  • Working with Nodes
  • Hierarchy and Content Editors
  • 2D Workflow
  • 3D Workflow
  • PBR Workflow
  • Animation Workflow
  • Best Practices
  • Reading Data in Ventuz
  • Display Images and Movies
  • Scene Performance and Tweaks
  • Deploying a Ventuz Presentation
  • Render to Disk
  • Multi Screen and Output Setup
  • Explanation of Compositions, Screens and Outputs
  • Workflow of using Multi Screens
  • Multi GPU
  • Previs
User Interface
  • Designer User Interface Index
  • Designer Interface
  • Renderer Window
  • Layer Editor
  • Property Editor
  • Property Groups
  • Hierarchy Editor
  • Content Editor
  • Find and Replace
  • Toolbox
  • Animation Editor
  • Shader Editor
  • Text Editor
  • Message View
  • Scene Tree
  • Stage Editor
  • Container Outline
  • Watches Editor
  • Scene Control Window
  • Performance Statistics
2D Workflow
  • 2D Workflow Index
  • 2D Workflow
  • Layer Editor
  • Common Layer Properties
  • IPP Effects
  • Color Correction FX
  • Distortion FX
  • Filter FX
  • Hierarchy and Content Editors
  • Display Images and Movies
3D Workflow
  • 3D Workflow Index
  • 3D Workflow
  • Hierarchy and Content Editors
  • Renderer Window
  • Camera Navigation
  • Manipulate Objects with Gizmos
  • In-Scene Editing
  • Layer Editor
  • Property Editor
  • Hierarchy Editor
  • Working with Nodes
  • Isolated Objects
  • Containers
  • Text Rendering
  • Character Sets
  • Geometry Import
  • Color Management and HDR Workflow
  • Display Images and Movies
  • Particle System
  • Creating Realistic Reflections
  • Unreal Integration
  • Notch Integration
  • E2E Node Overview
Logic Workflow
  • Logic Workflow Index
  • Hierarchy and Content Editors
  • Content Editor
  • Hierarchy Editor
  • Working with Nodes
  • Property Editor
  • Containers
  • Project and Scene Data
  • Reading Data in Ventuz
  • Display Images and Movies
  • Input Subsystem
  • Multitouch
  • TUIO Protocol
  • Open Sound Control
  • Unreal Integration
  • Notch Integration
  • E2E Node Overview
Animation Workflow
  • Animation Workflow Index
  • Animation Workflow
  • Animation Editor
  • Content Editor
  • Hierarchy Editor
  • Property Editor
  • Animation and State Engine
  • Templates
  • Template Engine
  • Scene Transitions
  • Unreal Integration
  • Notch Integration
Project Structure
  • Project Structure Index
  • Annotations
  • Project Documentation
  • Projects and Scenes
  • Project Properties
  • Project Maintenance
  • Project and Scene Data
  • Scene Management
  • Scene Statistics
  • Scene Tree
  • Performance Statistics
How Tos
  • Designer How to Index
  • How to Run Ventuz
  • How to Work with Designer
  • Ventuz Designer Drag&Drop Workflow
  • How to work with Shadows
  • How to Build Content for Multiple Screens
  • How to Use Emoijs
  • How to Build a Template
  • How To Build a Custom Scene Transition
  • How to Use the Color Difference Keyer
  • How To Enable HDR Video Output
  • How To Work with the HDR Layer
  • How Create Lens Flares and Bloom
  • How to Create Visuals Loader Node
  • How to Remote Control with a Phone
  • How to use Head Mounted Displays
  • How to work with 3D Reference Layers
  • How to create a Firework Particle System
  • How to use DDS with new Block Compression modes
  • How To use Stream Out
  • How to use the Substance Integration
  • How To Integrate Unreal
  • How To Integrate Notch
  • How To use the Vertex Integration
  • How To Control and Customize Ventuz
  • How to use the Companion with Director
  • How to build Previs scenes with Designer
  • How to migrate from Ventuz 6 to Ventuz 7
Reference
  • Available Nodes
  • Animation Nodes
  • Material&Color Nodes
  • Data Nodes
  • E2E Nodes
  • Geometry Nodes
  • Interaction Nodes
  • IO Nodes
  • Layers
  • Light Nodes
  • Logic Nodes
  • Previs Nodes
  • Render Option Nodes
  • Slides Nodes
  • Sound Nodes
  • Text Nodes
  • Texture Nodes
  • VR Nodes
  • World Nodes
  • Summary Shortcuts
  • Layer Editor Shortcuts
  • Hierarchy Editor Shortcuts
  • Content Editor Shortcuts
  • Animation Editor Shortcuts
  • Director Shortcuts

Ventuz Director

  • Index
  • What's New in Director
  • Introduction
  • Environment
  • Show
  • User Interface
  • Assets
  • Taking Action
  • Property Editor
  • Shot Box
  • Project Data
  • Pages
  • Playlist
  • Transitions
  • Timeline
  • Content References
  • Topology
  • Channels
  • Macros
  • Designing Templates
  • Scene Transitions
  • Plug-Ins
  • Shortcuts
  • Command Line Options
  • Application Settings
  • Glossary
  • GPI Configuration

Ventuz Runtime & Configuration

  • Runtime Index
  • Configuration Editor
  • Machine Configuration
  • Device Configuration
  • Project and Show Management
  • Live Runtime Control
  • Web Configuration Editor
  • Render Setup Editor
  • Warping and Soft-Edging Editor
  • Multi Screen and Output Setup
  • How to migrate from Ventuz 6 to Ventuz 7
  • Machine Clustering
  • Supported Hardware
  • Director Mode
  • How to Configure Audio
  • How to Use Live Options
  • How To Play Out On Multiple Screens
  • How To Render on a Machine Cluster
  • How to Use Head Mounted Displays
  • How to Setup Spout with Ventuz
  • How to Use Newtek NDI
  • How to Use a Mixed Frame Rate Cluster
  • How to Use Tracking

Multi Output & Display Setups

Introduction
  • Introduction to Compositions, Screens and Outputs
  • Explanation of Compositions, Screens and Outputs
  • Machine Clustering
  • Support for multiple GPU's
Editors
  • Configuration Editor
  • Device Configuration
  • Render Setup Editor
  • Warping and Soft-Edging Editor
  • Designer Stage Editor
Workflows
  • How to Build Content for Multiple Screens
  • How To Play Out On Multiple Outputs
  • How To Render on a Machine Cluster
  • How to build Previs scenes with Designer

How To

Designer
  • Designer How to Index
  • How to Run Ventuz
  • How to Work with Designer
  • Ventuz Designer Drag&Drop Workflow
  • How to work with Shadows
  • How to Build Content for Multiple Screens
  • How to Use Emoijs
  • How to Build a Template
  • How To Build a Custom Scene Transition
  • How to Use the Color Difference Keyer
  • How To Work with the HDR Layer
  • How To Enable HDR video output
  • How Create Lens Flares and Bloom
  • How to Create Visuals Loader Node
  • How to Remote Control with a Phone
  • How to use Head Mounted Displays
  • How to work with 3D Reference Layers
  • How to create a Firework Particle System
  • How to use DDS with new Block Compression modes
  • How to use the Substance Integration
  • How To Integrate Unreal
  • How To Integrate Notch
  • How To build and playback Ventuz Content in Vertex
Runtime & Configuration
  • Runtime How Tos Index
  • How to Configure Audio
  • How to Use Live Options
  • How To Play Out On Multiple Screens
  • How To Render on a Machine Cluster
  • How to use Head Mounted Displays
  • How to setup Spout with Ventuz
  • How to use Newtek NDI
  • How to use a Mixed Frame Rate Cluster
  • How to use Tracking
  • How To Integrate Unreal
  • How To Integrate Notch
  • How To build and playback Ventuz Content in Vertex
  • Multi Screen and Output Setup
  • How To Enable HDR video output
Director
  • How To Control Multiple Graphics Independently From Each Other
  • How to use the Companion with Director

Ventuz Node Reference

Available Nodes Overview
  • All Designer Nodes
ANIMATION
  • Mover
  • Alternator
  • Simple Control
  • Timeline Control
  • Anmation Rig
  • Keyframe Animation
  • Animation Group
COLOR/MATERIAL
  • Alpha
  • Fog
  • Ground Fog
  • Sky Box
  • Color to RGBA
  • HSLA to Color
  • RGBA to Color
  • Color Transformer
  • HLSL Shader
  • Color
  • Material
  • Color Picker
  • Substance Material
DATA
  • Database
  • Excel
  • JSON
  • RSS Feed
  • Resource Linker
  • Text File
  • XML
E2E
  • E2E Axis
  • E2E Data
  • E2E Control
  • E2E Layer
  • E2E Provider
  • E2E Node Overview
GEOMETRY
  • Rectangle
  • Rounded Rectangle
  • Gradient Rectangle
  • Overlay Rectangle
  • Cube
  • Circle
  • Sphere
  • Cylinder
  • Cone
  • Torus
  • Chart
  • Random Points
  • Mesh Loader
  • Geometry Import (Live)
  • Volume
  • Get Bounding Box
  • Arrow
  • Particle System
  • Path Renderer
  • Geometry Renderer
INTERACTION
  • Interaction Rect
  • Touch Button
  • Touch Excluder
  • Touch Marker
  • Touch Paint
  • Touch Pattern
  • Touch Proxy
  • Touch Ripples
  • Touch Transformations
  • Web Browser
  • Touch Teleport
  • Touch Simulator
INPUT/OUTPUT (I/O)
  • GPI
  • Joystick
  • Keyboard
  • MIDI
  • Mouse
  • Network
  • Open Sound Control
  • Serial
  • Timecode
  • DMX
  • HTTP
  • RamDiskWriter
LAYER
  • 3D Layers
  • 3D Layer Reference
  • Composition Layer
  • 2D Layers
  • PSD Import Layer
  • E2E Layer
  • Mixer Layer
  • Others
LIGHT
  • Light Sources
LOGIC
  • Array Processing
  • Convert To Text
  • Cluster Synchronization
  • Counter
  • Data Portals
  • Date Time
  • Directory
  • Dispatcher
  • Enumeration
  • Expressions
  • Invert
  • Log
  • Loop Breaker
  • Math Effects
  • Matrix Operations
  • Scene Event
  • Script
  • String Operations
  • System ID
  • Render Setup Relation
  • Text Splitter
  • Timer
  • Toggle
  • Transition Info
  • URL
  • Value Switch
  • Value Buffer
  • Variables
  • Visual Indexer
PREVISUALIZATION
  • Introduction to Previs
  • Previs Screen
  • Previs Canvas
  • Compositon List
  • Rendersetup Objects
  • Composition Projector
  • Previs Screen Render Options
RENDER OPTIONS
  • Alpha Blending
  • Color Write
  • Alpha Testing
  • Clip Plane
  • Filter
  • Mask
  • Mirror
  • Effect
  • Render Cube Map
  • Draw Modes
  • Stencil
  • ZTesting
SOUND
  • Audio Clip
  • Sound
  • Volume Control
  • Audio Analysis
SLIDES
  • Slide Manager
  • Slide
  • Slide Port
  • Pivot
TEXT
  • Text Effects
  • Text Layouts
  • Text Rendering
TEXTURE
  • Background
  • Hatch
  • Image
  • Texture
  • SVG Loader
  • Gradient Texture
  • Live Video
  • Movie Stream
  • Movie Frame
  • Movie Clip
  • Texture Loader
  • Snapshot
  • Snapshot Framebuffer
  • Texture Saver
  • Video Source Selector
  • VIO Input
  • Spout Receiver
  • NDI Receiver
  • Substance Loader
  • QR Code
VR/AR
  • Tracked Devices
  • Draw Tracked Devices
WORLD
  • Axis
  • Billboard
  • GetWorld
  • SetWorld
  • Arrange
  • Ticker
  • Layout
  • Group
  • World Z Sort
  • YesNo
  • Switch
  • Spread
  • Filter Pass
  • Set Pass
  • Hierarchy Container
  • Scene Port
  • Content Container
  • Template Port
  • Container Info
  • Camera
  • Paths
  • Cloner

Advanced and Development

  • Advanced and Development Index
  • Command Line Options
  • Ventuz IP Ports
  • Ventuz Machine Service
  • TUIO
  • .NET Scripting
  • HLSL Shader Programming
  • Ventuz API and SDK
  • Ventuz Extension API
  • Ventuz VIO API
  • Ventuz File Format (VFF)
  • Ventuz Stream Out API
  • Lens Calibration File for FreeD
  • E2E Node Overview
  • Unreal Integration
  • Notch Integration
Remoting
  • Remoting Index
  • Remoting Overview
  • How To Control and Customize Ventuz
  • Remoting 4
  • Remoting 4 via Websockets
  • Remoting 4 via HTTP
  • Director Remoting
  • Deprecated Remoting

Misc

  • Presets
« Previous: Projects and Scenes
» Index «
Next: Project Maintenance »

Project Properties

Table of Contents

  1. Common Properties
    1. General
    2. Preview
    3. Description
  2. Data
    1. Project Data
    2. Published Scenes
  3. Security
    1. Project License
    2. System Lock
  4. Devices
    1. Interaction
  5. Graphics
    1. Format
      1. Color Space
    2. Logo Watermark
    3. Layout
    4. Render Setup
  6. Text
    1. Culture
    2. Fonts
    3. Emojis

The Project Properties store settings that usually do not vary between individual scenes but have to be kept consistent for a project. For example, the project dimension is specified here. To reach this options click either on the File menu point or on the name of your project and hit Project Properties. The most important of these values are specified when creating a new Project as part of the New Project Wizard.

The following is intended as a reference with additional links to the specific topics.

Common Properties

General

Name Name or Title of the Project to be displayed to the user. Usually this name is equal to the name of the project folder and project file (.vzp) but it does not have to be.
Category The category is used to organize your projects within the project browser window.
(see also Project and Scenes)
Author The authors name of this project. When creating a new project the user name of the current Windows session is used automatically.
Copyright Copyright notice for this project. When creating a new project the company/organisation name of the Windows registration is used automatically.
Image The project image can be change for faster identification of the project in the project browser. The image is also displayed at the Project Button if the project is opened for editing. An exported presentation will use this image to decorate the presentation Window.

Preview

Preview Preview image used when browsing for projects.

Description

Short Description A short and simple description text to store more detailed information about the project.
Full Description A longer description text that even can use simple HTML tags to store detailed information about the project.
Keywords A comma separated list of keywords characterizing this project.

Data

Project Data

The Project Data of a project contains properties that do not belong to any individual node but the project itself. For more information, see Project Data and Scene Data.
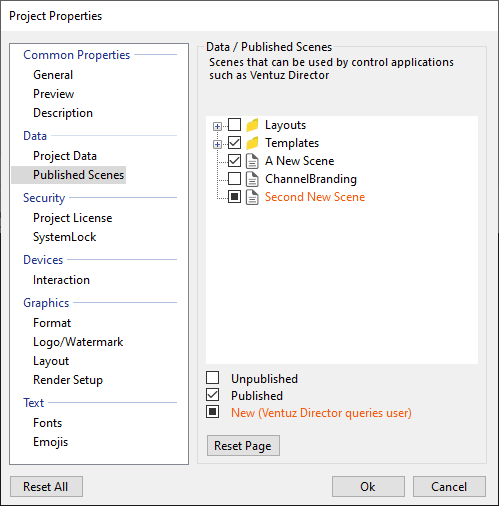
Published Scenes

The scenes selected in this dialog will be used inside the Director when you convert your project to a show and will be listed in the Templates window. Or if these are new scenes you want to add to a existing show. This dialog is also available in the Director either through the menu or when you do not check new scenes in this dialog and open a .show from the project.

Security

Project License

A Ventuz Project License is a content and runtime protection option for OEM and Project partners. Please contact Ventuz sales team for details.

License Name of the Ventuz Project License file (.vpl)
Sign Scenes Check the scene operations when a scene should be signed with the Project License. Usually all options are checked.

System Lock

An optional list of dongles that is used to restrict access to a scene, repository, VPR or VZA. If non-empty, only dongles from this list will be able to render the saved Ventuz file. In addition, only those entries that have a check mark will be able to edit the saved file. For more information, see Deployment.

Devices

Interaction

Single Tap Duration Maximum interval in seconds between a touch press and release that will still cause it to be interpreted as a tap by object-based interaction nodes.
Tap-and-Hold Duration Duration in seconds after a touch press when the hold event will be fired if the user did not lift the touch.
Movement Threshold If a touch moves further than this distance (in pixels), it will not fire a tap or tap-and-hold event. In addition, the transformation interaction nodes delay their behavior until at least this amount of pixel movement is done. This is primarily used in the context of stacked gestures to have a meaningful motion before one of the gestures exclusively claims the touch.
Intersect higher-level Layer first With this property enabled the intersection test is performed on Layers with higher composition level (lower level in Layer Editor) first. And if an object is hit within a Layer, the remaining Layers are not investigated anymore. This makes it possible to build e.g a touchable 2D UI Layer on top (in terms of composition) of a touchable 3D Content Layer. If this property is disabled the nearest object in Z direction (independent of the Layer level) receives the touch.
Smoothing Weight If a non-zero value is entered, Ventuz will try to smooth Touch Input positional information before passing it to the individual Interaction Nodes. Smoothing is done by calculating a weighted sum of previously received touch positions, multiplying last frames position by this weight, the frame before that with the weight squared and so on.
Interpolation Delay Used to compensate low input hardware refresh rates. Artificial delay between receiving a Touch position update and sending it to the individual Interaction Nodes. Increasing this value will allow Ventuz to interpolate (i.e. guess) the touch position when no update from the hardware device is available for a frame. This should only be used when the touch hardware is not capable of providing enough updates as increasing this value will introduce noticeable lag.

For more information, see MultiTouch.

Graphics

Format

The Format defines the aspect ratio and dimension of the project in square pixels. The configured dimension is then used inside the Layer Nodes that are set to Pixel Layout.

The actual render size is defined by the appropriate Render Setup and the device output. The Render Setup overwrites the settings in the Project Format and the device output defines in which resolution the content is rendered. If there is no Render Setup active, Ventuz use the Format as Default Composition resolution.
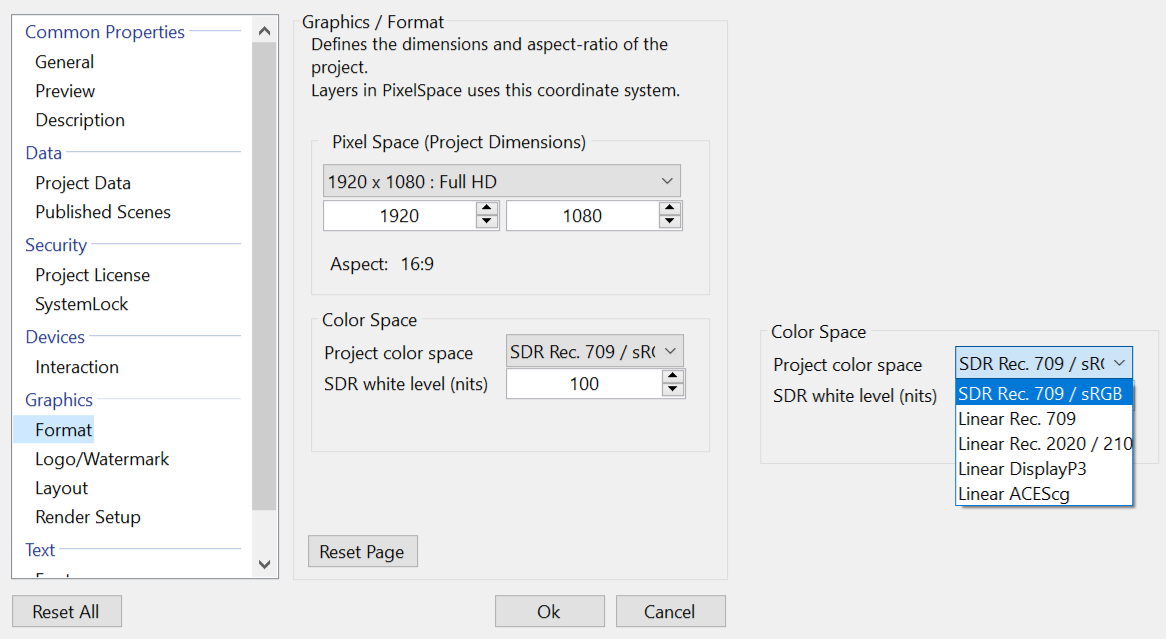
Color Space

Project Color Space sets the color space for the Ventuz project. The engines calculates color and brightness values in the set space. Where SDR Rec.709 / sRGB is the standard range, non-linear color space, which is the same to pre V7.1 color space. The other color spaces are calculated linear and some contain a wide color gamut. Depending on the HDR Output settings, the color space might be converted for the device output. For more information see: HDR and Color Management Workflow, Color Spaces in the Ventuz Engine, and How To Enable HDR.

SDR white level (nits) for all linear color spaces, this sets the brightness of the white-point (1.00 : 1.00 : 1.00) in nits. When blending between Standard Layer and HDR Layer the white level is also used as reference. (Note: With the Exposure property of the Layer, this maximum brightness can be re-adjusted, too.)

Logo Watermark

Community Watermark Properties

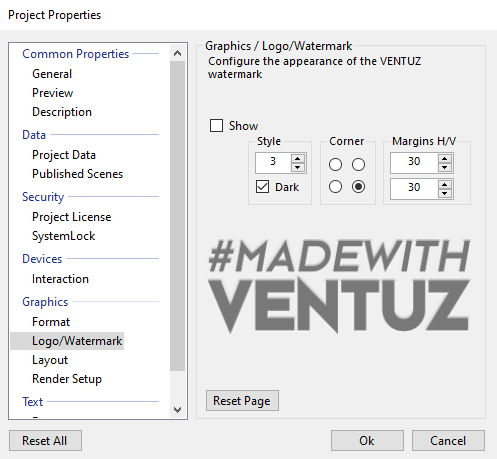
In the Ventuz Community Runtime the engine will render a branding watermark at all times. To let this watermark fit into your project's look more easily you can adjust its style. There are several different watermark images to choose from - each of them are available in transparent white and transparent black. Additionally you can define choose the location of the watermark by adjusting the corner and a margin from the screen's edge.

Note that the size as well as the position of the watermark are all relative to the screen. The Margin is given in Pixels for a target resolution of 4k (3840x2160 Pixels).

Layout

A Layout is a scene loaded by the project in front of the first 'user-scene' on Level 1. Layouts are placed on Level 0 and can be used to create multiple ports the Director can cue and take templates to (see Director Multichannel), achieve more complex setups or process data globally.

Layout Configuration

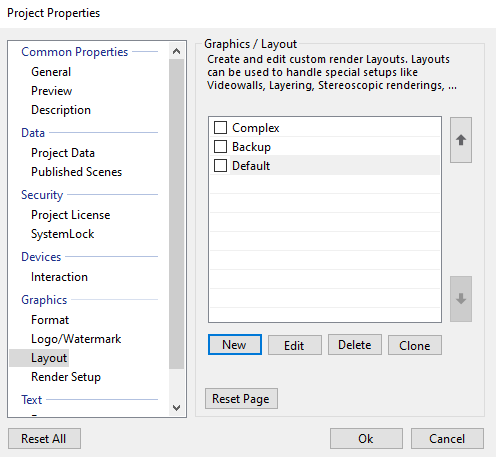
A Layout setup is created by  clicking the New button. In the General tab, a name for the Layout and the actual Layout scene file can be chosen. The fields Description and Icon can be used to help other users who work on the same project.

The Machine Tags property is a list of comma-separated three-character-codes. They are used to determine which Layout will be used on the current machine. Each machine has a Machine Tag that is defined in its Ventuz Configuration. Once the Runtime is started it will search for that tag in the Layouts - if no tag is given or it is not present in any Layout, the default layout will be used: Every entry in the Layout list has a check-box. The checked Layout is selected as the Runtime Layout which is automatically used if a scene is exported as Presentation (VPR) or the Ventuz Runtime is started in Director mode and no tagged Layout is used. Layout scenes are also loaded when the project is opened even if these are not set as active loadout scenes. This ensures that turning them on or switching them is fast.

For more information, see Project Layouts and Scene Management and Scene Tree.

Render Setup

Select the Render Setup that is used on project load or import Render Setups into the project.

Import to Project can also convert files from earlier Ventuz versions i.e Ventuz 6

Text

Culture

This section has moved to the Machine Configuration with Ventuz 4 upward.

Fonts

Project Fonts Edit Project Typeface Presets for Text Rendering
2D Text Font Styles Edit Project Presets for 2D Text Rendering
3D Text Font Styles Edit Project Presets for 3D Text Rendering
Texture Font Styles (deprecated) Edit the Presets for the Ventuz 3 Texture Text that has been replaced by the 2D Text

For more information, see Text and Text Rendering.

Emojis

Specify here which emoji texture set should be used for rendering emojis in text. The available sets are based on the files located in C:\ProgramData\Ventuz8\Cache\Emojis. Additionally you can specify which Unicodes should not be rendered as emoji even if a emoji texture is available. Note that the according Text Layout nodes must have the HandleEmojis property enabled to replace emoji codes with a texture.

We ship Ventuz with one default emoji set; to get more emoji sets download the VentuzEmoijInstaller on our ​website.

See also:
  • Character Sets and Text Rendering
  • Project Layouts and Scene Management
  • Projects and Scenes
  • MultiTouch

« Previous: Projects and Scenes
» Index «
Next: Project Maintenance »
Copyright 2025 Ventuz Technology