Compositions, Screens, and Multi Outputs
Table of Contents
The render path of Ventuz can seem complicated, but with the flexible options that are available. This document explains the different aspects of the Ventuz render path.
Introduction
Ventuz 7 introduced a completely overhauled workflow for setting up screens and outputs. Blending, custom mapping for displays such as LED walls or flat panels is simple to set up across multiple outputs on one or more graphics cards on one or more computers.
Overview
The Ventuz rendering pipeline is incredibly powerful and flexible. As a result, there are countless ways to configure the way Ventuz renders scenes. Outlined here is one or two of many different use cases in which this new workflow can be used. To decide the best type of workflow for each application of Ventuz, it is very important to understand how the pipeline works.
Render Pipeline
Ventuz Designer is where Projects and Scenes are created and modified. An important change since Ventuz 7 is the link between the Scene and its content to the renderer and play-out to the physical output. This render path includes new components.
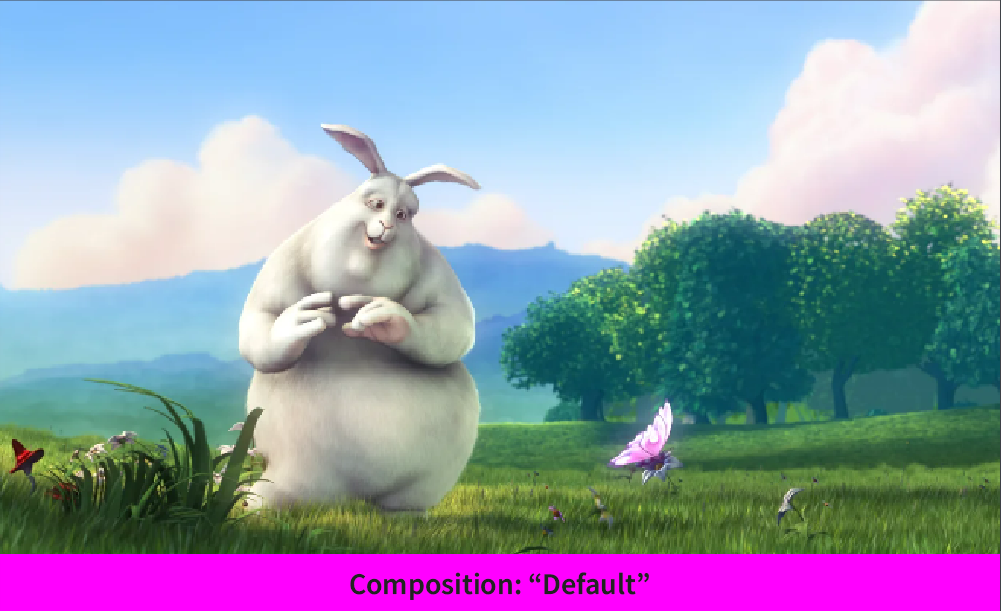
With the Composition we create the link within the Designer to the Render setup, this defines the render path. The Composition can be seen as a group of different Layers or assets. Inside of this Composition, different Layers can interact with each other or stand alone.
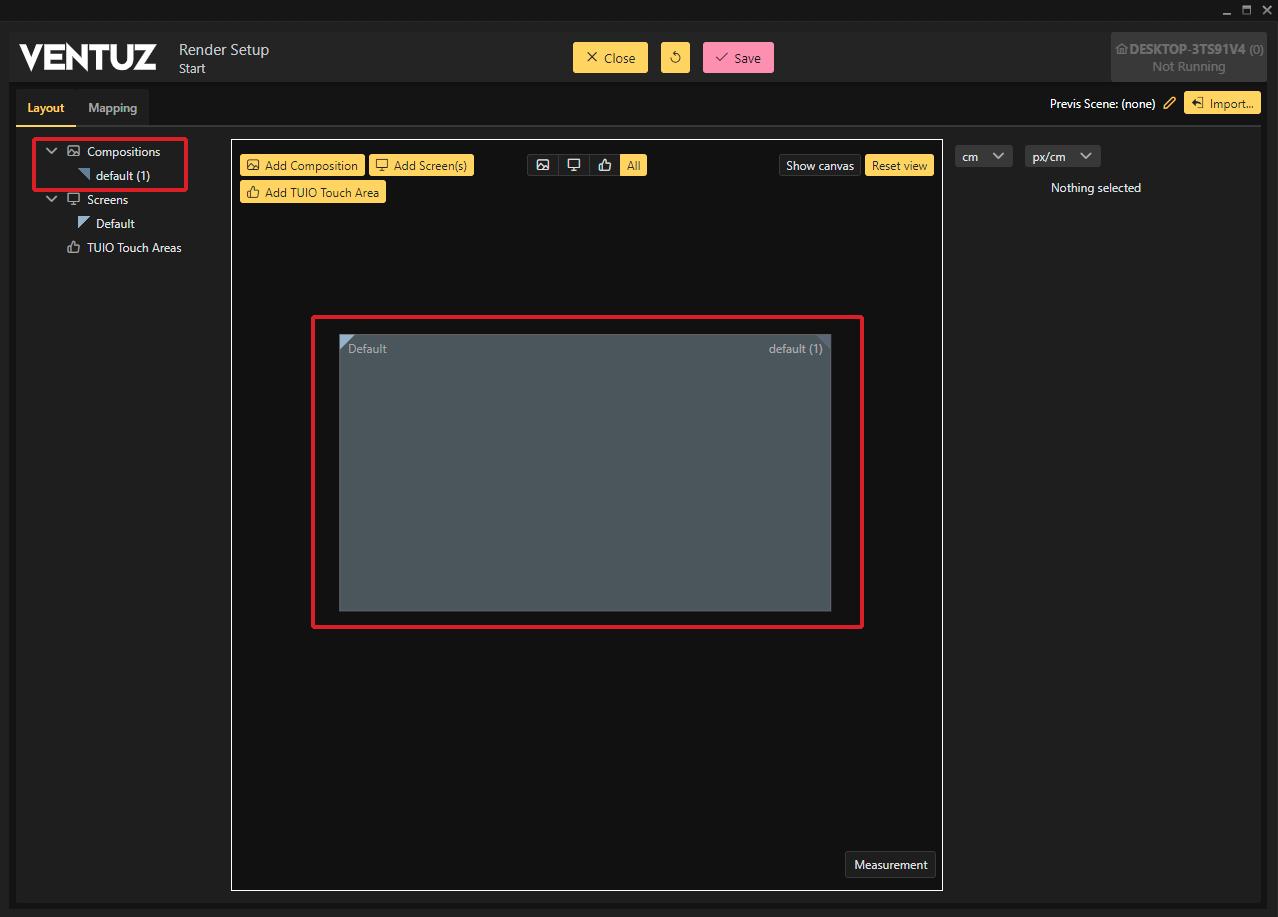
When a Scene or a Presentation has been created, the workflow for configuring Ventuz can be found inside of the Ventuz Configuration Editor and more specifically in the Render Setup. Independent of the project complexity, the workflow remains the same.
The Composition that has been used inside of the Designer is front-and-center in the render pipeline. In the Render Setup, the whole Composition or portions of the Composition can be selected to be displayed on physical displays using what Ventuz refers to as Screens.
The Screens can be applied to an Output. An Output can be bound to a physical output of a graphics card or a virtual one such as NDI.
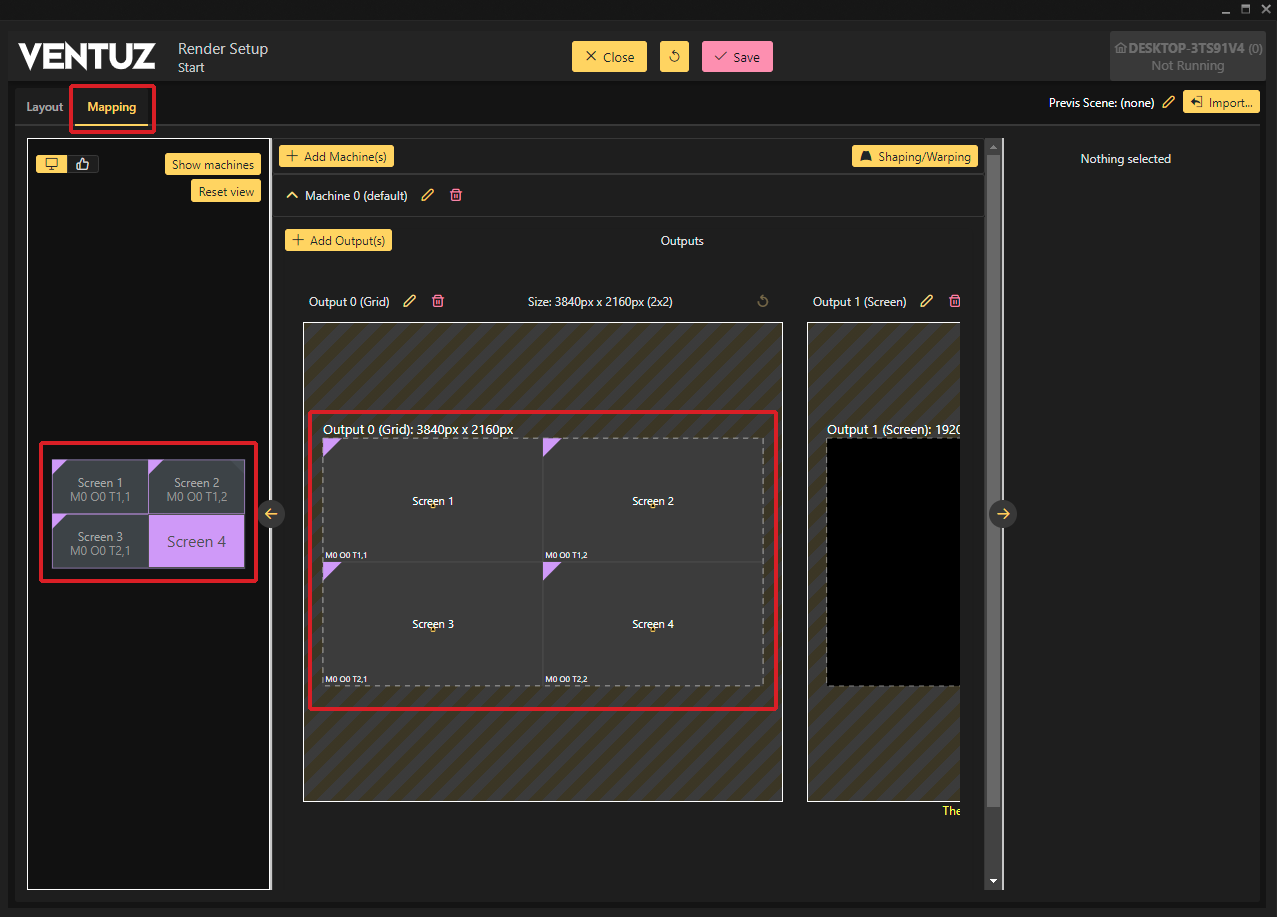
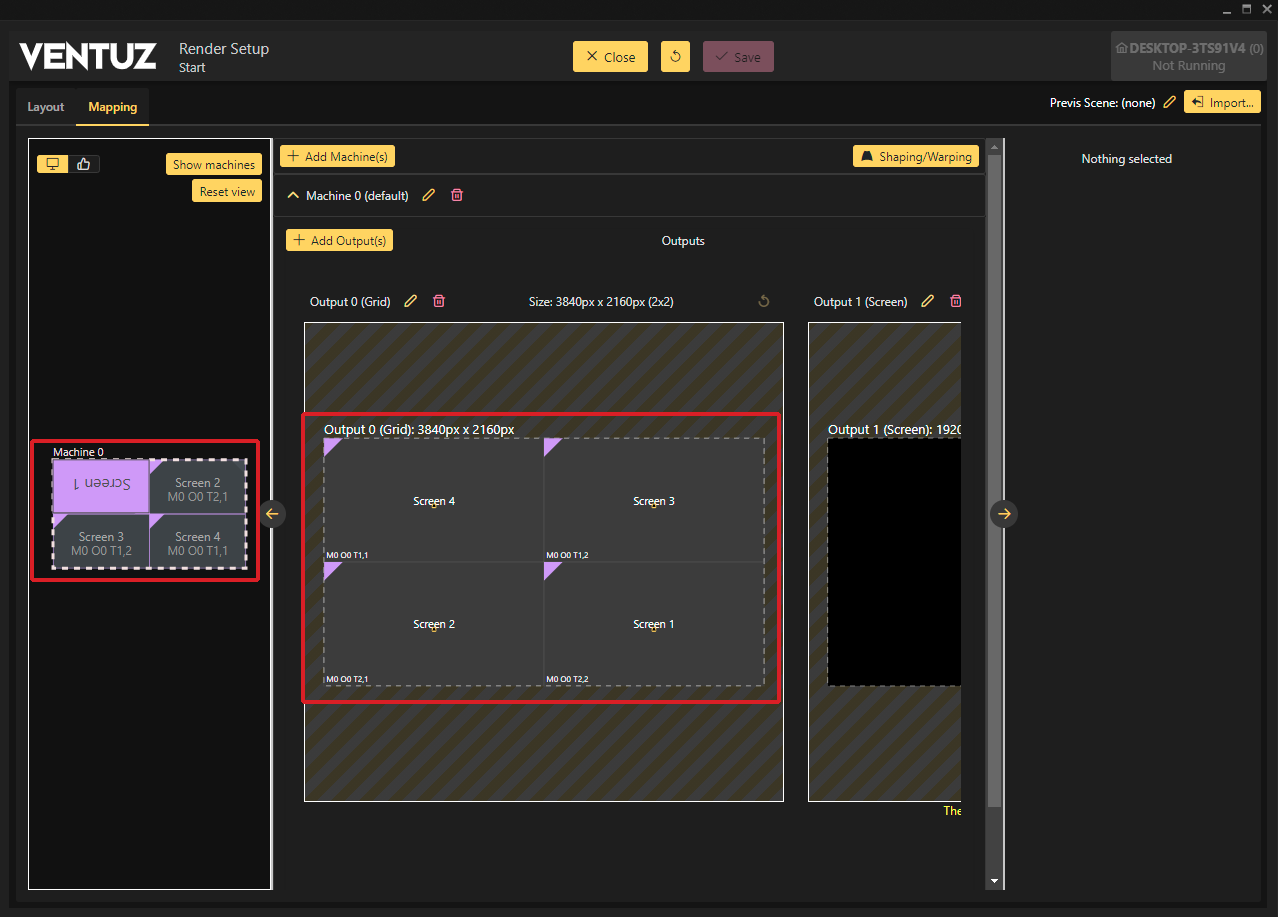
In the Mapping window of the Render Setup Editor, Outputs can be created and modified. An output is what is used to address as Video Output in the Device Config. Inside of the Mapping section, multiple screens and machines can exist on which to apply these Screens.
Screens can be applied to the Outputs in different modes.
- The basic mapping is a Single mapping of a whole Screen to an output.
- But with Grid and
- Manual mapping very complex output mappings are possible.
In general, the pipeline to render to a physical display from Ventuz is: Composition -> Screen -> Output.
There are other options and adjustments that can be applied to each Output such as Warping and Blending, Color Correction, and additional Blending options.
Example
When starting a Project and creating a Scene, Ventuz Designer automatically makes a Default Composition with a 3D Layer inside of it. This is the most common type of setup for starting a project.
Modifications can be made to various assets such as 3D objects, text, particles, as with any other scene in Ventuz. These assets can be positioned and animated in the workspace that is the Composition.
Once the Scene has been created in a way that is ready to present a Render Setup can be made. Inside of the Render Setup it is then possible to render an entire Composition to an Output or display, to scale that Composition, to take cuts or sections of that Composition, or to send one Composition to multiple Outputs. To accomplish this, the use of Screens and unique Output mapping is used.
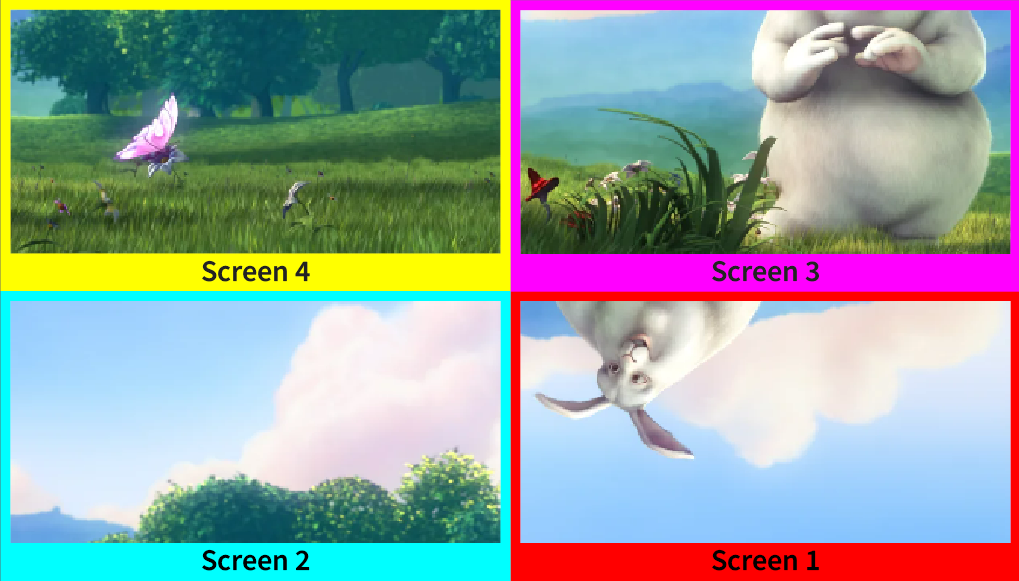
In this example:
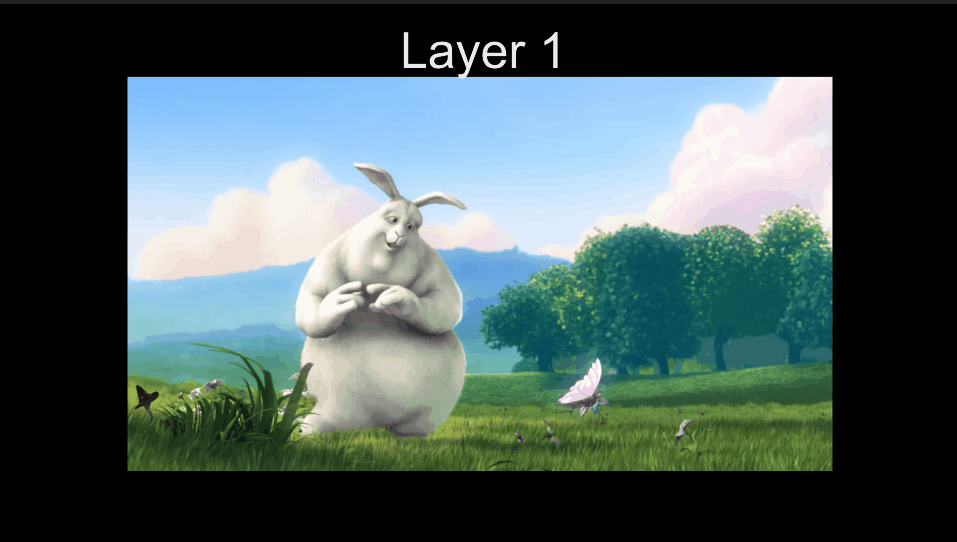
- One Layer is applied to a Composition.
- One Screen (Screen 1) is used to 'capture' the whole Composition.
- Screen 1 is applied to an Output that is connected to a physical display.
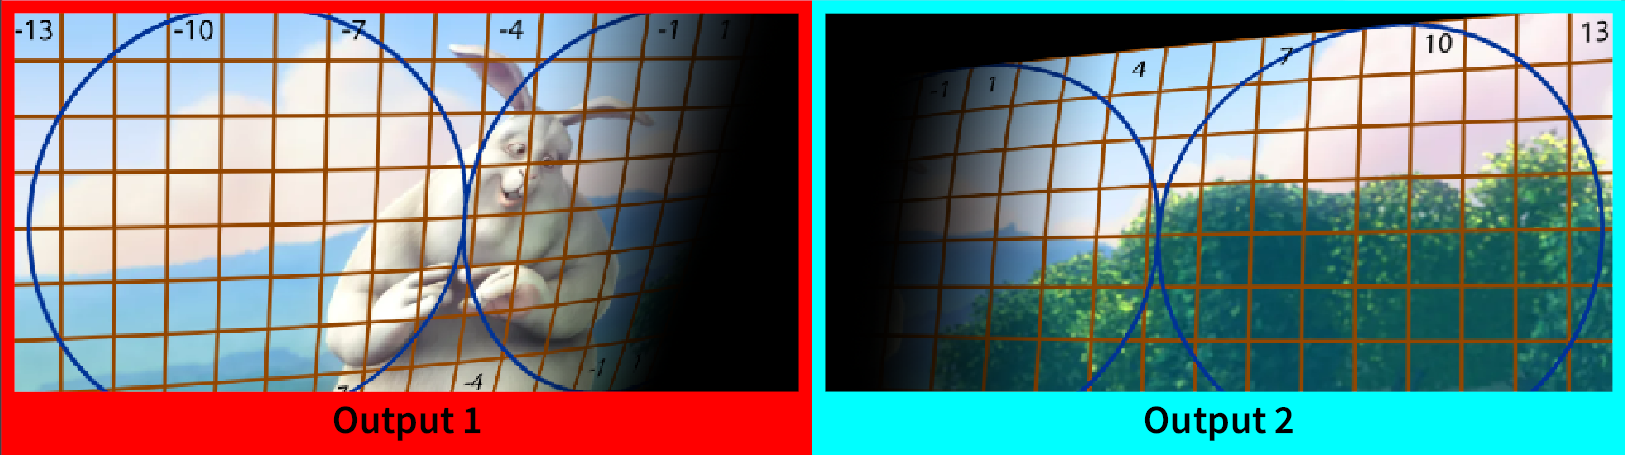
- Screen 1 is resized and moved to 'capture' a smaller section of the Composition.
- Three additional Screens are added and are positioned to 'capture' a 2x2 Grid.
- The four Screens have all been applied to four Outputs.
Resolution
Within the Render Setup Editor each component of the render path is described with pixel-values. The Composition has a dimension, the Screen has a resolution and the output mapping display has a resolution depending on the Screen assigned. To understand the render path, it is important to know, that the layout of the Composition to the Screen and the output mapping are internally calculated once for the engine to render the correct part in the correct resolution. The basis for this calculation is always the output resolution of the actual physical output. If, for example, the scene has been created with a resolution of 3840px by 2160px, the physical output determines the final resolution. If the GPU is connected to a 1080p monitor, Ventuz will render in 1920px by 1080px regardless of what the composition's dimensions are. This behaviour is to make sure, that the actual rendering is always in the correct output resolution.
Why is this important? If the output mapping resolution differs from the actual physical device resolution, the values of the Screen resolution and Composition dimension are not the actual render resolution anymore. But, very importantly, the relationship of each other, with the correct aspect ratio, stays correct.
In general it is best to know the resolution and physical dimension of the output screens. A Render Setup can be easily created that is using the correct dimension for your Composition in relation to the Screen that is also pixel-accurate.
Project Based Render Setups
Render Setups are unique for each project, they are stored inside each Project folder structure instead of in one common place.
This is great if one computer is used on multiple projects over time.
Create multiple Render Setups and easily switch between them without needing to close and restart your Ventuz Runtime or Designer.
Conversely, the Device Configuration settings are global settings. They will be applied to every Render Setup on the Device it has been created on.
Import/Export
Export your project's Render Settings to backup for later or to import to another project for any project at any time.
Live Editing
Changes made to the Render Path through the Ventuz Configuration Editor are now applied instantly. Since Ventuz 7, restarting Ventuz Runtime is not needed for most changes.
Edit properties on the fly while watching your changes happen as you work reducing time needed and the number of iterations needed to achieve a perfect setup.
Changing some settings will temporarily interrupt the Render Engine
Compositions
A Composition, inside of Ventuz, is where all of the magic happens. A composition is where the Layer assets are rendered; it defines the area to pass to the graphics card(s) or to Previsualization Screen(s).
Each composition in Ventuz can be a unique area that can 'hold' one or more Layers. One or more Compositions can be used in each scene. A Composition can be virtually any size, regardless of what the output sizes are, or are expected to be. Compositions allow Ventuz Scenes to be dynamic and allow them to be used for many different setups using the same Project File. By resizing a Composition, different Layers are able to utilize more or less pixel space without losing resolution.
Because Ventuz elements are rasterized and rendered inside of Ventuz in real-time, the size of the Composition does not matter, with the exception of videos or images that are created outside of Ventuz and imported into the Project.
 | 
|
Screens
Create screens inside of the Render Setup window that reflect your physical setup
Screens give the render engine the ability to map Content from a Composition to one or may unique displays such as LED screens, projectors, flat panels and more.
Enter the resolution, pixel density and/or the measurement of your screens to easily map a composition to multiple displays to make one beautiful image.
Automatically take the bezels and gaps between displays into account when creating a multiple display setup.
Screens can be used to show whole Compositions, cuts of Compositions, or both.
 | 
|
Measured Screen Sizing Tools
Screens can be added and their measured physical size, pixel density or resolution can be used easily and automatically to size them. This assists in setting up different types and sizes of screen to create one large canvas to create one beautiful image.
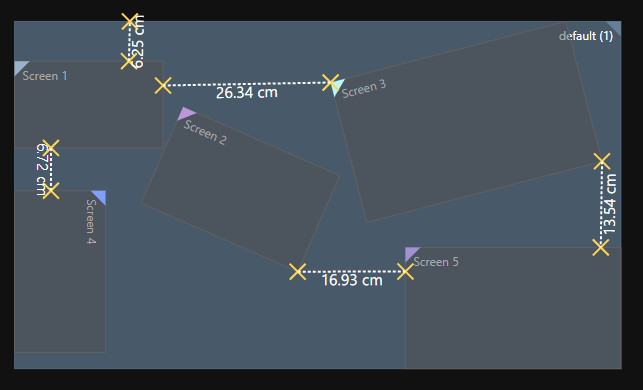
For more detailed information about the Measurement feature take a look here.
Canvases
In most scenarios, working with a Render Setup, the handling of Canvases is automatic. Canvases are a technically necessary tool for the Ventuz rendering path and the engine, since they act as middle step in the transformation chain between the layout of Compositions to Screens. To be able to layout multiple Compositions to one Screen, or even more complex setups, Ventuz has the intermediate step of Canvases. While working with the Render Setup, the creation and editing of Canvasses is done automatically. With creating Compositions and Screens the Canvasses are always edited correctly in the background. With multiple Compositions being connected, by overlapping or touching, one continuous Canvas is created, like you can see in the animation.
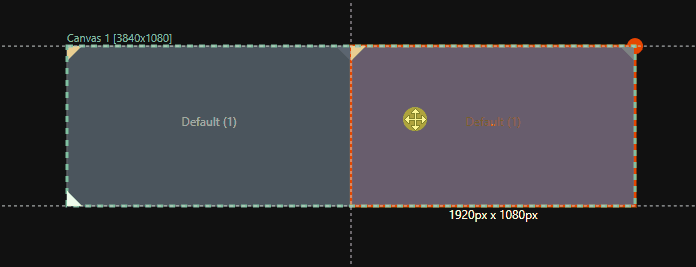
In this animation, when one Composition and Screen are moved away from the other, the Single Canvas will become two. It will automatically merge back into one when it is appropriate.
For very complex setups or the complete flexibility, you can use a Previs Scene and within the Canvas Node have the full flexibility of the Canvas.
Outputs
Following recent Microsoft Windows Updates to Full Screen Optimization, synchronization between frames across multiple GPU outputs may not be as predictable as before.
Enabling Mosaic Mode can solve this issue. In most cases, the timing discrepancies are minimal and unlikely to be noticeable to users. However, in scenarios where multiple displays are arranged with adjacent pixels, such as two touching LED walls using two outputs, such discrepancies may become more apparent. To ensure optimal synchronization in these situations, we recommend enabling Mosaic Mode. This only occurs when using multiple outputs on one GPU. If only one output is being used, this issue does not occur even if using multiple GPUs in one machine.
Outputs represent the physical or virtual output of a computer running Ventuz Runtime. Each Output can accept one or many Screens.
Ventuz is able to easily set up and synchronize outputs from one one graphics card, three outputs from 2 different cards, or 10 outputs across 4 computers in a cluster.
Outputs can be setup to work as as single Screen output, a variable sized grid, or manually.
Display groups, such as Mosaic or Eyefinity, are not needed since Ventuz 7 but can be used.
Inside of an Output a Screen that has been setup above can be assigned to display on. This way, the slices of the composition taken by creating and adjusting the Screens can be assigned to a physical output of the Ventuz environment.
The Render Editor can also be used to configure Clusters.
Previs Scenes can now be sent to an output of a Ventuz Runtime.

Cuts
Inside of each of the outputs, Screens can be adjusted to rotate, scale, and position a Screen to display on an output. This Cut can then be positioned with precise pixel-level accuracy on a physical Output to display a portion of a Composition on a custom size or shape LED wall for example.
 | 
|
Scaling
With Ventuz, the render engine is able to scale up or down a Composition instead of rendering it multiple times. In a scenario, where the same Composition is mapped on different outputs in different resolutions, the Allow Scaling properties enables to scale the rendering instead of rendering twice in different resolutions. This will save performance, and is especially useful, if one output is only used for a preview monitor of the production.
In general it is important to note, that the Allow Scaling functions has only an impact if a Composition or a Screen is rendered multiple times. It is currently not possible to scale up a single Composition.
To configure a specific part to be scaled, there are different options possible. If the same Screen is mapped to two different physical outputs, the Allow Scaling property in the Video Ouput Device Settings can be enabled. The output with Allow Scaling enabled will be scaled up or down, depending on the other output. For example, if Output 1 is a 4K screen and Output 2 a FullHD screen, Ventuz will render in 4k and scale down, if Allow Scaling is activated on Output 2. If it is activated on Output 1, Ventuz will render in FullHD and scale up to 4k on the Output 2.
To scale only a certain Composition you can use the Allow Scaling property of the Composition. With this functionality, a part of the rendering can be scaled, but the rest will be rendered in the actual resolution. Activate Allow Scaling on the Composition instance that should be scaled. The other instance will not be affected if scaling is not activated. Other Compositions that are part of the Screen containing the scaled Compositions are not affected.
Scaling is only possible if you are rendering the same part of a scene multiple times.
It is not possible to scale when only rendering one time. If rendered once, it will always render in the correct resolution of the output.
The following setup is a 3840px by 2160px screen as physical output on GPU0:0 (the first GPU output device in the device config) and a 1920px by 1080px screen on the GPU0:1 (the second output device). The screenshots show the Diagnostics of the Configuration Editor for the different cases of Allow Scaling enabled on the output configuration. The rendering is the simple default.vpr.
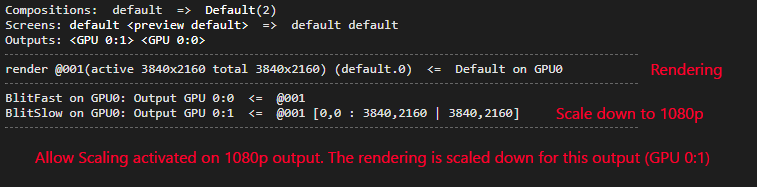
In this setup the Allow Scaling property is enabled for the 1080p GPU output. Therefore the 4K rendering is scaled down and played out again. The Diagnostics show, that it is only rendered once in this resolution.
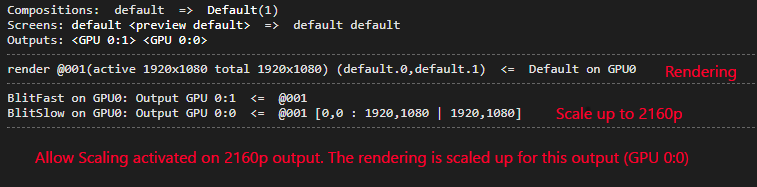
Now the Allow Scaling function is enabled for the 2160p output. The rendering in 1920x1080 is scaled up for the GPU out.
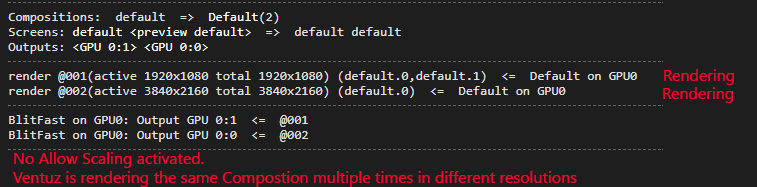
In this case, there is no scaling enabled. Therefore Ventuz is rendering the same content twice in different resolutions.
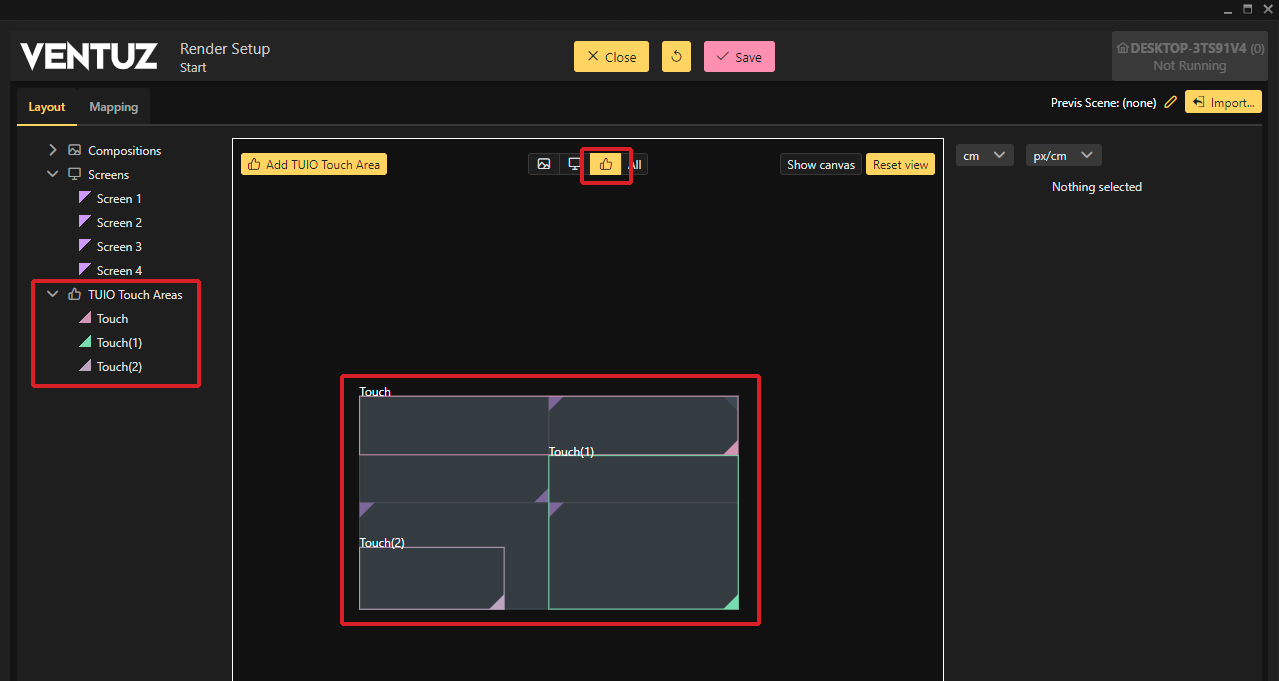
TUIO
Map TUIO exactly as needed to across multiple displays letting Ventuz do the work to accurately track input information. Touch areas can be assigned manually by using the touch areas:
Or by directly mapping TUIO touch inputs to a output in the Mapping Mode
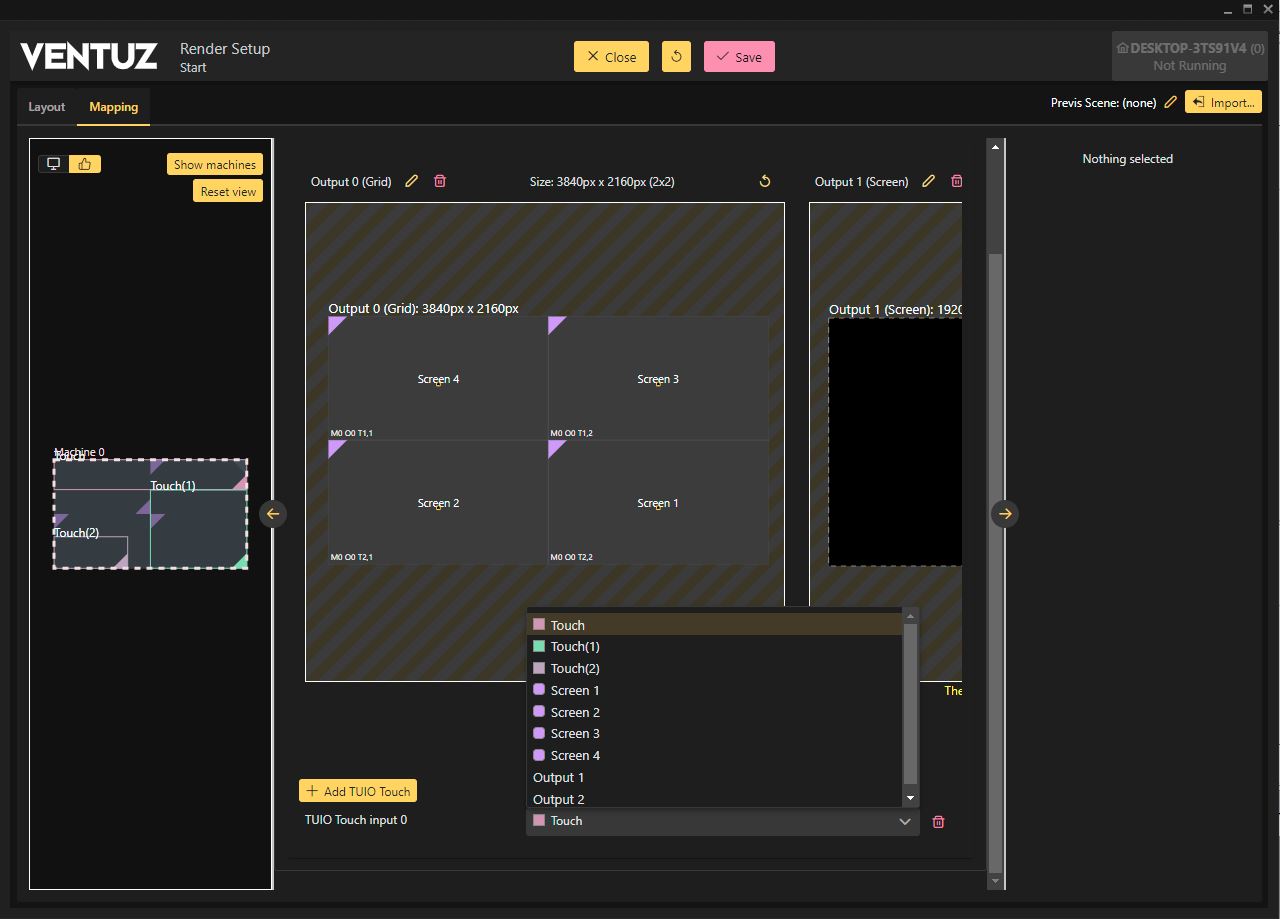
Here you can choose between the whole output or single Screens.
Shaping
Warping
Similar to Version 6, the Warping Engine allows granular control of every pixel for every output.
Inside of the Shaping Editor, each screen can be aligned individually to create edge blends, convergences or to assist in mapping an output to an object.
Blending
Blending is done automatically if there are any overlapping Screens. Adjusting the automatic blending can be done in the Blending section of the Shaping Editor