Navigation

Ventuz Introduction

  • Introduction
  • Getting Started
  • Ventuz Editions
  • Ventuz Products
  • Realtime Rendering
  • Frequently Asked Questions
  • Common Mistakes
  • Deploying a Ventuz Presentation
  • Scene Performance and Tweaks

Quick Guides

  • Quick Guide Index
  • Business Logic
  • 3D Art
  • 2D Art
  • Programming
  • System Engineer

General

  • Index
  • What's New
  • Ventuz System Requirements
  • Configuration Editor
  • Device Configuration
  • Machine Configuration
  • Render Setup Editor
  • Introduction to Compositions, Screens and Outputs
  • Explanation of Compositions, Screens and Outputs
  • Live Runtime Control
  • Project and Show Management
  • Web Configuration Editor
  • Communication Protocol Overview
  • GPI Configuration for Runtime or Director
  • Introduction to the Ventuz Video Engine
  • Supported Formats
  • Supported Hardware
  • Color Management and HDR Workflow
  • Multisampling / Anti-Aliasing
  • Input Subsystem
  • Ventuz Proprietary Files
  • Migrating Configs & Content to Ventuz 8
  • Migrating Content to Ventuz 7
  • Migrating Content to Ventuz 6
  • Migrating Content to Ventuz 5
  • Summary Shortcuts
  • Terminology
  • Manual Index

Ventuz Designer

  • Designer Indices
Introduction
  • Designer Introduction Index
  • Designer Overview
  • Realtime Rendering
  • Project Browser
  • Designer Interface
  • Designer Options
  • Working with Nodes
  • Hierarchy and Content Editors
  • 2D Workflow
  • 3D Workflow
  • PBR Workflow
  • Animation Workflow
  • Best Practices
  • Reading Data in Ventuz
  • Display Images and Movies
  • Scene Performance and Tweaks
  • Deploying a Ventuz Presentation
  • Render to Disk
  • Multi Screen and Output Setup
  • Explanation of Compositions, Screens and Outputs
  • Workflow of using Multi Screens
  • Multi GPU
  • Previs
User Interface
  • Designer User Interface Index
  • Designer Interface
  • Renderer Window
  • Layer Editor
  • Property Editor
  • Property Groups
  • Hierarchy Editor
  • Content Editor
  • Find and Replace
  • Toolbox
  • Animation Editor
  • Shader Editor
  • Text Editor
  • Message View
  • Scene Tree
  • Stage Editor
  • Container Outline
  • Watches Editor
  • Scene Control Window
  • Performance Statistics
2D Workflow
  • 2D Workflow Index
  • 2D Workflow
  • Layer Editor
  • Common Layer Properties
  • IPP Effects
  • Color Correction FX
  • Distortion FX
  • Filter FX
  • Hierarchy and Content Editors
  • Display Images and Movies
3D Workflow
  • 3D Workflow Index
  • 3D Workflow
  • Hierarchy and Content Editors
  • Renderer Window
  • Camera Navigation
  • Manipulate Objects with Gizmos
  • In-Scene Editing
  • Layer Editor
  • Property Editor
  • Hierarchy Editor
  • Working with Nodes
  • Isolated Objects
  • Containers
  • Text Rendering
  • Character Sets
  • Geometry Import
  • Color Management and HDR Workflow
  • Display Images and Movies
  • Particle System
  • Creating Realistic Reflections
  • Unreal Integration
  • Notch Integration
  • E2E Node Overview
Logic Workflow
  • Logic Workflow Index
  • Hierarchy and Content Editors
  • Content Editor
  • Hierarchy Editor
  • Working with Nodes
  • Property Editor
  • Containers
  • Project and Scene Data
  • Reading Data in Ventuz
  • Display Images and Movies
  • Input Subsystem
  • Multitouch
  • TUIO Protocol
  • Open Sound Control
  • Unreal Integration
  • Notch Integration
  • E2E Node Overview
Animation Workflow
  • Animation Workflow Index
  • Animation Workflow
  • Animation Editor
  • Content Editor
  • Hierarchy Editor
  • Property Editor
  • Animation and State Engine
  • Templates
  • Template Engine
  • Scene Transitions
  • Unreal Integration
  • Notch Integration
Project Structure
  • Project Structure Index
  • Annotations
  • Project Documentation
  • Projects and Scenes
  • Project Properties
  • Project Maintenance
  • Project and Scene Data
  • Scene Management
  • Scene Statistics
  • Scene Tree
  • Performance Statistics
How Tos
  • Designer How to Index
  • How to Run Ventuz
  • How to Work with Designer
  • Ventuz Designer Drag&Drop Workflow
  • How to work with Shadows
  • How to Build Content for Multiple Screens
  • How to Use Emoijs
  • How to Build a Template
  • How To Build a Custom Scene Transition
  • How to Use the Color Difference Keyer
  • How To Enable HDR Video Output
  • How To Work with the HDR Layer
  • How Create Lens Flares and Bloom
  • How to Create Visuals Loader Node
  • How to Remote Control with a Phone
  • How to use Head Mounted Displays
  • How to work with 3D Reference Layers
  • How to create a Firework Particle System
  • How to use DDS with new Block Compression modes
  • How To use Stream Out
  • How to use the Substance Integration
  • How To Integrate Unreal
  • How To Integrate Notch
  • How To use the Vertex Integration
  • How To Control and Customize Ventuz
  • How to use the Companion with Director
  • How to build Previs scenes with Designer
  • How to migrate from Ventuz 6 to Ventuz 7
Reference
  • Available Nodes
  • Animation Nodes
  • Material&Color Nodes
  • Data Nodes
  • E2E Nodes
  • Geometry Nodes
  • Interaction Nodes
  • IO Nodes
  • Layers
  • Light Nodes
  • Logic Nodes
  • Previs Nodes
  • Render Option Nodes
  • Slides Nodes
  • Sound Nodes
  • Text Nodes
  • Texture Nodes
  • VR Nodes
  • World Nodes
  • Summary Shortcuts
  • Layer Editor Shortcuts
  • Hierarchy Editor Shortcuts
  • Content Editor Shortcuts
  • Animation Editor Shortcuts
  • Director Shortcuts

Ventuz Director

  • Index
  • What's New in Director
  • Introduction
  • Environment
  • Show
  • User Interface
  • Assets
  • Taking Action
  • Property Editor
  • Shot Box
  • Project Data
  • Pages
  • Playlist
  • Transitions
  • Timeline
  • Content References
  • Topology
  • Channels
  • Macros
  • Designing Templates
  • Scene Transitions
  • Plug-Ins
  • Shortcuts
  • Command Line Options
  • Application Settings
  • Glossary
  • GPI Configuration

Ventuz Runtime & Configuration

  • Runtime Index
  • Configuration Editor
  • Machine Configuration
  • Device Configuration
  • Project and Show Management
  • Live Runtime Control
  • Web Configuration Editor
  • Render Setup Editor
  • Warping and Soft-Edging Editor
  • Multi Screen and Output Setup
  • How to migrate from Ventuz 6 to Ventuz 7
  • Machine Clustering
  • Supported Hardware
  • Director Mode
  • How to Configure Audio
  • How to Use Live Options
  • How To Play Out On Multiple Screens
  • How To Render on a Machine Cluster
  • How to Use Head Mounted Displays
  • How to Setup Spout with Ventuz
  • How to Use Newtek NDI
  • How to Use a Mixed Frame Rate Cluster
  • How to Use Tracking

Multi Output & Display Setups

Introduction
  • Introduction to Compositions, Screens and Outputs
  • Explanation of Compositions, Screens and Outputs
  • Machine Clustering
  • Support for multiple GPU's
Editors
  • Configuration Editor
  • Device Configuration
  • Render Setup Editor
  • Warping and Soft-Edging Editor
  • Designer Stage Editor
Workflows
  • How to Build Content for Multiple Screens
  • How To Play Out On Multiple Outputs
  • How To Render on a Machine Cluster
  • How to build Previs scenes with Designer

How To

Designer
  • Designer How to Index
  • How to Run Ventuz
  • How to Work with Designer
  • Ventuz Designer Drag&Drop Workflow
  • How to work with Shadows
  • How to Build Content for Multiple Screens
  • How to Use Emoijs
  • How to Build a Template
  • How To Build a Custom Scene Transition
  • How to Use the Color Difference Keyer
  • How To Work with the HDR Layer
  • How To Enable HDR video output
  • How Create Lens Flares and Bloom
  • How to Create Visuals Loader Node
  • How to Remote Control with a Phone
  • How to use Head Mounted Displays
  • How to work with 3D Reference Layers
  • How to create a Firework Particle System
  • How to use DDS with new Block Compression modes
  • How to use the Substance Integration
  • How To Integrate Unreal
  • How To Integrate Notch
  • How To build and playback Ventuz Content in Vertex
Runtime & Configuration
  • Runtime How Tos Index
  • How to Configure Audio
  • How to Use Live Options
  • How To Play Out On Multiple Screens
  • How To Render on a Machine Cluster
  • How to use Head Mounted Displays
  • How to setup Spout with Ventuz
  • How to use Newtek NDI
  • How to use a Mixed Frame Rate Cluster
  • How to use Tracking
  • How To Integrate Unreal
  • How To Integrate Notch
  • How To build and playback Ventuz Content in Vertex
  • Multi Screen and Output Setup
  • How To Enable HDR video output
Director
  • How To Control Multiple Graphics Independently From Each Other
  • How to use the Companion with Director

Ventuz Node Reference

Available Nodes Overview
  • All Designer Nodes
ANIMATION
  • Mover
  • Alternator
  • Simple Control
  • Timeline Control
  • Anmation Rig
  • Keyframe Animation
  • Animation Group
COLOR/MATERIAL
  • Alpha
  • Fog
  • Ground Fog
  • Sky Box
  • Color to RGBA
  • HSLA to Color
  • RGBA to Color
  • Color Transformer
  • HLSL Shader
  • Color
  • Material
  • Color Picker
  • Substance Material
DATA
  • Database
  • Excel
  • JSON
  • RSS Feed
  • Resource Linker
  • Text File
  • XML
E2E
  • E2E Axis
  • E2E Data
  • E2E Control
  • E2E Layer
  • E2E Provider
  • E2E Node Overview
GEOMETRY
  • Rectangle
  • Rounded Rectangle
  • Gradient Rectangle
  • Overlay Rectangle
  • Cube
  • Circle
  • Sphere
  • Cylinder
  • Cone
  • Torus
  • Chart
  • Random Points
  • Mesh Loader
  • Geometry Import (Live)
  • Volume
  • Get Bounding Box
  • Arrow
  • Particle System
  • Path Renderer
  • Geometry Renderer
INTERACTION
  • Interaction Rect
  • Touch Button
  • Touch Excluder
  • Touch Marker
  • Touch Paint
  • Touch Pattern
  • Touch Proxy
  • Touch Ripples
  • Touch Transformations
  • Web Browser
  • Touch Teleport
  • Touch Simulator
INPUT/OUTPUT (I/O)
  • GPI
  • Joystick
  • Keyboard
  • MIDI
  • Mouse
  • Network
  • Open Sound Control
  • Serial
  • Timecode
  • DMX
  • HTTP
  • RamDiskWriter
LAYER
  • 3D Layers
  • 3D Layer Reference
  • Composition Layer
  • 2D Layers
  • PSD Import Layer
  • E2E Layer
  • Mixer Layer
  • Others
LIGHT
  • Light Sources
LOGIC
  • Array Processing
  • Convert To Text
  • Cluster Synchronization
  • Counter
  • Data Portals
  • Date Time
  • Directory
  • Dispatcher
  • Enumeration
  • Expressions
  • Invert
  • Log
  • Loop Breaker
  • Math Effects
  • Matrix Operations
  • Scene Event
  • Script
  • String Operations
  • System ID
  • Render Setup Relation
  • Text Splitter
  • Timer
  • Toggle
  • Transition Info
  • URL
  • Value Switch
  • Value Buffer
  • Variables
  • Visual Indexer
PREVISUALIZATION
  • Introduction to Previs
  • Previs Screen
  • Previs Canvas
  • Compositon List
  • Rendersetup Objects
  • Composition Projector
  • Previs Screen Render Options
RENDER OPTIONS
  • Alpha Blending
  • Color Write
  • Alpha Testing
  • Clip Plane
  • Filter
  • Mask
  • Mirror
  • Effect
  • Render Cube Map
  • Draw Modes
  • Stencil
  • ZTesting
SOUND
  • Audio Clip
  • Sound
  • Volume Control
  • Audio Analysis
SLIDES
  • Slide Manager
  • Slide
  • Slide Port
  • Pivot
TEXT
  • Text Effects
  • Text Layouts
  • Text Rendering
TEXTURE
  • Background
  • Hatch
  • Image
  • Texture
  • SVG Loader
  • Gradient Texture
  • Live Video
  • Movie Stream
  • Movie Frame
  • Movie Clip
  • Texture Loader
  • Snapshot
  • Snapshot Framebuffer
  • Texture Saver
  • Video Source Selector
  • VIO Input
  • Spout Receiver
  • NDI Receiver
  • Substance Loader
  • QR Code
VR/AR
  • Tracked Devices
  • Draw Tracked Devices
WORLD
  • Axis
  • Billboard
  • GetWorld
  • SetWorld
  • Arrange
  • Ticker
  • Layout
  • Group
  • World Z Sort
  • YesNo
  • Switch
  • Spread
  • Filter Pass
  • Set Pass
  • Hierarchy Container
  • Scene Port
  • Content Container
  • Template Port
  • Container Info
  • Camera
  • Paths
  • Cloner

Advanced and Development

  • Advanced and Development Index
  • Command Line Options
  • Ventuz IP Ports
  • Ventuz Machine Service
  • TUIO
  • .NET Scripting
  • HLSL Shader Programming
  • Ventuz API and SDK
  • Ventuz Extension API
  • Ventuz VIO API
  • Ventuz File Format (VFF)
  • Ventuz Stream Out API
  • Lens Calibration File for FreeD
  • E2E Node Overview
  • Unreal Integration
  • Notch Integration
Remoting
  • Remoting Index
  • Remoting Overview
  • How To Control and Customize Ventuz
  • Remoting 4
  • Remoting 4 via Websockets
  • Remoting 4 via HTTP
  • Director Remoting
  • Deprecated Remoting

Misc

  • Presets
« Previous: How to Build a Template
» Index «
Next: How to Use the Color Difference Keyer »

How to Build a Custom Transition Scene

Table of Contents

  1. Introduction
  2. Setup a Scene
  3. Basic Idea
  4. Building Cross-Fade Transition
    1. Loading Content
    2. Animating the Cross-fade
  5. Saving for Use in Director
  6. Using Transition Scenes in Director
  7. Adding Transition
  8. Design Tips
  9. Troubleshooting

Introduction

With Scene Transitions (or Transition Scenes), Ventuz can seamlessly blend two Scenes or Templates. The Transition Scene holds the current on-air Scene, and the cued Scene in a Scene Port. Because of this, it is possible to blend the two Scenes together to enable Ventuz to make both Scenes visible at the same time.

To use Transitions, every Template in Director has a tab with Transition, to add a built-in Transition or custom Transitions. The Transition is always added to the cued Template and will be placed between the (default) Layout Scene and the Template Scene when cued. Because the Scene Transition holds both Scenes, the engine has to validate and render both. When both Templates are in the same Scene, the Scene is loaded twice to perform the Transition.

Please Note: during a transition, Ventuz will render both Scenes at the same time; Please ensure that all systems that will be using these transitions can handle the extra load of two scenes running simultaneously

The following HowTo is a guide to build a custom Transition Scene to blend or animate between two Scenes inside of Ventuz Director. For more details about Scene Transitions  click Here

The Transition Scene is placed between the Layout Port and the Scene when it's cued with a Template/Scene. When the animation or Transition is complete, the Transition Scene is released and only the active Scene is rendered in the Program Pipe. This enables Ventuz to blend or animate between these two Scenes in any way. As both Scenes are rendered in at the same time when a Transition Scene is cued, the machine needs to have enough resources for both. Keep this in mind when using performance-heavy Scenes and make sure to test.

While there are many built-in Transitions, it's also possible to create custom Transitions for your project. Here's how you create your own customized Transition:

Setup a Scene

In Ventuz Designer, there is a menu that has preset Scenes to make getting started easier:
 Click File -> New From Preset -> Scene Transistion.

In this preset Scene, you will see the base requirements for a Transition Scene:

  • 2 Scene Port Layers. The first to hold the Program Pipe content and the second for the Preview Pipe.
  • The Main Animation is in Template mode and has a Begin State connected to a Present State.
  • The Scene is saved with .trans at the end of the name. For example: CustomTransition.trans.vzs This naming scheme is mandatory for Ventuz to recognize the Scene as a Transition! Removing the .trans in the name will change the behavior of the Scene to a standard Scene.

By default, the Template Scene Transition uses the Mixer Layer which helps to blend between two Layers. This is a very useful tool for nice blends, but it is not mandatory for the custom Transition to work.

Basic Idea

For this HowTo we will create a simple cross-fade between the two Scenes. A cross-fade is one of the simplest Transitions and is also included in the internal default Transitions in the Director. It is an easy start to demonstrate the workflow of a custom Transition.

The Scene in the Preview Pipe (Scene Port To) should be increased in opacity over time and the Program Pipe (Scene Port A) decreased. The Begin State of our Animation should only show the first Scene Port (current Program Pipe) and the Present State should only show the second Scene Port (Preview Pipe). When the transition has completed, the Scene will automatically go to the Program Pipe and release the Preview Pipe for its next use.

Building Cross-Fade Transition

Loading Content

First, we need content in the Scene Port to Transition From and To:

  1. Navigate to the Scene Layer From in the Layer Editor, go to Scene, and  click the (...).
  2. Load your own image or select an image from the _HELP_ folder.
  3. Repeat the same for Scene Layer To, but with a different image.
    • Alternatively you can load any Ventuz Scene or a movie.

Animating the Cross-fade

Thanks to the Mixer Layer, the cross-fade between two Layers is very easy. The default setting of the Mixer Layer is to Mix between both ports with the input Property Progress.

Add the Progress input to the Main Animation and animate it:
(Note: When using the Template Transition Scene this step and the following animation is already done.)

  1.  Click on Progress and  click Animate.
  2. Switch to the Animate Tab in the top-right menu.
  3. Navigate to the State Logic tab of the Main Animation.

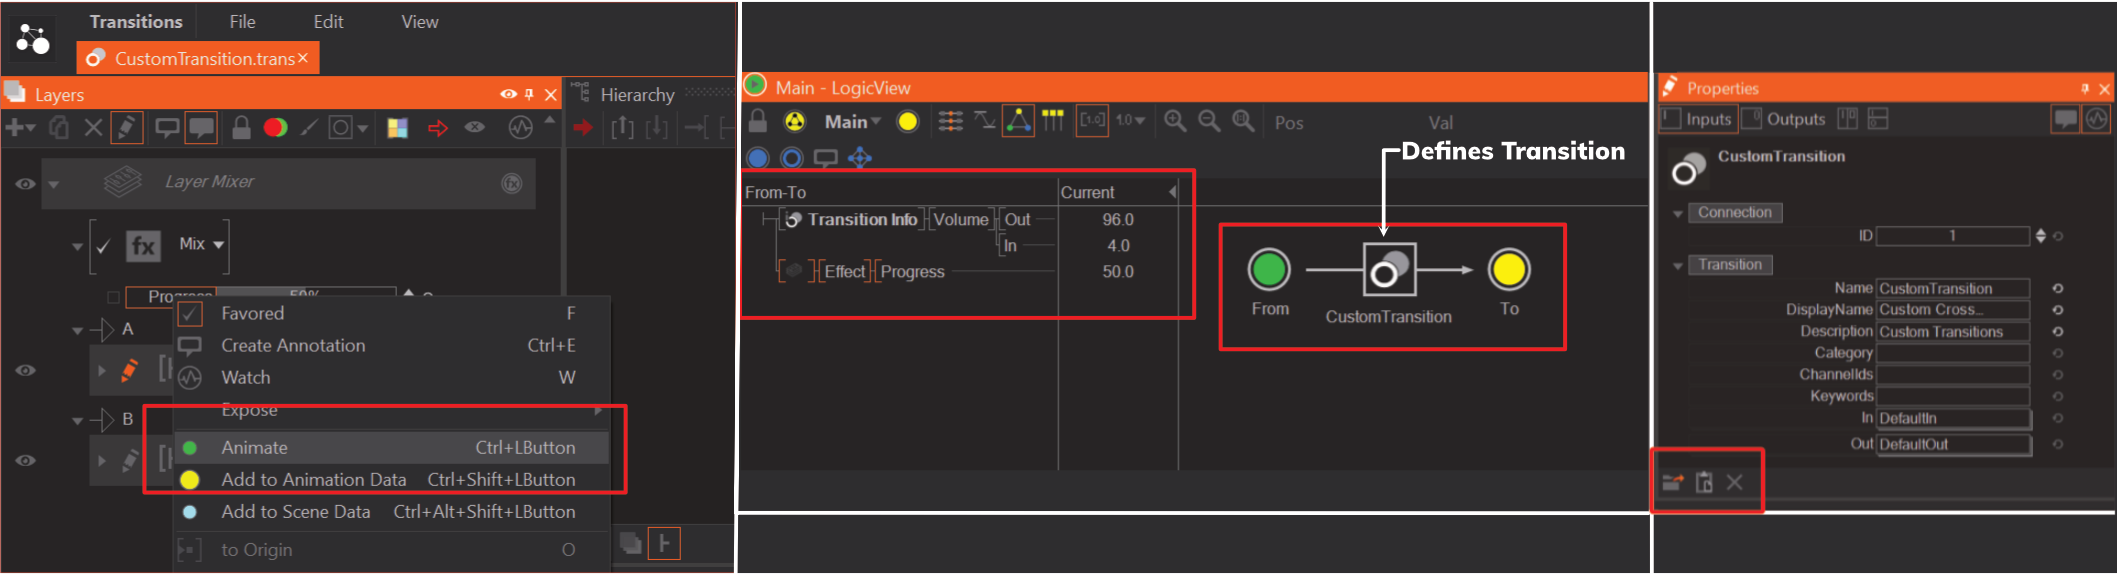
You will find a Begin and a Present State and a connection between these two. The drawn rectangle in the middle of the connection represents the data of the Transition.  click on the rectangle to edit the Transition name and the displayed name for the Director UI. You can also use a description and a category. Similar to the Templates, Thumbnails can be added at the bottom of the Property editor.

Since the connection between these two States represents our Transition, all our blending and animating has to be done here. We switch to the Timeline tab. (simply press T)

Note: It might be necessary to activate the Monitor Timeline and Value switch in the top-right corner of the Animation Editor, to see your timeline cursor moving.

There are already two channels in the Timeline. By default, these are bound to the Transition Info Node to control the audio level in the Scene Ports during the transition.

For the cross-fade, simply animate the Progress channel from 0 on From to 100 on To  click on the keyframe of From and set 0 and navigate with the timeline cursor to To and set 100.

In general, we always want From be solely visible on the beginning of the Transition and To solely at the end. This is necessary to have a issue-free Cue and Take process.

With space-bar you can trigger the playback of the timeline and see your animation. Alternatively you can move around with the cursor to manually watch the animation.

The general duration is defined by the length of the connection between the two States. Per default, it is set to 1 second. You will see To at the time marker of 1s or 10.0 (depending on your Timeline settings) To change the default duration, move the To (Present State). The timing also can be changed in the Director.

Okay our basic cross-fade animation is done now.

Saving for Use in Director

The Scene Ports must be empty before saving and switching to Director.

  1. Go to each Scene Port Layer and  click the small revert icon, next to the Scene Property.
  2. Save the Transition.
    • For example as: CustomTransition.trans.vzs. Don't forget the .trans in the name!
  3. Add the Scene to the Published Scenes now or do it in a moment when opening the Director.

Using Transition Scenes in Director

The work in Designer is done now, so we can switch to Director.

  1. Close the Ventuz Designer.
  2. Open Director.

To use a custom Transition the .tranz.vzs scene has to be part of the Project directory of the Director Show.

  1. Open the Director Show of the Project we just created, or create a new Show by  clicking on the plus-icon and select your Project or  click Browse to select your Ventuz Project manually.
  1. Ventuz will ask now for the Published Scenes if you havent done this step inside the Designer.
  2. Select the Scenes that contain Templates or Transitions to use for the Director Show.
    • For this HowTo, select the Templates or Scenes you want to use for testing the Transition and the Transition Scene itself, e.g.: CustomTransition.trans.vzs.

When Ventuz Runtime is up and running and your Configuration is setup correctly, you should see now two blank windows and be able to cue a Template by  double-clicking on the icon in the Templates window.

Adding Transition

To add a Transition from one Template to another:

  1. Cue a Template
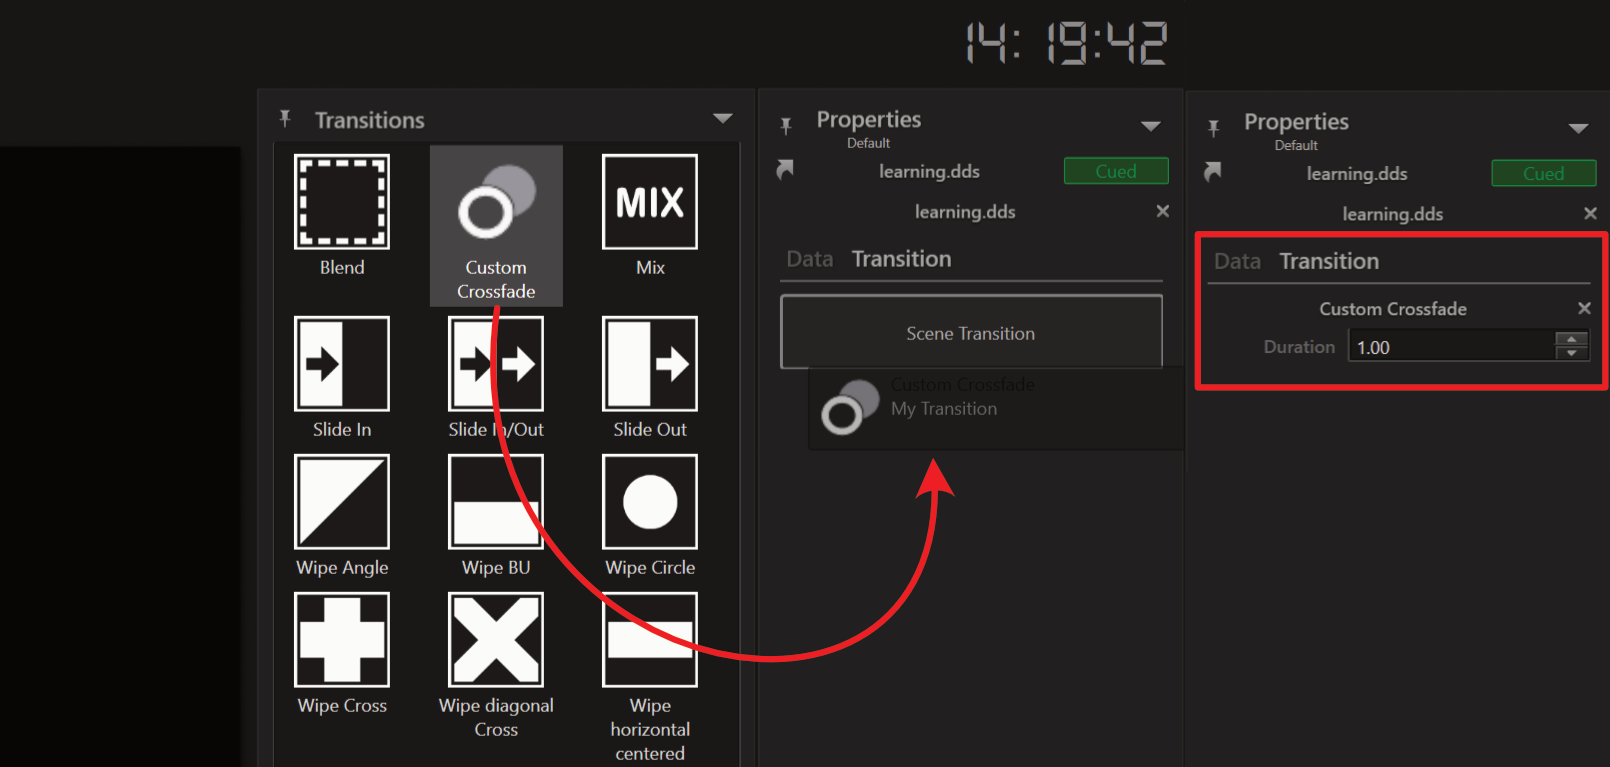
  2. Add your Transition from the Transition window to the Animation tab in the Properties window of the cued Template.

The Transition is always added to the cued item and defines how the Template comes in. So the Transition is always applied to the current content in the Program Pipe and the cued Template with the Transition.

The Duration property of the Transition overwrites the default timing. It simply stretches or squeezes the animation between the first and second State of your Transition. If you cue your Template or any item from the Asset Browser, like an image or video, and add your Custom Transition, you can see your Transition in action and have successfully built a custom Transition Scene!

Design Tips

Here are some design tips for building more complex Scenes:

  • Use the Transition Info Node to build custom logic and control for your Transition or your Templates.
  • Using the in-built Masks is a good way to blend between the Scene Layers. You can use a mask on the second Scene Layer which wont show the Layer at Begin State and reveal it to be fully shown at Present State.
  • You can create Masks also from the rendering of another Layer. A Particle System for instance, can be used as Mask for the Scene Layer. Simply switch the 3D Layer with your Particle System under Layout to Offscreen Render Target. The Layer has a Texture output, which is bindable to the Default Texture Property of a Mask.
  • Transitions can look different depending on the output's resolution. It is best to check your desired aspect ratio and also test other ratios if they may be used for production.
    • For very flexible Transitions, logic can help change the Transition depending on the outputs resolution. Check the Render Setup Relation Node to get the current information about your configuration.
  • Like a Template, you can use the Animation Data to control the Transition, when cued in Designer. Simply add a Property to the Data Channel of the Transition Animation. You can use it for text input, which should be custom for each Transition.
  • Depending on the the content of your Scenes and the design of the Transition, it might be necessary to have a background with a full alpha channel, for a visually appealing transition. You can simply add a black solid color background Layer. For more flexibility, bind the Blocked property to the Animation Data, and you can decide for each cue, if it should have a solid background.

Troubleshooting

If you're having difficulty cueing a template, here is a brief list to troubleshoot:

  1. Go to the Configuration Editor and change the Device Config to none. This will activate a default Configuration with two Offscreen outputs.
  2. In Director, go to Topology and check if the (local) Topology is activated.
  3. Check if the default Director window layout is activated: Under Window --> Window Layout and select unnamed

These steps should bring the Configuration to a default basic setup. In general, you can use the Transition Scenes with the same setups you are used to in Director.

See also:
  • Scene Transition
  • How To Build a Template
  • Data Portals
  • Transition Info Node
  • Main Animation
  • Scene Port Layers
  • Published Scenes
  • Mixer Layer
  • Render Setup Relation Node

« Previous: How to Build a Template
» Index «
Next: How to Use the Color Difference Keyer »
Copyright 2025 Ventuz Technology