Cloner
Table of Contents
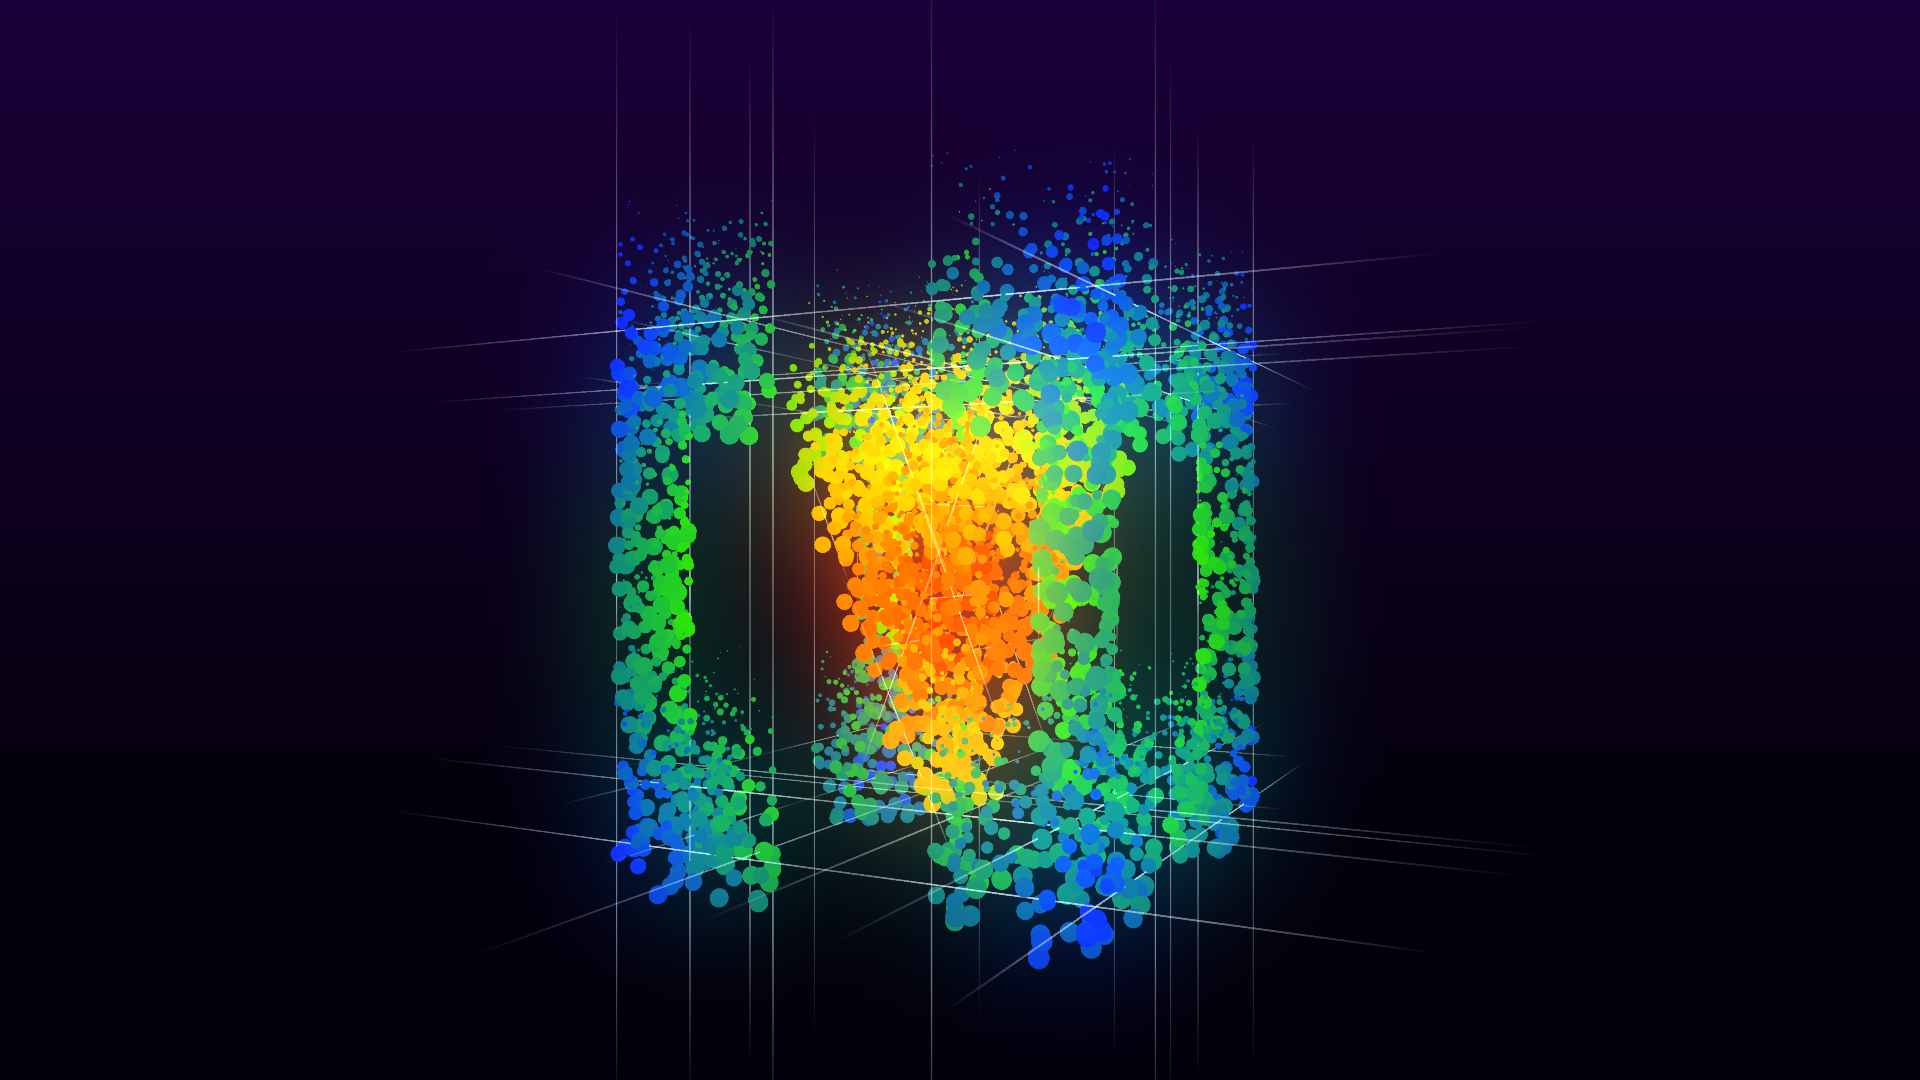
 | Cloner | The Cloner uses fast GPU instancing to create many copies of the hierarchy nodes to the right of it. These copies can be different in Scale, Rotation, Translation and Color. It is the much faster and more versatile successor of the Spreader node, and it is easier to use and more performant than the more powerful Particle System. |
Introduction
The Cloner Node allows you to create multiple copies (or instances) of objects with minimal impact on performance by using GPU instancing. This makes it easy to generate large numbers of objects efficiently, without slowing down your system. This is possible because the node uses fast instancing to create many copies of the hierarchy nodes to the right of it. By using different modes combined with modifiers inside of the Cloner Node, one can easily create unique animations and visualizations.
Cloner vs. Spreader vs. Particle System
So when should I use the Spreader, Cloner or Particle System?
- Simply put, from now on do not use the Spreader Node. The Cloner Node is much faster, more performant, has more options and is more versatile than the Spreader Node.
- The properties of the Spreader are different than those of the new Cloner, so an automatic conversion from older projects is not possible.
- Like the Spreader Node, it is possible to "stack" the Cloner Node. For example, if you have 1 Cloner Node creating 5 instances, and you put it inside of a parent Cloner Node that's creating 3 instances, you'll have a total of 15 instances (5 x 3 = 15)
- Spreader and Cloner duplicate anything right to them in the tree except for the Particle System.
- The Cloner is intentionally designed to be much simpler to use than the particle system, but that makes it less powerful. Unlike the Spreader it has some modularity.
You can not use the Cloner on a Particle System as they both use the same mechanism to duplicate objects.
Performance
- The Cloner uses the same instancing mechanism as the particle system to draw the geometry, but does the calculation for the instance locations and colors on CPU, as such, it is slower than the Particle System. It is still fast enough on the CPU for up to 100,000 instances. Generally speaking, drawing on the GPU will be the bottleneck, and that process is as fast as the Particle System.
- The Particle System does everything from calculations to instancing on the GPU, so it is the fastest option.
- The Spreader is very old and has not been updated in a long time, so it does not utilize the available engine technology and is very slow.
Anatomy of the Cloner
First, you have to create locations where objects are cloned. The Spread property group (minimized by default) gives you choices on placement.
Spread
From the Spread dropdown menu:
| Spread | Function |
|---|---|
| Applies "scale - rotate - translate" over and over to the location. Each new location has the full transformation applied. When scaling by 2.0 over 4 instances, the instances will be scaled by 1, 2, 4, 8. | |
| Spreads the "scale - rotate - translate" over the instances. The final instance will have the full effect - once. When scaling by 2.0 over 4 instances, the instances will be scaled by 1.0, 1.33, 1.66. 2.0. | |
| Tries to imitate the old spreader, similar to ScaleRotateTranslate Spiral. | |
| Place locations in a 3D grid. In the past, one would need 3 Spreader Nodes for this effect. | |
| Place locations inside a sphere. | |
| Take locations from an array of matrices. | |
| Take locations from the vertices of a mesh. | |
| Place locations randomly on the surface of a mesh. |
More information about "Spread" can be found below.
Misc Properties:
All spread options share these properties:
| Property | Default | Function |
|---|---|---|
| MaxClones | 10000 | Limit the number of instances. The purpose of this property is to prevent low performance or crashes when playing around with properties accidentally creates a very large number of instances. If you stack multiple cloners, this will be applied to the total number of instances multiplied from all cloners. |
| Touch | false | When True, this allows all instances to react to mouse and touch input. This reduces performance depending on the number of instances. Note - it is not possible to distinguish between each instance in a Cloner Node. |
| BoundingBoxes | ShadowOnly | Bounding boxes are used skip unneccessary calculations for objects that are not visible. This is required for shadows on directional lights. If there are multiple cloners, the right-most wins. Off : no bounding box calculations, cloners might not cast shadows for directional lights. ShadowOnly : bounding boxes are only used for calculations required for directional shadow maps. On : full bounding box calculations. This may improve or hurt performance, see below about details. With large instance counts, these calculations cost more on the CPU than they could save. See below for more information about performance. |
| Mix | Off | These modes only function if you have more then one node as a direct child of the cloner. Off : Use all child nodes for all instances. Regular : Use one child for each instance, repeating in the order they appear in the hierarchy. Random : Randomly choose one of the children. |
| MixRandomSeed | 0 | With Mix Random, a random seed to scramble the selection. |
| MixProbabilities | 1 | With Mix Random, bend the probability. At 1.0, the probabilities of all children are the same. With larger numbers, the earlier children become more likely, with smaller number, the later children become less likely. |
Modifiers
To add some variability and flexibility, Modifiers can change the locations, rotation, size and color based on many factors.
The following Modifiers can be added:
| Modifier | Allowed Shapes | Function |
|---|---|---|
| Standard | Applies a color gradient. | |
| Standard | Fades in or out by scaling to 0 or alpha channel. | |
| Standard+All | Applies a random translation. | |
| None | Applies a random translation controlled by a smooth noise function. | |
| None | Applies the color of an image to the instances. |
A detailed description of all options and their properties follows below.
When using Modifiers that support Shapes, the following options are available: Internally, a Shape creates a number from 0 to 100% that is used by the Modifier.
| Shape | Function |
|---|---|
| All | Always 100%. Only available for Modifier Random Pos |
| Range | Internal number of the spread |
| Sphere | Inside a sphere. Is 100% at the center, 0% at the surface and outside. |
| Box | Inside a box. Is 100% at the center, 0% at the surface and outside. |
| Distance to Plane | Defines two parallel planes, and the number goes from 0% to 100% between the planes. |
| Noise | Create a smooth random value from 0% to 100%. |
| Image | Takes red, green, blue, alpha or gray from an image mapped to 3D space to get a value from 0% to 100%. |
| List (advanced) | Merge multiple shapes. |
More information about modifiers can be found below.
Spread Modules
Spread defines the locations for the cloned instances.
ScaleRotateTranslate Sprial and Linear
These nodes are similar and share most properties.
The Spiral variant applies full Scale - Rotate - Translate repeatedly to create new locations.
The Linear variant applies the specified Scale - Rotate - Translate to the last instance. Then 0% to 100% of the Scale - Rotate - Translate are used for each instance.
| Property | Default | Function |
|---|---|---|
| Count | 5 | Number of instances to create. |
| Mirror | Off | Mirror instances. The count includes the mirrored instances, when the count is even there is no first instance at the start, just instances left and right from the start at half the distance. Off : No mirroring. Mirror : Apply "reverse translate - reverse rotate - reverse scale" for the mirrored objects. MirrorReverse : Apply reverse translate, but same rotate and scale for the mirrored objects. See below for image |
| First | true | Draw the first instance. When using Mirror and the count is even, this has no effect as the first element is not visible. Otherwise, one less instance is created than count indicates, so with Count = 5 and First = false, only 4 instances are created. |
| Scale | 1 | Scale. |
| Rotate | 0 | Rotate, full circle is 360. |
| RotateOrder | XYZ | Order in which the axis are applied to rotation. |
| Translate | 0 | Translate |
| Spiral only | ||
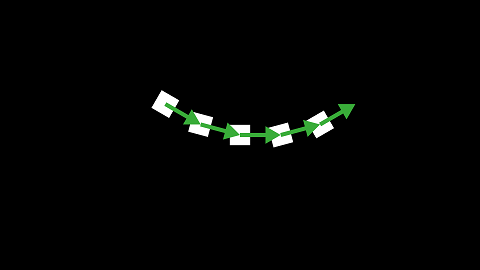
| Symmetrical | true | When using Mirror, the result does not appear symmetrical, because applying "scale - rotate - translate" is inherently asymmetrical. In Symmetrical mode, "half translate - scale - rotate - half translate" is applied, which is more symmetrical. See below for images. |
| Linear only | ||
| LinearScale | true | While translation and rotation are always linear, scaling can be interpolated linear or exponentially. |
| PtrTranslate | 0 | Additional translation before scale and rotate. |
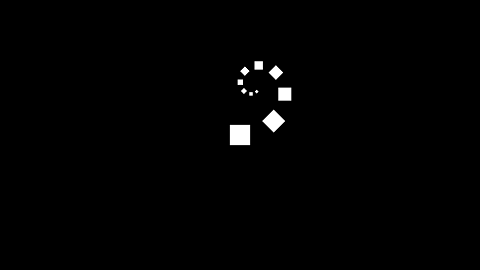
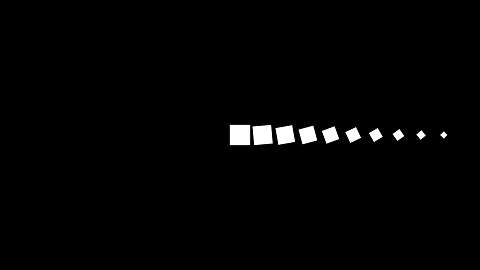
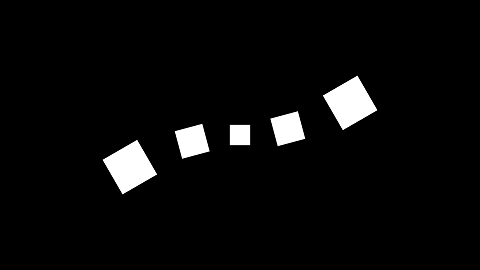
Spiral and Linear variant. Scale, Rotate and Translate are set differently:
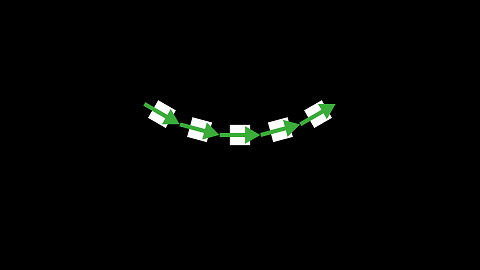
Mirror normal and reverse:
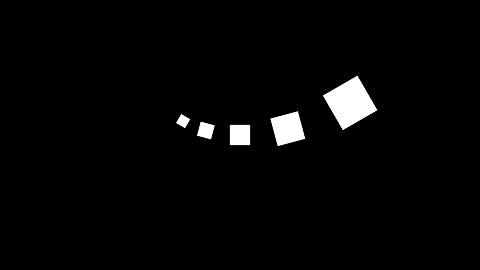
Mirror symmetrical (default) and not symmetrical:
Legacy
A version of the ScaleRotateTranslate spread mode that behaves more like the Spreader - to ease porting to the Cloner if you need to take advantage of the performance enhancements of the Cloner Node. See above for an explanation of the parameters.
Grid
Create a 3D grid of instances
| Property | Default | Function |
|---|---|---|
| Packing | Cube | use either Cube or Sphere packing, see below for explanation. |
| Count | 5 | Number of instances in each dimension |
| Scale | 1 | Distance between instances, in each dimension |
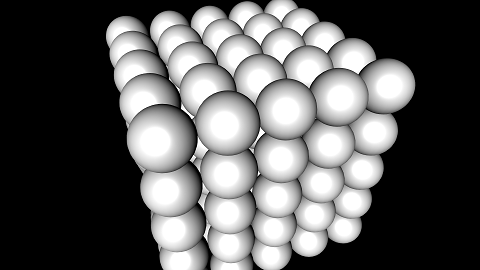
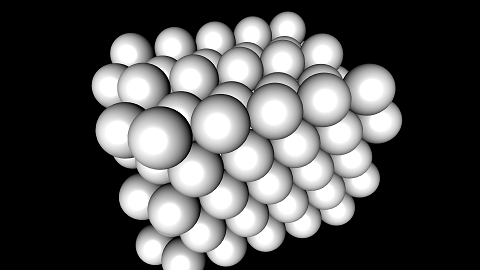
Cube Packing and Sphere Packing:
- Cube Packing: each instance is aligned equally by the top corner of its bounds.
- Sphere Packing: instances are placed like a stack of cannonballs by the center of each instance:
| Cube Packing | Sphere Packing |
 | 
|
Sphere
Similar to the grid, it creates instances within a certain radius.
| Property | Default | Function |
|---|---|---|
| Packing | Cube | use either Cube or Sphere packing, see above for explanation. |
| Distance | 1 | Distance between instances within the radius |
| Radius | 1 | Size of the sphere |
| Hole | 1 | Size of an inner sphere in which no instances are generated. Allows to create shells or bubbles. |
Data Array
Binds data arrays for location and color of the instances.
| Property | Default | Function |
|---|---|---|
| Matrix | none | Array of matrices. This is mandatory and the number of matrices determines the number of instances. |
| Color | none | Array of colors. This is optional, if less colors are provided than matrices, the remaining instances are white. Excess is allowed and ignored. |
Mesh Vertex / Surface
Allows to place instances at the mesh vertices or randomly on the surface. Both allow for animated meshes.
The Surface variant will evenly distribute instances on the surface, independent of triangulation. Larger triangles will get more instances than smaller triangles. This is a non-trivial calculation so this mode can be slow whenever properties change.
| Property | Default | Function |
|---|---|---|
| Mesh | Cube | Mesh to use. |
| Transform | none | Allows to transform the mesh (scale / rotate / translate). |
| Subset | -1 (all) | Subset of the mesh to use. |
| Frame | 0 | Frame of the mesh to use. |
| Orientation | false | Get orientation for the instance from mesh normal and tangent. |
| Surface only | ||
| Count | 100 | Number of instances to place. |
| RandomSeed | 0 | Randomize locations. |
| MinDistance | 0 | After creating the locations as specified with Count, remove all locations that are nearer to another location than the minimum distance. This can be slow for large numbers of particle system when any of the properties change. |
Note that the "can be slow" warnings only apply when properties change or the mesh is animated. When creating a spreader that is not animated, it only needs to be processed one time, when it is initially loaded. After it is loaded, it is not as expensive on the system if the parameters don't change and the mesh isn't animated.
Changing the parameters or animating the mesh every frame can cause performance issues and should be extensively tested.
List
Merge multiple spreads.
This is an advanced option. Consider using the more powerful Particle system.
| Property | Default | Function |
|---|---|---|
| Spreads | Empty | A list of spreads. If empty, a single instance in generated. |
| MergeMode | Multiply | Multiply: each instance of the second spread creates a full copy of the first spread, and so on. The spreads are placed on top of each other. You may miss a transform here, in this case use the particle system. |
If you need to mix different MergeModes, you can build trees by nesting List shapes into each other.
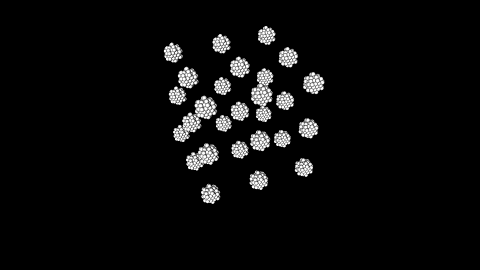
This shows a Grid and a Sphere spread, multiplied and added. For both MergeModes, the order does not matter.

Shapes
Shapes are used to define the area of effect of a modifier. For each instance, a value from 0% to 100% is calculated.
Most shapes derive their value from the instance position, for instance, distance to a point (sphere). The position used is only effected by the spreader mode (grid, SRT, ...) and previous modifiers. It is not effected by axis or other cloners before and after the cloner in the hierarchy.
Many shapes have the following properties:
| Property | Default | Function |
|---|---|---|
| Reverse | false | reverse the 0..100% range. |
| Function | none | Add an function to the result. Options are Ease In, Ease Out and Ease In and Out. |
| FunctionParameter | 2.0 | Steepness of the ease in / out. 2.0 is a reasonable value, larger values exaggerate the effect, 1.0 means no effect. |
The Ease Out function is y = pow(x, FunctionParameter);, the other ease functions are constructed similarily.
Note that many shapes come with visualizations that make it much simpler to tweak properties:

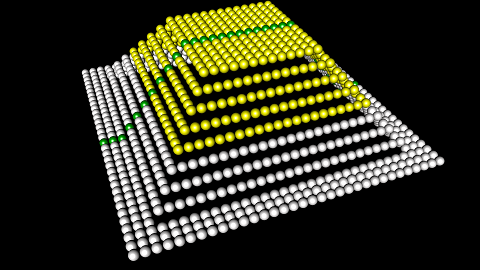
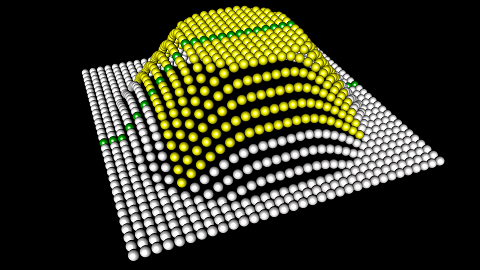
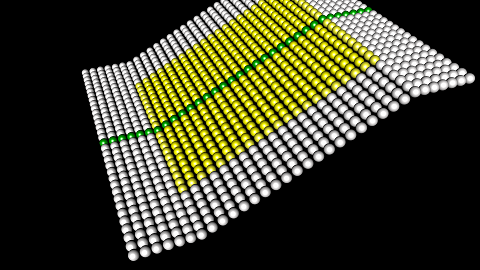
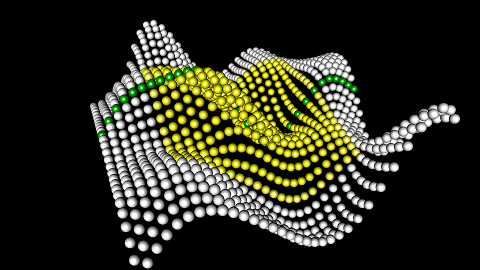
We use this grid to demonstrate the effect of the shapes:
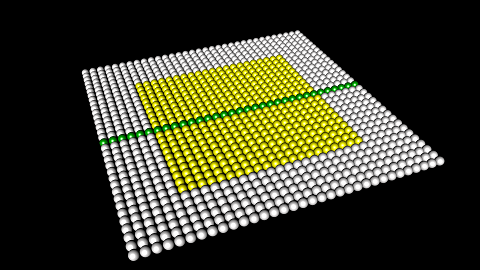
The yellow square goes from -5 to 5 in x and z direction, the z=0 plane is highlighted green. The spheres will be moved upwards by 5 for 100% of the shape.
All
Set the value to 100%. This is only available for the Random Pos modifier.
There are no parameters.
Range
The instances have an internal order, this shape makes the value ramp up depending on this order. This is especially useful for the ScaleRotateTransform, Legacy, and Data Array spreads.
There are no parameters.
Sphere
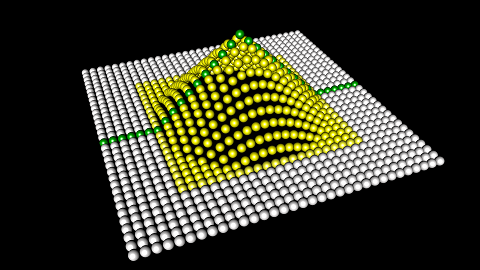
100% at the center of the sphere, smoothly going to 0% at the surface and outside.
| Property | Default | Function |
|---|---|---|
| Center | 0 | Center of the sphere. |
| SizeAll | 5 | Radius of the sphere. |
This is the default sphere shape with a radius of 5.0:
Box
100% inside the box, 0% outside the box, and locations close to the surface inside the SmoothRange ramp from 100% to 0% as they go from inside to outside.
| Property | Default | Function |
|---|---|---|
| Size | 1 | Size of the box. This is like diameter, not radius. |
| Rotate | 0 | Rotation of the box. |
| Center | 0 | Center of the box. |
| RotateOrder | XYZ | Order in which the axis are applied to rotation. |
| SmoothMode | Sharp | Sharp calculates the distance to the surface using a max metric, creating sharp edges. Smooth uses an Euclidean matric, creating round borders. |
| SmoothRange | 1 | The range in which locations that are near to the surface ramp. It specifies the distance from 0% to 100% (like a diameter), not the distance from the middle to the edges (not like a radius). |
Note that the smooth effect is applied in all three dimensions. When applying a box to a plane, like in the examples, it is best to make the unused axis very large, otherwise the results can be confusing where the unused axis is near the plane.
With a Size of 10 and a SmoothRange of 0, the box starts at -5 and ends at 5. With a SmoothRange of 4, the box starts fading in at -7 and ends fading in at -3, then starts fading out at 3 and ends fading out at 7.
This is a 10x10x10 cube with 4 SmoothRange in Sharp and Round mode, same as the numbers used in the example above:
Distance to Plane
Defines two parallel planes, with values going from 0% to 100% between the planes.
| Property | Default | Function |
|---|---|---|
| Center | 0 | Center point between two planes. |
| Elevation | 0 | Rotation of the planes up and down, like the slope of a cannon. |
| Azimut | 0 | Rotation of the planes, like the direction of a cannon. |
| SizeAll | 5 | Distance from the center to the planes. |
The visualizations are especially important for this shape.
This is the default plane with a SizeAll of 5, Rotated by 90 degrees to face the camera:
Noise
This node creates a smooth random value based on the position. The noise field can be moved with Scale - Rotate - Translate.
| Property | Default | Function |
|---|---|---|
| RandomSeed | 0 | Random seed. |
| Phase | 0 | Animates the noise. |
| Scale | 1 | Scale the noise-field. |
| Rotate | 0 | Rotate the noise-field. |
| RotateOrder | XYZ | Order in which the axis are applied to rotation. |
| Translate | 0 | Translate the noise-field. |
Image
Project an image file in the x-y plane of the world. The image can be transformed in any position.
The pixels of the image are converted into a 0% to 100% value. So this can not be used to transfer the color of the image, there is a modifier for that (see below).
The idea of this node is to animate the transformation on the image and use specially prepared grayscale images to animate locations along those transformations.
The image can not be any Ventuz texture. Textures exist in GPU memory, and the Cloner works on the CPU. You can not bind a texture property, you can not use a movie or rendertarget. Getting data from the GPU to the CPU, while possible, would result in performance issues, defeating the purpose of the cloner. If you need to use textures as a source like this, use the Particle System. Because the Particle System runs on GPU, has no problem accessing even dynamic (moving) textures.
The image property can not be bound to a resource. If two Image shapes or two Image modifiers use the same texture, it will only be loaded once.
| Property | Default | Function |
|---|---|---|
| ImageFile | checker | specify image file to load. |
| ImageChannel | Gray | Image channel to use. Gray mixes RGB by the BT709 factors. |
| ImageAddressing | Wrap | For pixels outside the image Wrap, Clamp or use BorderBlack or BorderWhite. |
| ImageGamma | sRGB | For translating pixel values to a 0% to 100% range, apply either an sRGB curve or apply no curve when setting this to linear. |
| ImageCenter | true | If true, the image will be centered. Otherwise, the center of the image before the scale-rotate-translate transformation is the upper left corner. |
| Scale | 1 | Scale the image. |
| Rotate | 0 | Rotate the image. |
| RotateOrder | XYZ | Order in which the axis are applied to rotation. |
| Translate | 0 | Translate the image. |
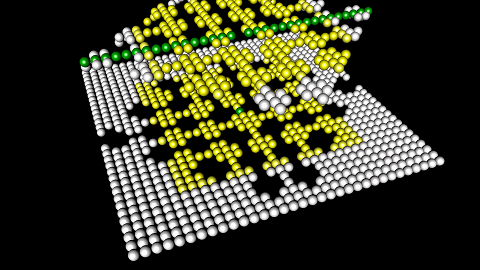
The famous checkerboard texture used as shape. Rotated 90 degrees in X so it's in the X-Z plane, then rotated 45 degrees in Y just for fun. Using BorderBlack:
List
Merge multiple shapes. Be warned, this is an advanced option, consider using the more powerful particle system.
| Property | Default | Function |
|---|---|---|
| Shapes | Empty | A list of shapes. If empty, the shape is all 100%. |
| MergeMode | Multiply | Multiply: a * b. Add: a + b. Results larger than 100% are clamped to 100%. AddSmooth: (a+b) - (a*b). Not that this option is order dependent. |
If you need to mix different MergeModes, you can build trees by nesting List shapes into each other.
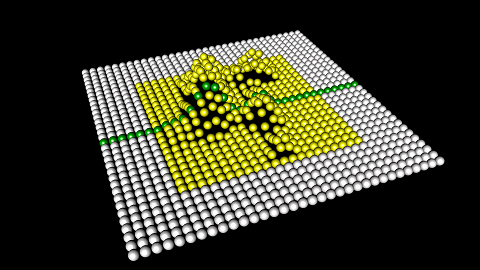
A Noise shape multiplied with a Sphere shape, to mask the noise:
Modifiers
The modifiers use a Shape to modify either location or color of an instance.
The test images here use a grid with a sphere shape that fills almost the whole grid.
The modifiers Color Gradient and Fade need a shape to specify how the modifier is applied. Random Pos May have a shape, but the shape can be set to All as this effect is so complex it can be reasonably used without a shape.
Noise and Image are versions of the shapes with the same name, where multiple channels are applied at the same time. For instance, an image shape can only use one color channel at the time, while the image modifier can use RGBA at once. The shape noise creates only one channel of noise, while the noise modifier creates different noises for all axes of scale, rotate and translate individually. The modifiers have no additional shape property.
Color Gradient
Applies a gradient depending on the range to the color.
| Property | Default | Function |
|---|---|---|
| Shape | Range | Shape to use |
| Gradient | White to Black | Gradient to use |
| BlendMode | Mul | Overwrite : overwrite color and alpha. Mul : Multiply color and alpha. Blend : Use gradient alpha to blend between old color and gradient color. |
The color operation is done with non-premultiplied colors. The blend function takes this into account.
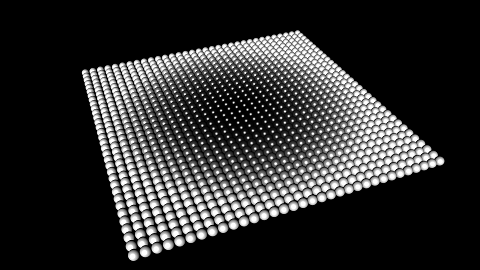
Default gradient applied to the test grid:
Random Pos
Specify a transformation with Scale - Rotate - Translate. This is then applied according to two things : When Randomize is used, the transform is randomized differently in all axes. This is faded in with the shape, and there is no effect outside the shape. Without Randomize, the full transform is applied depending on the shape.
The randomization can be in one direction (biased) or in both directions (centered), with more complex options available for scale and transform.
| Property | Default | Function |
|---|---|---|
| Shape | Range | Shape to use |
| ScaleMode | Biased | Biased : values >0 will scale up, values <0 will scale down, according to shape. If random is used, that is multiplied to the amount, and all instances are scaled in the same direction. When scaling up, a value of 2 will scale up by 200%, making the largest possible size 3 times the original. When scaling down, a value of 1 will scale down by 100%, making the smallest possible size 0. If calculations result in negative numbers, the size will be clamped to zero, the instance will not be inverted. Centered : Same as Biased, but the random will go in both directions, with negative values flipping which instances are randomly scaled up or down. Logarithmic The scaling is applied logarithmically, randomly in both directions like with Centered. A value of 1 will double the size, 2 will quadruple the size, while -1 will half the size. This is more symmetrical than the linear/biased behavior. |
| Scale | 1 | Scale of the transform, depending on ScaleMode |
| RotateMode | Biased | Biased : rotate all in one direction, according to shape. If random is used, that is multiplied to the mount, and all instances are rotated in the same direction. Centered : Same as Biased, but the random will go in both directions. |
| Rotate | 0 | Rotation of the transform in degrees. |
| RotateOrder | XYZ | Order in which the axis are applied to rotation. |
| Align | Centered | Alignment for the translation. |
| Translate | 0 | Translation of the transform. |
| Randomize | 0 | At 0, the transformation is not randomized. At 1, the transformation is fully randomized, with each property using a different random value |
| RandomSeed | 0 | Random seed to scramble random numbers |
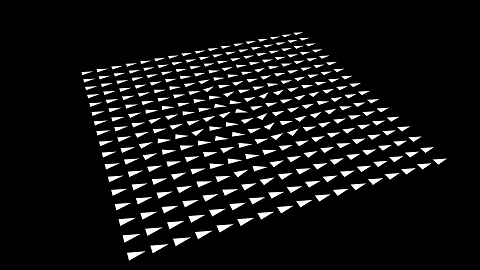
Rotation by 90 degrees with no random, with biased random (all are rotated in the same direction, at a maximum by 90 degrees) and centered random (randomly rotated in both directions, 45 degrees left or right). The shape is the same sphere as with the gradient example:


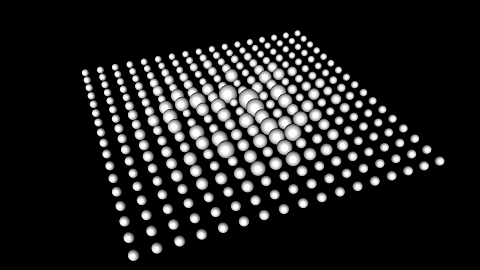
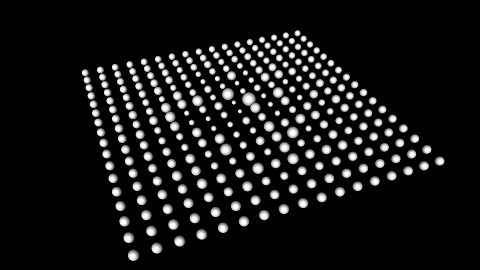
Scaling is more complex, as there is also the logarithmic mode. We scale by 2. With biased random, a scale of 200% is at max a factor of 3. With centered random, instances are scaled up by 100% which is a factor of 2 or scaled down by 100% towards 0. The logarithmic scaling will at max quadruple and at minimum quarter the size. We still apply the sphere shape:

Fade
| Property | Default | Function |
|---|---|---|
| Shape | Range | Shape to use. |
| Target | Alpha | Scale or Alpha. |
| Softness | 20% | how many instances are partially visible during fading. |
| Animate | 50% | Animate this from 0% to 100% to fade in instances |
Using Scale target and 20% softness, Animate is set to 10%, 50% and 90%:
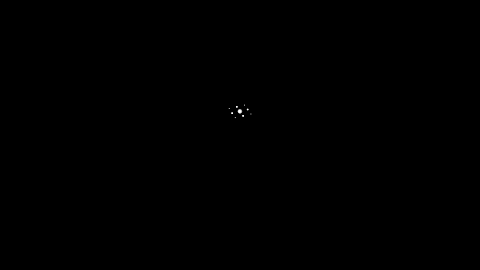
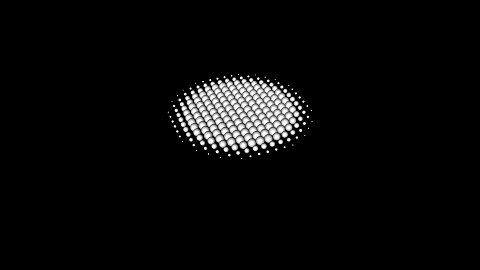
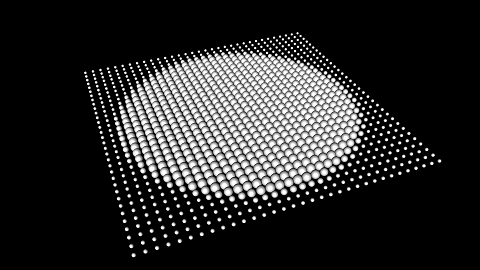
The instances inside the shape, with a value of 100%, fade in first, the instances outside the shape, with a value of 0% fade in last. That is why with 20% softness and 90% amount, all the instances outside the circle are partially faded in.
Noise
This modifier is a combination of the Random Pos modifier that has Randomize set to 0 with a distinct Noise shape for each Scale - Rotate - Translate axis. To get the same effect using Noise shapes and Random Pos, one would need up to 10 modifiers.
As this is a combination of the two, it has the properties of both nodes, including two sets of Scale - Rotate - Translate properties.
The first Scale - Rotate - Translate defines a transformation to be applied to the instances, This works like the properties of the Random Pos.
The second set transforms the noise function that modules the first transform, this works like the properties in the noise shape.
| Property | Default | Function |
|---|---|---|
| ScaleMode | Biased | See Random Pos modifier. |
| Scale | 0 | Instance scale. |
| RotateMode | Biased | See Random Pos modifier. |
| Rotate | 0 | Instance rotate. |
| RotateOrder | XYZ | Order in which the axis are applied to rotation. |
| Align | Center | See Random Pos modifier |
| Translate | 0 | Instance translate. |
| NoiseRandomSeed | 0 | Random seed. |
| NoisePhase | 0 | Animates the noise. |
| NoiseScale | 1 | Scale the noise-field. |
| NoiseRotate | 0 | Rotate the noise-field. |
| NoiseRotateOrder | XYZ | Order in which the axis are applied to rotation. |
| NoiseTranslate | 0 | Translate the noise-field. |
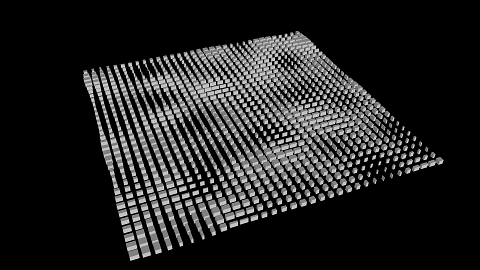
Apply different noise function for scale in x and z:
Image
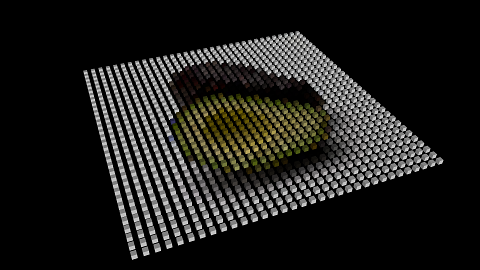
Applies an image to the color of the instances. This is similar to the image shape, but to apply red green blue and alpha one would need four gradient modifiers with image shape, so this is much easier to use.
| Property | Default | Function |
|---|---|---|
| ImageFile | checker | specify image file to load. |
| ImageAddressing | Wrap | For pixels outside the image Wrap, Clamp or use BorderBlack or BorderWhite. |
| ImageCenter | true | If true, the image will be centered. Otherwise, the center of the image before the scale-rotate-translate transformation is the upper left corner. |
| Scale | 1 | Scale the image. |
| Rotate | 0 | Rotate the image. |
| RotateOrder | XYZ | Order in which the axis are applied to rotation. |
| Translate | 0 | Translate the image. |
Cloner Performance
Compared to the old Spreader Node, the Cloner Node performance is very good. Compared to the Particle System, it's not as good. In general, the performance of the Cloner Node should not be a concern if you are using less than 1000 instances.
The cloner works by creating a list of instances (matrices + color) on the CPU, and passing this list along the hierarchy tree. Everything that is placed right of the cloner in the hierarchy has this list of matrices applied to it, just like a texture or a color node would be applied. When two or more cloners are found, the instances get "multiplied". All of this work is done on the CPU. For drawing each instance, the GPU applies the list of instances, which has no measurable cost on the CPU side. Due to the way most modern GPUs work, meshes smaller than a hundred vertices may not fully utilize the GPUs resources, but apart from that GPU speed is what you would expect from drawing a single mesh with all the instances combined.
Per instance CPU performance costs arise at the following places:
- Generating the locations of the instances, executing the code for Spread, Modifier and Shape options.
- Multiplying multiple cloners in the hierarchy.
- Calculating bounding boxes, if needed.
When the properties of a cloner change, that cloner needs to recalculate the locations of all instances. This also means the hierarchy and the bounding boxes need to be recalculated, but the locations of multiple cloners are independent of each others, even if they need to be multiplied later on.
Calculations in the hierarchy are more complicated:

The list of matrices created by the CPU contains the Pre and Mid axis and the two cloners. The post matrices are multiplied in the shader, so the same list of matrices can be used for all geometries. The bounding box calculation is unique for both geometries, so if bounding boxes are needed, that work is done twice.
This also means that any change to the pre or mid axis will need the hierarchy and bounding box calculations to be redone. Only the locations depending on the cloner properties will not need to be updated.
Changing an axis before the cloner can be expensive depending on the total number of instance.
As per-instance bounding box calculations are expensive on the CPU and they save little time on the GPU, they are disabled for cloners. In any case, bounding boxes are only used when the 3D layer node enables them. But when using directional shadows, bounding boxes are required for calculating the shadow volume, so that is currently the only situation where they are used.
Performance Statistics
Understanding is good - measurement is better.
The Advanced GPU Information of the performance statistics gives you some hard data about how many calculations are done.
In this example, two cloners with 10 instances each are put next to each other, with two geometries, like in the example above. There is a directional light with percentage closer shadow maps. The scene is rigged so that everything is animated and needs to be re-calculated each frame:
Bounding Boxes
Bounding boxes are used for two things in the Ventuz engine:
- For directional shadows, calculating how far the shadow map has to be stretched to cover all shadow casters.
- If the 3D engine node has culling enabled, a simple test of the bounding box against the camera frustum can be used to skip the complicated setup for drawing the geometry.
With cloner instances, things change. The bounding boxes of all instances need to be combined into a larger bounding box, at per-instance costs, while the CPU cost for drawing all instances is the same as for drawing non-instanced geometry. With large instance counts, the cost can be quite high for little potential gains.
Note that this test will either prevent all instances from drawing or cause all instances to be drawn, while the test is individual, the decision is for all. So if instances are placed all around, there will rarely be any savings.
The calculation for the bounding box test has to be re-done if any of the axis change, even the post-axis, or the cloners themselves change. They do not need to be re-done when the camera moves. So for static geometry, there is no per frame cost for the bounding boxes.
The default option of using bounding boxes for directional shadows only will be the best in most cases.

- Node 20 : Inside the nodes, 10+10 instances are calculated separately. This number does not change if you add more modifiers or use the list spreads / shapes, although the actual processing cost will go up.
- Hierarchy 110 : The first cloner causes 10 matrix multiplications in the hierarchy. The second one causes 10*10, for a total of 110 calculations.
- Bounding Boxes 200 : Because of the shadow bounding boxes must be calculated. Since there are two geometries with potentially different bounding boxes, this totals to 10*10*2 calculations.
- Drawn 400 : We have 100 instances, two geometry, and since we are doing a directional shadow, we draw everything twice, once for the shadowmap and once for the main screen. Thats 10*10*2*2 instances drawn by the GPU.
The calculations in the node can be quite complex, depending on the number and complexity of modules, so it is good that these calculations are done separately and don't multiply. The hierarchy and bounding box calculations are done in highly optimized loops, so the fact that costs multiply isn't too bad.