Navigation

Ventuz Introduction

  • Introduction
  • Getting Started
  • Ventuz Editions
  • Ventuz Products
  • Realtime Rendering
  • Frequently Asked Questions
  • Common Mistakes
  • Deploying a Ventuz Presentation
  • Scene Performance and Tweaks

Quick Guides

  • Quick Guide Index
  • Business Logic
  • 3D Art
  • 2D Art
  • Programming
  • System Engineer

General

  • Index
  • What's New
  • Ventuz System Requirements
  • Configuration Editor
  • Device Configuration
  • Machine Configuration
  • Render Setup Editor
  • Introduction to Compositions, Screens and Outputs
  • Explanation of Compositions, Screens and Outputs
  • Live Runtime Control
  • Project and Show Management
  • Web Configuration Editor
  • Communication Protocol Overview
  • GPI Configuration for Runtime or Director
  • Introduction to the Ventuz Video Engine
  • Supported Formats
  • Supported Hardware
  • Color Management and HDR Workflow
  • Multisampling / Anti-Aliasing
  • Input Subsystem
  • Ventuz Proprietary Files
  • Migrating Configs & Content to Ventuz 8
  • Migrating Content to Ventuz 7
  • Migrating Content to Ventuz 6
  • Migrating Content to Ventuz 5
  • Summary Shortcuts
  • Terminology
  • Manual Index

Ventuz Designer

  • Designer Indices
Introduction
  • Designer Introduction Index
  • Designer Overview
  • Realtime Rendering
  • Project Browser
  • Designer Interface
  • Designer Options
  • Working with Nodes
  • Hierarchy and Content Editors
  • 2D Workflow
  • 3D Workflow
  • PBR Workflow
  • Animation Workflow
  • Best Practices
  • Reading Data in Ventuz
  • Display Images and Movies
  • Scene Performance and Tweaks
  • Deploying a Ventuz Presentation
  • Render to Disk
  • Multi Screen and Output Setup
  • Explanation of Compositions, Screens and Outputs
  • Workflow of using Multi Screens
  • Multi GPU
  • Previs
User Interface
  • Designer User Interface Index
  • Designer Interface
  • Renderer Window
  • Layer Editor
  • Property Editor
  • Property Groups
  • Hierarchy Editor
  • Content Editor
  • Find and Replace
  • Toolbox
  • Animation Editor
  • Shader Editor
  • Text Editor
  • Message View
  • Scene Tree
  • Stage Editor
  • Container Outline
  • Watches Editor
  • Scene Control Window
  • Performance Statistics
2D Workflow
  • 2D Workflow Index
  • 2D Workflow
  • Layer Editor
  • Common Layer Properties
  • IPP Effects
  • Color Correction FX
  • Distortion FX
  • Filter FX
  • Hierarchy and Content Editors
  • Display Images and Movies
3D Workflow
  • 3D Workflow Index
  • 3D Workflow
  • Hierarchy and Content Editors
  • Renderer Window
  • Camera Navigation
  • Manipulate Objects with Gizmos
  • In-Scene Editing
  • Layer Editor
  • Property Editor
  • Hierarchy Editor
  • Working with Nodes
  • Isolated Objects
  • Containers
  • Text Rendering
  • Character Sets
  • Geometry Import
  • Color Management and HDR Workflow
  • Display Images and Movies
  • Particle System
  • Creating Realistic Reflections
  • Unreal Integration
  • Notch Integration
  • E2E Node Overview
Logic Workflow
  • Logic Workflow Index
  • Hierarchy and Content Editors
  • Content Editor
  • Hierarchy Editor
  • Working with Nodes
  • Property Editor
  • Containers
  • Project and Scene Data
  • Reading Data in Ventuz
  • Display Images and Movies
  • Input Subsystem
  • Multitouch
  • TUIO Protocol
  • Open Sound Control
  • Unreal Integration
  • Notch Integration
  • E2E Node Overview
Animation Workflow
  • Animation Workflow Index
  • Animation Workflow
  • Animation Editor
  • Content Editor
  • Hierarchy Editor
  • Property Editor
  • Animation and State Engine
  • Templates
  • Template Engine
  • Scene Transitions
  • Unreal Integration
  • Notch Integration
Project Structure
  • Project Structure Index
  • Annotations
  • Project Documentation
  • Projects and Scenes
  • Project Properties
  • Project Maintenance
  • Project and Scene Data
  • Scene Management
  • Scene Statistics
  • Scene Tree
  • Performance Statistics
How Tos
  • Designer How to Index
  • How to Run Ventuz
  • How to Work with Designer
  • Ventuz Designer Drag&Drop Workflow
  • How to work with Shadows
  • How to Build Content for Multiple Screens
  • How to Use Emoijs
  • How to Build a Template
  • How To Build a Custom Scene Transition
  • How to Use the Color Difference Keyer
  • How To Enable HDR Video Output
  • How To Work with the HDR Layer
  • How Create Lens Flares and Bloom
  • How to Create Visuals Loader Node
  • How to Remote Control with a Phone
  • How to use Head Mounted Displays
  • How to work with 3D Reference Layers
  • How to create a Firework Particle System
  • How to use DDS with new Block Compression modes
  • How To use Stream Out
  • How to use the Substance Integration
  • How To Integrate Unreal
  • How To Integrate Notch
  • How To use the Vertex Integration
  • How To Control and Customize Ventuz
  • How to use the Companion with Director
  • How to build Previs scenes with Designer
  • How to migrate from Ventuz 6 to Ventuz 7
Reference
  • Available Nodes
  • Animation Nodes
  • Material&Color Nodes
  • Data Nodes
  • E2E Nodes
  • Geometry Nodes
  • Interaction Nodes
  • IO Nodes
  • Layers
  • Light Nodes
  • Logic Nodes
  • Previs Nodes
  • Render Option Nodes
  • Slides Nodes
  • Sound Nodes
  • Text Nodes
  • Texture Nodes
  • VR Nodes
  • World Nodes
  • Summary Shortcuts
  • Layer Editor Shortcuts
  • Hierarchy Editor Shortcuts
  • Content Editor Shortcuts
  • Animation Editor Shortcuts
  • Director Shortcuts

Ventuz Director

  • Index
  • What's New in Director
  • Introduction
  • Environment
  • Show
  • User Interface
  • Assets
  • Taking Action
  • Property Editor
  • Shot Box
  • Project Data
  • Pages
  • Playlist
  • Transitions
  • Timeline
  • Content References
  • Topology
  • Channels
  • Macros
  • Designing Templates
  • Scene Transitions
  • Plug-Ins
  • Shortcuts
  • Command Line Options
  • Application Settings
  • Glossary
  • GPI Configuration

Ventuz Runtime & Configuration

  • Runtime Index
  • Configuration Editor
  • Machine Configuration
  • Device Configuration
  • Project and Show Management
  • Live Runtime Control
  • Web Configuration Editor
  • Render Setup Editor
  • Warping and Soft-Edging Editor
  • Multi Screen and Output Setup
  • How to migrate from Ventuz 6 to Ventuz 7
  • Machine Clustering
  • Supported Hardware
  • Director Mode
  • How to Configure Audio
  • How to Use Live Options
  • How To Play Out On Multiple Screens
  • How To Render on a Machine Cluster
  • How to Use Head Mounted Displays
  • How to Setup Spout with Ventuz
  • How to Use Newtek NDI
  • How to Use a Mixed Frame Rate Cluster
  • How to Use Tracking

Multi Output & Display Setups

Introduction
  • Introduction to Compositions, Screens and Outputs
  • Explanation of Compositions, Screens and Outputs
  • Machine Clustering
  • Support for multiple GPU's
Editors
  • Configuration Editor
  • Device Configuration
  • Render Setup Editor
  • Warping and Soft-Edging Editor
  • Designer Stage Editor
Workflows
  • How to Build Content for Multiple Screens
  • How To Play Out On Multiple Outputs
  • How To Render on a Machine Cluster
  • How to build Previs scenes with Designer

How To

Designer
  • Designer How to Index
  • How to Run Ventuz
  • How to Work with Designer
  • Ventuz Designer Drag&Drop Workflow
  • How to work with Shadows
  • How to Build Content for Multiple Screens
  • How to Use Emoijs
  • How to Build a Template
  • How To Build a Custom Scene Transition
  • How to Use the Color Difference Keyer
  • How To Work with the HDR Layer
  • How To Enable HDR video output
  • How Create Lens Flares and Bloom
  • How to Create Visuals Loader Node
  • How to Remote Control with a Phone
  • How to use Head Mounted Displays
  • How to work with 3D Reference Layers
  • How to create a Firework Particle System
  • How to use DDS with new Block Compression modes
  • How to use the Substance Integration
  • How To Integrate Unreal
  • How To Integrate Notch
  • How To build and playback Ventuz Content in Vertex
Runtime & Configuration
  • Runtime How Tos Index
  • How to Configure Audio
  • How to Use Live Options
  • How To Play Out On Multiple Screens
  • How To Render on a Machine Cluster
  • How to use Head Mounted Displays
  • How to setup Spout with Ventuz
  • How to use Newtek NDI
  • How to use a Mixed Frame Rate Cluster
  • How to use Tracking
  • How To Integrate Unreal
  • How To Integrate Notch
  • How To build and playback Ventuz Content in Vertex
  • Multi Screen and Output Setup
  • How To Enable HDR video output
Director
  • How To Control Multiple Graphics Independently From Each Other
  • How to use the Companion with Director

Ventuz Node Reference

Available Nodes Overview
  • All Designer Nodes
ANIMATION
  • Mover
  • Alternator
  • Simple Control
  • Timeline Control
  • Anmation Rig
  • Keyframe Animation
  • Animation Group
COLOR/MATERIAL
  • Alpha
  • Fog
  • Ground Fog
  • Sky Box
  • Color to RGBA
  • HSLA to Color
  • RGBA to Color
  • Color Transformer
  • HLSL Shader
  • Color
  • Material
  • Color Picker
  • Substance Material
DATA
  • Database
  • Excel
  • JSON
  • RSS Feed
  • Resource Linker
  • Text File
  • XML
E2E
  • E2E Axis
  • E2E Data
  • E2E Control
  • E2E Layer
  • E2E Provider
  • E2E Node Overview
GEOMETRY
  • Rectangle
  • Rounded Rectangle
  • Gradient Rectangle
  • Overlay Rectangle
  • Cube
  • Circle
  • Sphere
  • Cylinder
  • Cone
  • Torus
  • Chart
  • Random Points
  • Mesh Loader
  • Geometry Import (Live)
  • Volume
  • Get Bounding Box
  • Arrow
  • Particle System
  • Path Renderer
  • Geometry Renderer
INTERACTION
  • Interaction Rect
  • Touch Button
  • Touch Excluder
  • Touch Marker
  • Touch Paint
  • Touch Pattern
  • Touch Proxy
  • Touch Ripples
  • Touch Transformations
  • Web Browser
  • Touch Teleport
  • Touch Simulator
INPUT/OUTPUT (I/O)
  • GPI
  • Joystick
  • Keyboard
  • MIDI
  • Mouse
  • Network
  • Open Sound Control
  • Serial
  • Timecode
  • DMX
  • HTTP
  • RamDiskWriter
LAYER
  • 3D Layers
  • 3D Layer Reference
  • Composition Layer
  • 2D Layers
  • PSD Import Layer
  • E2E Layer
  • Mixer Layer
  • Others
LIGHT
  • Light Sources
LOGIC
  • Array Processing
  • Convert To Text
  • Cluster Synchronization
  • Counter
  • Data Portals
  • Date Time
  • Directory
  • Dispatcher
  • Enumeration
  • Expressions
  • Invert
  • Log
  • Loop Breaker
  • Math Effects
  • Matrix Operations
  • Scene Event
  • Script
  • String Operations
  • System ID
  • Render Setup Relation
  • Text Splitter
  • Timer
  • Toggle
  • Transition Info
  • URL
  • Value Switch
  • Value Buffer
  • Variables
  • Visual Indexer
PREVISUALIZATION
  • Introduction to Previs
  • Previs Screen
  • Previs Canvas
  • Compositon List
  • Rendersetup Objects
  • Composition Projector
  • Previs Screen Render Options
RENDER OPTIONS
  • Alpha Blending
  • Color Write
  • Alpha Testing
  • Clip Plane
  • Filter
  • Mask
  • Mirror
  • Effect
  • Render Cube Map
  • Draw Modes
  • Stencil
  • ZTesting
SOUND
  • Audio Clip
  • Sound
  • Volume Control
  • Audio Analysis
SLIDES
  • Slide Manager
  • Slide
  • Slide Port
  • Pivot
TEXT
  • Text Effects
  • Text Layouts
  • Text Rendering
TEXTURE
  • Background
  • Hatch
  • Image
  • Texture
  • SVG Loader
  • Gradient Texture
  • Live Video
  • Movie Stream
  • Movie Frame
  • Movie Clip
  • Texture Loader
  • Snapshot
  • Snapshot Framebuffer
  • Texture Saver
  • Video Source Selector
  • VIO Input
  • Spout Receiver
  • NDI Receiver
  • Substance Loader
  • QR Code
VR/AR
  • Tracked Devices
  • Draw Tracked Devices
WORLD
  • Axis
  • Billboard
  • GetWorld
  • SetWorld
  • Arrange
  • Ticker
  • Layout
  • Group
  • World Z Sort
  • YesNo
  • Switch
  • Spread
  • Filter Pass
  • Set Pass
  • Hierarchy Container
  • Scene Port
  • Content Container
  • Template Port
  • Container Info
  • Camera
  • Paths
  • Cloner

Advanced and Development

  • Advanced and Development Index
  • Command Line Options
  • Ventuz IP Ports
  • Ventuz Machine Service
  • TUIO
  • .NET Scripting
  • HLSL Shader Programming
  • Ventuz API and SDK
  • Ventuz Extension API
  • Ventuz VIO API
  • Ventuz File Format (VFF)
  • Ventuz Stream Out API
  • Lens Calibration File for FreeD
  • E2E Node Overview
  • Unreal Integration
  • Notch Integration
Remoting
  • Remoting Index
  • Remoting Overview
  • How To Control and Customize Ventuz
  • Remoting 4
  • Remoting 4 via Websockets
  • Remoting 4 via HTTP
  • Director Remoting
  • Deprecated Remoting

Misc

  • Presets
« Previous: Designer Interface
» Index «
Next: Layer Editor »

Renderer Window

Table of Contents

  1. In Render Edit Mode Manipulation
  2. Camera Navigation in Renderer View
    1. Walk Through Camera
    2. Orbit Camera
    3. Render window Pan and Zoom
    4. Create a Camera from a Free Flight Camera
  3. Render Point and Isolate Mode
    1. Isolate a Layer
    2. Camera Shortcuts
  4. List of Shortcuts for Camera Navigation

Ventuz is a realtime WYSIWYG design application. The Renderer Window shows the rendering result of the Scene/Presentation and updates it every frame. Additionally some information can be displayed as overlay graphics like Performance Statistics or Transformation Gizmos for the in-renderer editing.

On the top right of the Ventuz Designer User Interface there is a row of buttons. A short hint to their functionality can be found in the list below.


Preview Selection Menu Menu to change the currently previewed Compositions / Screens or Outputs
Pixel Snoop This Tool picks the color of a certain pixel and copies the information to the clipboard, see PixelSnoop
Wireframe Turns the Wireframe-mode on and off
Statistics Shows / hides the Statistics for the current scene, like CPU Usage
Input Diagnostics Turns on the Input Diagnostics
Bounding Boxes Shows / hides the bounding boxes
Show Key Toggles the render output to show the Key signal
Fullscreen When activated the render window will be shown in full screen
Zoom Enables the 2D Zoom function for the Renderer Window.
Show/Hide Tooltips Show or hide tooltips in Editing modes - like coordinates and labels.
In-Render Edit Mode As long as In-Render Edit Mode is activated, objects can be moved, rotated and scaled inside the render window
Show non-render objects All objects in the scene will be rendered including hidden objects like lights and cameras
Translate Switch to translation mode. In-Render Edit Mode has to be activated
Rotate Switch to rotation mode. In-Render Edit Mode has to be activated
Scale Switch to scale mode. In-Render Edit Mode has to be activated
Local Coordinate Gizmos Toggles the orientation of the Transformation Gizmo in the renderer to Local
World Coordinate Gizmos Toggles the orientation of the Transformation Gizmo in the renderer to World
Parent Coordinate Gizmos Toggles the orientation of the Transformation Gizmo in the renderer to Parent
Autoselect 2D Editing - Automatically select Layers under the mouse cursor - else use Alt+click. LMB
In-Scene Editing Enables the 2D In-Scene Editing (2D) for 2D/3D Layers
Snapshot to File Takes a screenshot and saves it to disk
Snapshot to Clipboard Takes a screenshot and copies it to the clipboard
Render to Disk Opens the Render To Disk Tool

All rendering options are also available as Live Option in the Configuration Editor.

To change between Window and Fullscreen mode press Alt +  Enter.
To switch into the In-Render-Edit Mode press TAB.

In Render Edit Mode Manipulation

If the In-Renderer Editing is enabled, it is possible to select/move/rotate/scale objects directly in the Renderer window by clicking and dragging the corresponding object handles. Note that in this mode the scene logic does not receive any Mouse and Keyboard events!

When you scale, move or rotate an object with the Transformation Gizmo, Ventuz will apply these changes to the next axis in front of that object, but only if that axis has only one Object as its child. If there is no such axis or if there is no axis existent at all, Ventuz will place one in front of the transformed Object.

When clicking in the rendered image Ventuz performs a raycast and selects the first hit object in 3D Space and jumps to the corresponding Node in the Hierarchy Editor.

Camera Navigation in Renderer View

Currently Ventuz offers a Free Flight Camera, Walk Through Camera and Orbit Camera for the In-Render camera navigation, which can be switched by the use of shortcuts. A complete list of Shortcuts is below.

You can move the camera with Keyboard-shortcuts and Mouse, when the In-Render-Edit Mode is active. As soon as any of the cameras is active, you can see a Camera Info Panel in the bottom of the Render Window.


The Camera Info Panel shows the FOV, Speed (movement speed), Status Information (Fly, Orbit, Heightlock).

By pressing NUM ÷ you get the camera help on screen in the Render Window as well.

To navigate the Free Flight Camera, hold the right mouse button  hold and use W,A,S,D to move the camera around.
If you just hold the right mouse button  drag and move the mouse around, you would Pan & Tilt the camera, like rotating your head. (The camera info panel will say: FLY)

Walk Through Camera

To enable the Walk Through Camera, press Num * and walk around with the same controls like for the Free Flight Camera. This enables a so called Height Lock. You can increase/decrease the height by using E and C. (The camera info panel will say: HEIGHT LOCK)

You can also increase/decrease the speed of movement for the Free Flight- and Walk Through Camera by holding the  hold and scroll the  scroll. You can see the Speed value in the camera info panel change. Hold Shift or Ctrl to increase/decrease the Fly-/Walk speed for a moment.

Orbit Camera

To make use of the Orbit Camera you must have an object selected. Hold ALT &  drag, left mouse and move the mouse around. (The camera info panel will say: ORBIT)


Whenever the In-Renderer-Edit Mode is switched on you can display a grid that is always aligned to the origin of the scene. This grid is only shown for the active layer, so if you are working on several 3D Layers you can only see one grid. Turn the grid off with the dropdown menu of the In-Renderer-Editing Button or by pressing G in the active Renderer Window.

Whenever you turn the In-Render-Edit mode off, the Free Flight Camera of every layer will be reset to the camera chosen on each 3D Layer's property.

When using multiple 3D Layers the Free Flight Camera is only activated for the currently edited one. All other layers preserve their current Free Flight Camera positions and they are not affected by any inputs. When clicking on an object that is located in another layer, the Hierarchy Editor will jump into that layer and the Free Flight Camera is switched accordingly.

Render window Pan and Zoom

Use CTRL+ TAB or this button to enable the 2D zoom function for the Renderer Window. Use the mouse scroll wheel to zoom in and out or the middle mouse button to pan the view. The current zoom percentage will be shown in the lower left corner of the renderer window. Use R to reset the view.

Create a Camera from a Free Flight Camera

You can use any of the above described cameras to create a camera in in the Hierarchy! Just fly to your desired position, adjust your camera in Free Flight Mode and press Ctrl +  INSERT. A new camera will be create inside the active 3D layer.

If you want to apply the Free Flight camera parameters to an already existing camera simply select the camera and press From Free Flight at the bottom of the Properties Editor.

Render Point and Isolate Mode

The isolate Mode is basically the Render Point functionality. Doubleclick  doubleclick any object in the Render Window. This will set a Render Point for the selected Object, all other parts of the scene tree are ignored. The navigation and shortcuts are listed below. Doubleclick  doubleclick the selected object again to leave the Isolate Mode

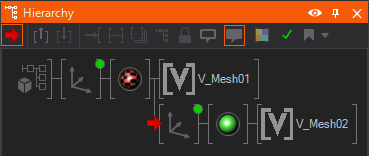
Selecting a node and pressing CTRL + R will set the Render Point to that Node. Additionally you can activate the Render Point in the Hierarchy/- Toolbar or select the Set Render Point from the context menu with a  click on the selected Node. The Render Point defines teh isolated subtree in the Hierarchy. For the following screenshot it means the V_Mesh02 is isolated and centered in your Rendering Window.

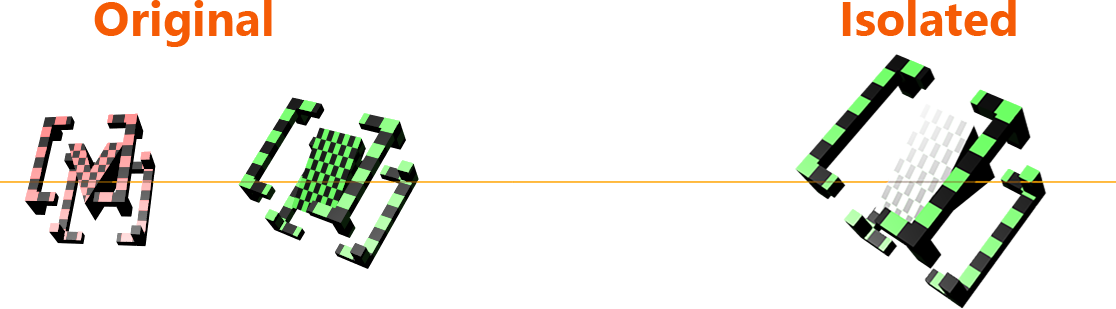
As you can see in the screenshot above, other meshes are skipped but Materials, Transformations, Lights are still applied to your isolated mesh or subtree.

In contrast to Ventuz 4 or earlier versions the render engine is not starting to traverse the scene tree at the selected node. The whole tree is traversed but meshes outside the isolated subtree are skipped.
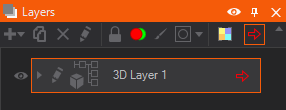
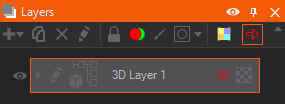
Isolate a Layer

To isolate a Layer from its composition select it and press CTRL + R. You can also press the Isolate button on the Layer Tool Bar. It allows you to view and edit the Layer outside the context of your already finished composition without changing the actual surrounded logic.


It becomes a mandatory tool when you start working with OffScreen Layers that are already applied somewhere else but you need to check the actual outputted Texture without destroying your surrounding logic.

Camera Shortcuts

Applying a Render Point inside a 3D Layer allows you to orbit around the isolated mesh or subtree. Please note that this is not possible for isolated Layers.

Use the mouse in combination with some modifier key to change the viewing parameters:

Move the camera:

 drag Rotate object
ALT +  drag Orbit around object
 drag Rotate camera
Ctrl + ALT + drag Roll camera
ALT +  drag Pan camera
ALT +  drag Zoom camera
 doubleclick Leave Isolation Mode / Remove Render Point

List of Shortcuts for Camera Navigation

Following is a list of all Shortcuts:

Tab Toggle In-Renderer Editing
R Switch to Rotation Mode
T Switch to Translation Mode
L Switch to Scaling Mode
 drag rotate camera (rotate head)
 hold + W,A,S,D Move/Walk around - Free Flight Cam (if heightlock enabled: Walk Through Cam) (Shift & Ctrl faster/slower *10)
 hold + E,C Fly up/down (increase/decrease height)
Num * Toggle height lock
 hold +  scroll change movement speed (Fly-/Walk- cam only)
Alt +  drag Rotate Camera (around targeted point (Orbit Camera))
Alt +  drag Zoom/FOV Camera (toward targeted point)
Alt +  drag Pan camera (move targeted point)
Ctrl +  Alt +  drag Roll camera
Num1 Front View
Num3 Side View
Num7 Top View
Num2 and Num8 Rotate around x-Axis (Turn Up/Down)
Num4 and Num6 Rotate around y-Axis (Turn Left/Right)
Num , Focus on selected Object (only with selection)
Num5 Toggle Orthographic / FOV (only with selection)
Num0 Toggle Free Flight Cam / Active Cam
Num9 Reset Roll
Num Enter Reset Free Flight Cam
Num / Toggle On Screen Camera Help
Ctrl +  insert Create a camera of the actual Free Flight Camera
Hold Ctrl +  Shift Pixel Zoom

See also:
  • User Interface
  • Performance Statistics
  • Axis Node
  • Camera Node
  • Camera Navigation
  • Render Point and Isolate Mode
  • OffScreen Rendertarget Layer
  • Stage Editor

« Previous: Designer Interface
» Index «
Next: Layer Editor »
Copyright 2025 Ventuz Technology