Renderer Window
Table of Contents
Ventuz is a realtime WYSIWYG design application. The Renderer Window shows the rendering result of the Scene/Presentation and updates it every frame. Additionally some information can be displayed as overlay graphics like Performance Statistics or Transformation Gizmos for the in-renderer editing.
On the top right of the Ventuz Designer User Interface there is a row of buttons. A short hint to their functionality can be found in the list below.

 | Preview Selection Menu | Menu to change the currently previewed Compositions / Screens or Outputs |
| Pixel Snoop | This Tool picks the color of a certain pixel and copies the information to the clipboard, see PixelSnoop | |
 | Wireframe | Turns the Wireframe-mode on and off |
 | Statistics | Shows / hides the Statistics for the current scene, like CPU Usage |
 | Input Diagnostics | Turns on the Input Diagnostics |
 | Bounding Boxes | Shows / hides the bounding boxes |
 | Show Key | Toggles the render output to show the Key signal |
 | Fullscreen | When activated the render window will be shown in full screen |
 | Zoom | Enables the 2D Zoom function for the Renderer Window. |
 | Show/Hide Tooltips | Show or hide tooltips in Editing modes - like coordinates and labels. |
 | In-Render Edit Mode | As long as In-Render Edit Mode is activated, objects can be moved, rotated and scaled inside the render window |
 | Show non-render objects | All objects in the scene will be rendered including hidden objects like lights and cameras |
 | Translate | Switch to translation mode. In-Render Edit Mode has to be activated |
 | Rotate | Switch to rotation mode. In-Render Edit Mode has to be activated |
 | Scale | Switch to scale mode. In-Render Edit Mode has to be activated |
 | Local Coordinate Gizmos | Toggles the orientation of the Transformation Gizmo in the renderer to Local |
 | World Coordinate Gizmos | Toggles the orientation of the Transformation Gizmo in the renderer to World |
 | Parent Coordinate Gizmos | Toggles the orientation of the Transformation Gizmo in the renderer to Parent |
 | Autoselect | 2D Editing - Automatically select Layers under the mouse cursor - else use Alt+click. LMB |
 | In-Scene Editing | Enables the 2D In-Scene Editing (2D) for 2D/3D Layers |
 | Snapshot to File | Takes a screenshot and saves it to disk |
 | Snapshot to Clipboard | Takes a screenshot and copies it to the clipboard |
 | Render to Disk | Opens the Render To Disk Tool |
All rendering options are also available as Live Option in the Configuration Editor.
To change between Window and Fullscreen mode press Alt + Enter.
To switch into the In-Render-Edit Mode press TAB.
In Render Edit Mode Manipulation
If the In-Renderer Editing is enabled, it is possible to select/move/rotate/scale objects directly in the Renderer window by clicking and dragging the corresponding object handles. Note that in this mode the scene logic does not receive any Mouse and Keyboard events!
When you scale, move or rotate an object with the Transformation Gizmo, Ventuz will apply these changes to the next axis in front of that object, but only if that axis has only one Object as its child. If there is no such axis or if there is no axis existent at all, Ventuz will place one in front of the transformed Object.
When clicking in the rendered image Ventuz performs a raycast and selects the first hit object in 3D Space and jumps to the corresponding Node in the Hierarchy Editor.
Camera Navigation in Renderer View
Currently Ventuz offers a Free Flight Camera, Walk Through Camera and Orbit Camera for the In-Render camera navigation, which can be switched by the use of shortcuts. A complete list of Shortcuts is below.
You can move the camera with Keyboard-shortcuts and Mouse, when the In-Render-Edit Mode is active.
As soon as any of the cameras is active, you can see a Camera Info Panel in the bottom of the Render Window.

The Camera Info Panel shows the FOV, Speed (movement speed), Status Information (Fly, Orbit, Heightlock).
By pressing NUM ÷ you get the camera help on screen in the Render Window as well.
To navigate the Free Flight Camera, hold the right mouse button hold and use W,A,S,D to move the camera around.
If you just hold the right mouse button drag and move the mouse around, you would Pan & Tilt the camera, like rotating your head. (The camera info panel will say: FLY)
Walk Through Camera
To enable the Walk Through Camera, press Num * and walk around with the same controls like for the Free Flight Camera. This enables a so called Height Lock. You can increase/decrease the height by using E and C. (The camera info panel will say: HEIGHT LOCK)
You can also increase/decrease the speed of movement for the Free Flight- and Walk Through Camera by holding the hold and scroll the
Orbit Camera
To make use of the Orbit Camera you must have an object selected. Hold ALT & drag, left mouse and move the mouse around. (The camera info panel will say: ORBIT)
Whenever the In-Renderer-Edit Mode is switched on you can display a grid that is always aligned to the origin of the scene. This grid is only shown for the active layer, so if you are working on several 3D Layers you can only see one grid. Turn the grid off with the dropdown menu of the In-Renderer-Editing Button or by pressing G in the active Renderer Window.
Whenever you turn the In-Render-Edit mode off, the Free Flight Camera of every layer will be reset to the camera chosen on each 3D Layer's property.
When using multiple 3D Layers the Free Flight Camera is only activated for the currently edited one. All other layers preserve their current Free Flight Camera positions and they are not affected by any inputs. When clicking on an object that is located in another layer, the Hierarchy Editor will jump into that layer and the Free Flight Camera is switched accordingly.
Render window Pan and Zoom
Use CTRL+ TAB or this button  to enable the 2D zoom function for the Renderer Window.
Use the mouse scroll wheel to zoom in and out or the middle mouse button to pan the view. The current zoom percentage will be shown in the lower left corner of the renderer window. Use R to reset the view.
Create a Camera from a Free Flight Camera
You can use any of the above described cameras to create a camera in in the Hierarchy! Just fly to your desired position, adjust your camera in Free Flight Mode and press Ctrl + INSERT. A new camera will be create inside the active 3D layer.
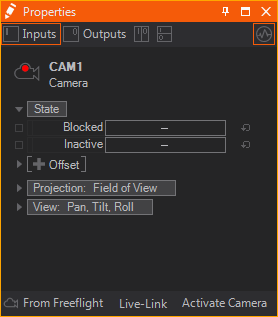
If you want to apply the Free Flight camera parameters to an already existing camera simply select the camera and press From Free Flight at the bottom of the Properties Editor.

Render Point and Isolate Mode
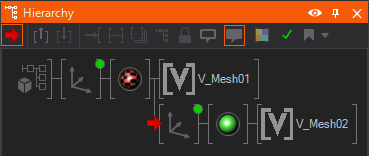
Selecting a node and pressing CTRL + R will set the Render Point to that Node. Additionally you can activate the Render Point in the Hierarchy/- Toolbar or select the Set Render Point from the context menu with a click on the selected Node. The Render Point defines teh isolated subtree in the Hierarchy. For the following screenshot it means the V_Mesh02 is isolated and centered in your Rendering Window.


As you can see in the screenshot above, other meshes are skipped but Materials, Transformations, Lights are still applied to your isolated mesh or subtree.
In contrast to Ventuz 4 or earlier versions the render engine is not starting to traverse the scene tree at the selected node. The whole tree is traversed but meshes outside the isolated subtree are skipped.
Isolate a Layer
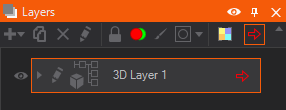
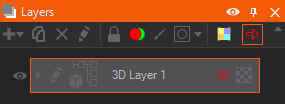
To isolate a Layer from its composition select it and press CTRL + R. You can also press the Isolate button on the Layer Tool Bar. It allows you to view and edit the Layer outside the context of your already finished composition without changing the actual surrounded logic.

It becomes a mandatory tool when you start working with OffScreen Layers that are already applied somewhere else but you need to check the actual outputted Texture without destroying your surrounding logic.

Camera Shortcuts
Applying a Render Point inside a 3D Layer allows you to orbit around the isolated mesh or subtree. Please note that this is not possible for isolated Layers.
Use the mouse in combination with some modifier key to change the viewing parameters:
Move the camera:
drag Rotate object ALT + drag Orbit around object drag Rotate camera Ctrl + ALT + drag Roll camera ALT + drag Pan camera ALT + drag Zoom camera doubleclick Leave Isolation Mode / Remove Render Point
List of Shortcuts for Camera Navigation
Following is a list of all Shortcuts:
| Tab | Toggle In-Renderer Editing |
| R | Switch to Rotation Mode |
| T | Switch to Translation Mode |
| L | Switch to Scaling Mode |
| drag | rotate camera (rotate head) |
| hold + W,A,S,D | Move/Walk around - Free Flight Cam (if heightlock enabled: Walk Through Cam) (Shift & Ctrl faster/slower *10) |
| hold + E,C | Fly up/down (increase/decrease height) |
| Num * | Toggle height lock |
| hold + | change movement speed (Fly-/Walk- cam only) |
| Alt + drag | Rotate Camera (around targeted point (Orbit Camera)) |
| Alt + drag | Zoom/FOV Camera (toward targeted point) |
| Alt + | Pan camera (move targeted point) |
| Ctrl + Alt + drag | Roll camera |
| Num1 | Front View |
| Num3 | Side View |
| Num7 | Top View |
| Num2 and Num8 | Rotate around x-Axis (Turn Up/Down) |
| Num4 and Num6 | Rotate around y-Axis (Turn Left/Right) |
| Num , | Focus on selected Object (only with selection) |
| Num5 | Toggle Orthographic / FOV (only with selection) |
| Num0 | Toggle Free Flight Cam / Active Cam |
| Num9 | Reset Roll |
| Num Enter | Reset Free Flight Cam |
| Num / | Toggle On Screen Camera Help |
| Ctrl + insert | Create a camera of the actual Free Flight Camera |
| Hold Ctrl + Shift | Pixel Zoom |