Navigation

Ventuz Introduction

  • Introduction
  • Getting Started
  • Ventuz Editions
  • Ventuz Products
  • Realtime Rendering
  • Frequently Asked Questions
  • Common Mistakes
  • Deploying a Ventuz Presentation
  • Scene Performance and Tweaks

Quick Guides

  • Quick Guide Index
  • Business Logic
  • 3D Art
  • 2D Art
  • Programming
  • System Engineer

General

  • Index
  • What's New
  • Ventuz System Requirements
  • Configuration Editor
  • Device Configuration
  • Machine Configuration
  • Render Setup Editor
  • Introduction to Compositions, Screens and Outputs
  • Explanation of Compositions, Screens and Outputs
  • Live Runtime Control
  • Project and Show Management
  • Web Configuration Editor
  • Communication Protocol Overview
  • GPI Configuration for Runtime or Director
  • Introduction to the Ventuz Video Engine
  • Supported Formats
  • Supported Hardware
  • Color Management and HDR Workflow
  • Multisampling / Anti-Aliasing
  • Input Subsystem
  • Ventuz Proprietary Files
  • Migrating Configs & Content to Ventuz 8
  • Migrating Content to Ventuz 7
  • Migrating Content to Ventuz 6
  • Migrating Content to Ventuz 5
  • Summary Shortcuts
  • Terminology
  • Manual Index

Ventuz Designer

  • Designer Indices
Introduction
  • Designer Introduction Index
  • Designer Overview
  • Realtime Rendering
  • Project Browser
  • Designer Interface
  • Designer Options
  • Working with Nodes
  • Hierarchy and Content Editors
  • 2D Workflow
  • 3D Workflow
  • PBR Workflow
  • Animation Workflow
  • Best Practices
  • Reading Data in Ventuz
  • Display Images and Movies
  • Scene Performance and Tweaks
  • Deploying a Ventuz Presentation
  • Render to Disk
  • Multi Screen and Output Setup
  • Explanation of Compositions, Screens and Outputs
  • Workflow of using Multi Screens
  • Multi GPU
  • Previs
User Interface
  • Designer User Interface Index
  • Designer Interface
  • Renderer Window
  • Layer Editor
  • Property Editor
  • Property Groups
  • Hierarchy Editor
  • Content Editor
  • Find and Replace
  • Toolbox
  • Animation Editor
  • Shader Editor
  • Text Editor
  • Message View
  • Scene Tree
  • Stage Editor
  • Container Outline
  • Watches Editor
  • Scene Control Window
  • Performance Statistics
2D Workflow
  • 2D Workflow Index
  • 2D Workflow
  • Layer Editor
  • Common Layer Properties
  • IPP Effects
  • Color Correction FX
  • Distortion FX
  • Filter FX
  • Hierarchy and Content Editors
  • Display Images and Movies
3D Workflow
  • 3D Workflow Index
  • 3D Workflow
  • Hierarchy and Content Editors
  • Renderer Window
  • Camera Navigation
  • Manipulate Objects with Gizmos
  • In-Scene Editing
  • Layer Editor
  • Property Editor
  • Hierarchy Editor
  • Working with Nodes
  • Isolated Objects
  • Containers
  • Text Rendering
  • Character Sets
  • Geometry Import
  • Color Management and HDR Workflow
  • Display Images and Movies
  • Particle System
  • Creating Realistic Reflections
  • Unreal Integration
  • Notch Integration
  • E2E Node Overview
Logic Workflow
  • Logic Workflow Index
  • Hierarchy and Content Editors
  • Content Editor
  • Hierarchy Editor
  • Working with Nodes
  • Property Editor
  • Containers
  • Project and Scene Data
  • Reading Data in Ventuz
  • Display Images and Movies
  • Input Subsystem
  • Multitouch
  • TUIO Protocol
  • Open Sound Control
  • Unreal Integration
  • Notch Integration
  • E2E Node Overview
Animation Workflow
  • Animation Workflow Index
  • Animation Workflow
  • Animation Editor
  • Content Editor
  • Hierarchy Editor
  • Property Editor
  • Animation and State Engine
  • Templates
  • Template Engine
  • Scene Transitions
  • Unreal Integration
  • Notch Integration
Project Structure
  • Project Structure Index
  • Annotations
  • Project Documentation
  • Projects and Scenes
  • Project Properties
  • Project Maintenance
  • Project and Scene Data
  • Scene Management
  • Scene Statistics
  • Scene Tree
  • Performance Statistics
How Tos
  • Designer How to Index
  • How to Run Ventuz
  • How to Work with Designer
  • Ventuz Designer Drag&Drop Workflow
  • How to work with Shadows
  • How to Build Content for Multiple Screens
  • How to Use Emoijs
  • How to Build a Template
  • How To Build a Custom Scene Transition
  • How to Use the Color Difference Keyer
  • How To Enable HDR Video Output
  • How To Work with the HDR Layer
  • How Create Lens Flares and Bloom
  • How to Create Visuals Loader Node
  • How to Remote Control with a Phone
  • How to use Head Mounted Displays
  • How to work with 3D Reference Layers
  • How to create a Firework Particle System
  • How to use DDS with new Block Compression modes
  • How To use Stream Out
  • How to use the Substance Integration
  • How To Integrate Unreal
  • How To Integrate Notch
  • How To use the Vertex Integration
  • How To Control and Customize Ventuz
  • How to use the Companion with Director
  • How to build Previs scenes with Designer
  • How to migrate from Ventuz 6 to Ventuz 7
Reference
  • Available Nodes
  • Animation Nodes
  • Material&Color Nodes
  • Data Nodes
  • E2E Nodes
  • Geometry Nodes
  • Interaction Nodes
  • IO Nodes
  • Layers
  • Light Nodes
  • Logic Nodes
  • Previs Nodes
  • Render Option Nodes
  • Slides Nodes
  • Sound Nodes
  • Text Nodes
  • Texture Nodes
  • VR Nodes
  • World Nodes
  • Summary Shortcuts
  • Layer Editor Shortcuts
  • Hierarchy Editor Shortcuts
  • Content Editor Shortcuts
  • Animation Editor Shortcuts
  • Director Shortcuts

Ventuz Director

  • Index
  • What's New in Director
  • Introduction
  • Environment
  • Show
  • User Interface
  • Assets
  • Taking Action
  • Property Editor
  • Shot Box
  • Project Data
  • Pages
  • Playlist
  • Transitions
  • Timeline
  • Content References
  • Topology
  • Channels
  • Macros
  • Designing Templates
  • Scene Transitions
  • Plug-Ins
  • Shortcuts
  • Command Line Options
  • Application Settings
  • Glossary
  • GPI Configuration

Ventuz Runtime & Configuration

  • Runtime Index
  • Configuration Editor
  • Machine Configuration
  • Device Configuration
  • Project and Show Management
  • Live Runtime Control
  • Web Configuration Editor
  • Render Setup Editor
  • Warping and Soft-Edging Editor
  • Multi Screen and Output Setup
  • How to migrate from Ventuz 6 to Ventuz 7
  • Machine Clustering
  • Supported Hardware
  • Director Mode
  • How to Configure Audio
  • How to Use Live Options
  • How To Play Out On Multiple Screens
  • How To Render on a Machine Cluster
  • How to Use Head Mounted Displays
  • How to Setup Spout with Ventuz
  • How to Use Newtek NDI
  • How to Use a Mixed Frame Rate Cluster
  • How to Use Tracking

Multi Output & Display Setups

Introduction
  • Introduction to Compositions, Screens and Outputs
  • Explanation of Compositions, Screens and Outputs
  • Machine Clustering
  • Support for multiple GPU's
Editors
  • Configuration Editor
  • Device Configuration
  • Render Setup Editor
  • Warping and Soft-Edging Editor
  • Designer Stage Editor
Workflows
  • How to Build Content for Multiple Screens
  • How To Play Out On Multiple Outputs
  • How To Render on a Machine Cluster
  • How to build Previs scenes with Designer

How To

Designer
  • Designer How to Index
  • How to Run Ventuz
  • How to Work with Designer
  • Ventuz Designer Drag&Drop Workflow
  • How to work with Shadows
  • How to Build Content for Multiple Screens
  • How to Use Emoijs
  • How to Build a Template
  • How To Build a Custom Scene Transition
  • How to Use the Color Difference Keyer
  • How To Work with the HDR Layer
  • How To Enable HDR video output
  • How Create Lens Flares and Bloom
  • How to Create Visuals Loader Node
  • How to Remote Control with a Phone
  • How to use Head Mounted Displays
  • How to work with 3D Reference Layers
  • How to create a Firework Particle System
  • How to use DDS with new Block Compression modes
  • How to use the Substance Integration
  • How To Integrate Unreal
  • How To Integrate Notch
  • How To build and playback Ventuz Content in Vertex
Runtime & Configuration
  • Runtime How Tos Index
  • How to Configure Audio
  • How to Use Live Options
  • How To Play Out On Multiple Screens
  • How To Render on a Machine Cluster
  • How to use Head Mounted Displays
  • How to setup Spout with Ventuz
  • How to use Newtek NDI
  • How to use a Mixed Frame Rate Cluster
  • How to use Tracking
  • How To Integrate Unreal
  • How To Integrate Notch
  • How To build and playback Ventuz Content in Vertex
  • Multi Screen and Output Setup
  • How To Enable HDR video output
Director
  • How To Control Multiple Graphics Independently From Each Other
  • How to use the Companion with Director

Ventuz Node Reference

Available Nodes Overview
  • All Designer Nodes
ANIMATION
  • Mover
  • Alternator
  • Simple Control
  • Timeline Control
  • Anmation Rig
  • Keyframe Animation
  • Animation Group
COLOR/MATERIAL
  • Alpha
  • Fog
  • Ground Fog
  • Sky Box
  • Color to RGBA
  • HSLA to Color
  • RGBA to Color
  • Color Transformer
  • HLSL Shader
  • Color
  • Material
  • Color Picker
  • Substance Material
DATA
  • Database
  • Excel
  • JSON
  • RSS Feed
  • Resource Linker
  • Text File
  • XML
E2E
  • E2E Axis
  • E2E Data
  • E2E Control
  • E2E Layer
  • E2E Provider
  • E2E Node Overview
GEOMETRY
  • Rectangle
  • Rounded Rectangle
  • Gradient Rectangle
  • Overlay Rectangle
  • Cube
  • Circle
  • Sphere
  • Cylinder
  • Cone
  • Torus
  • Chart
  • Random Points
  • Mesh Loader
  • Geometry Import (Live)
  • Volume
  • Get Bounding Box
  • Arrow
  • Particle System
  • Path Renderer
  • Geometry Renderer
INTERACTION
  • Interaction Rect
  • Touch Button
  • Touch Excluder
  • Touch Marker
  • Touch Paint
  • Touch Pattern
  • Touch Proxy
  • Touch Ripples
  • Touch Transformations
  • Web Browser
  • Touch Teleport
  • Touch Simulator
INPUT/OUTPUT (I/O)
  • GPI
  • Joystick
  • Keyboard
  • MIDI
  • Mouse
  • Network
  • Open Sound Control
  • Serial
  • Timecode
  • DMX
  • HTTP
  • RamDiskWriter
LAYER
  • 3D Layers
  • 3D Layer Reference
  • Composition Layer
  • 2D Layers
  • PSD Import Layer
  • E2E Layer
  • Mixer Layer
  • Others
LIGHT
  • Light Sources
LOGIC
  • Array Processing
  • Convert To Text
  • Cluster Synchronization
  • Counter
  • Data Portals
  • Date Time
  • Directory
  • Dispatcher
  • Enumeration
  • Expressions
  • Invert
  • Log
  • Loop Breaker
  • Math Effects
  • Matrix Operations
  • Scene Event
  • Script
  • String Operations
  • System ID
  • Render Setup Relation
  • Text Splitter
  • Timer
  • Toggle
  • Transition Info
  • URL
  • Value Switch
  • Value Buffer
  • Variables
  • Visual Indexer
PREVISUALIZATION
  • Introduction to Previs
  • Previs Screen
  • Previs Canvas
  • Compositon List
  • Rendersetup Objects
  • Composition Projector
  • Previs Screen Render Options
RENDER OPTIONS
  • Alpha Blending
  • Color Write
  • Alpha Testing
  • Clip Plane
  • Filter
  • Mask
  • Mirror
  • Effect
  • Render Cube Map
  • Draw Modes
  • Stencil
  • ZTesting
SOUND
  • Audio Clip
  • Sound
  • Volume Control
  • Audio Analysis
SLIDES
  • Slide Manager
  • Slide
  • Slide Port
  • Pivot
TEXT
  • Text Effects
  • Text Layouts
  • Text Rendering
TEXTURE
  • Background
  • Hatch
  • Image
  • Texture
  • SVG Loader
  • Gradient Texture
  • Live Video
  • Movie Stream
  • Movie Frame
  • Movie Clip
  • Texture Loader
  • Snapshot
  • Snapshot Framebuffer
  • Texture Saver
  • Video Source Selector
  • VIO Input
  • Spout Receiver
  • NDI Receiver
  • Substance Loader
  • QR Code
VR/AR
  • Tracked Devices
  • Draw Tracked Devices
WORLD
  • Axis
  • Billboard
  • GetWorld
  • SetWorld
  • Arrange
  • Ticker
  • Layout
  • Group
  • World Z Sort
  • YesNo
  • Switch
  • Spread
  • Filter Pass
  • Set Pass
  • Hierarchy Container
  • Scene Port
  • Content Container
  • Template Port
  • Container Info
  • Camera
  • Paths
  • Cloner

Advanced and Development

  • Advanced and Development Index
  • Command Line Options
  • Ventuz IP Ports
  • Ventuz Machine Service
  • TUIO
  • .NET Scripting
  • HLSL Shader Programming
  • Ventuz API and SDK
  • Ventuz Extension API
  • Ventuz VIO API
  • Ventuz File Format (VFF)
  • Ventuz Stream Out API
  • Lens Calibration File for FreeD
  • E2E Node Overview
  • Unreal Integration
  • Notch Integration
Remoting
  • Remoting Index
  • Remoting Overview
  • How To Control and Customize Ventuz
  • Remoting 4
  • Remoting 4 via Websockets
  • Remoting 4 via HTTP
  • Director Remoting
  • Deprecated Remoting

Misc

  • Presets
« Previous: 2D Workflow
» Index «
Next: PBR Workflow »

3D Workflow Introduction

Table of Contents

  1. Introduction
  2. Geometry Import
  3. Geometry Live Import
  4. Materials
  5. Animations
  6. Supported Formats
    1. Geometries
      1. GLTF
      2. 3DS
      3. ASE
      4. DAE / ZAE (COLLADA)
      5. OBJ
      6. FBX
      7. STL / STP

This side will give you a quick introduction into the 3D world of Ventuz, and where you can find familiar things like texture channels, or how to import your assets, to start right away working on your projects.

Introduction

There are multiple ways to effectively work in 3D inside the Ventuz Designer. The most common workflow for more complex 3D models is using a third party tool like Blender or Cinema4D for the modeling and animating part, followed by texturing in substance painter for example and importing the finished model into the Designer. But it is also possible to texture your assets directly inside Ventuz, since it has many functionalities that are very helpful. Like many UV mapping options. Or the .sbsar support to quickly import Substance Designer textures into Ventuz. It is also possible to Live Link a asset with the help of Cinema4D for a even quicker workflow. Animating can also be done beforehand or by using the strong Animation Editor inside Ventuz to be able to make non linear Animations.

We will cover the following in this introduction:

  • Geometry import
  • Geometry Live import
  • Materials
  • Animations
  • Supported formats

Geometry Import

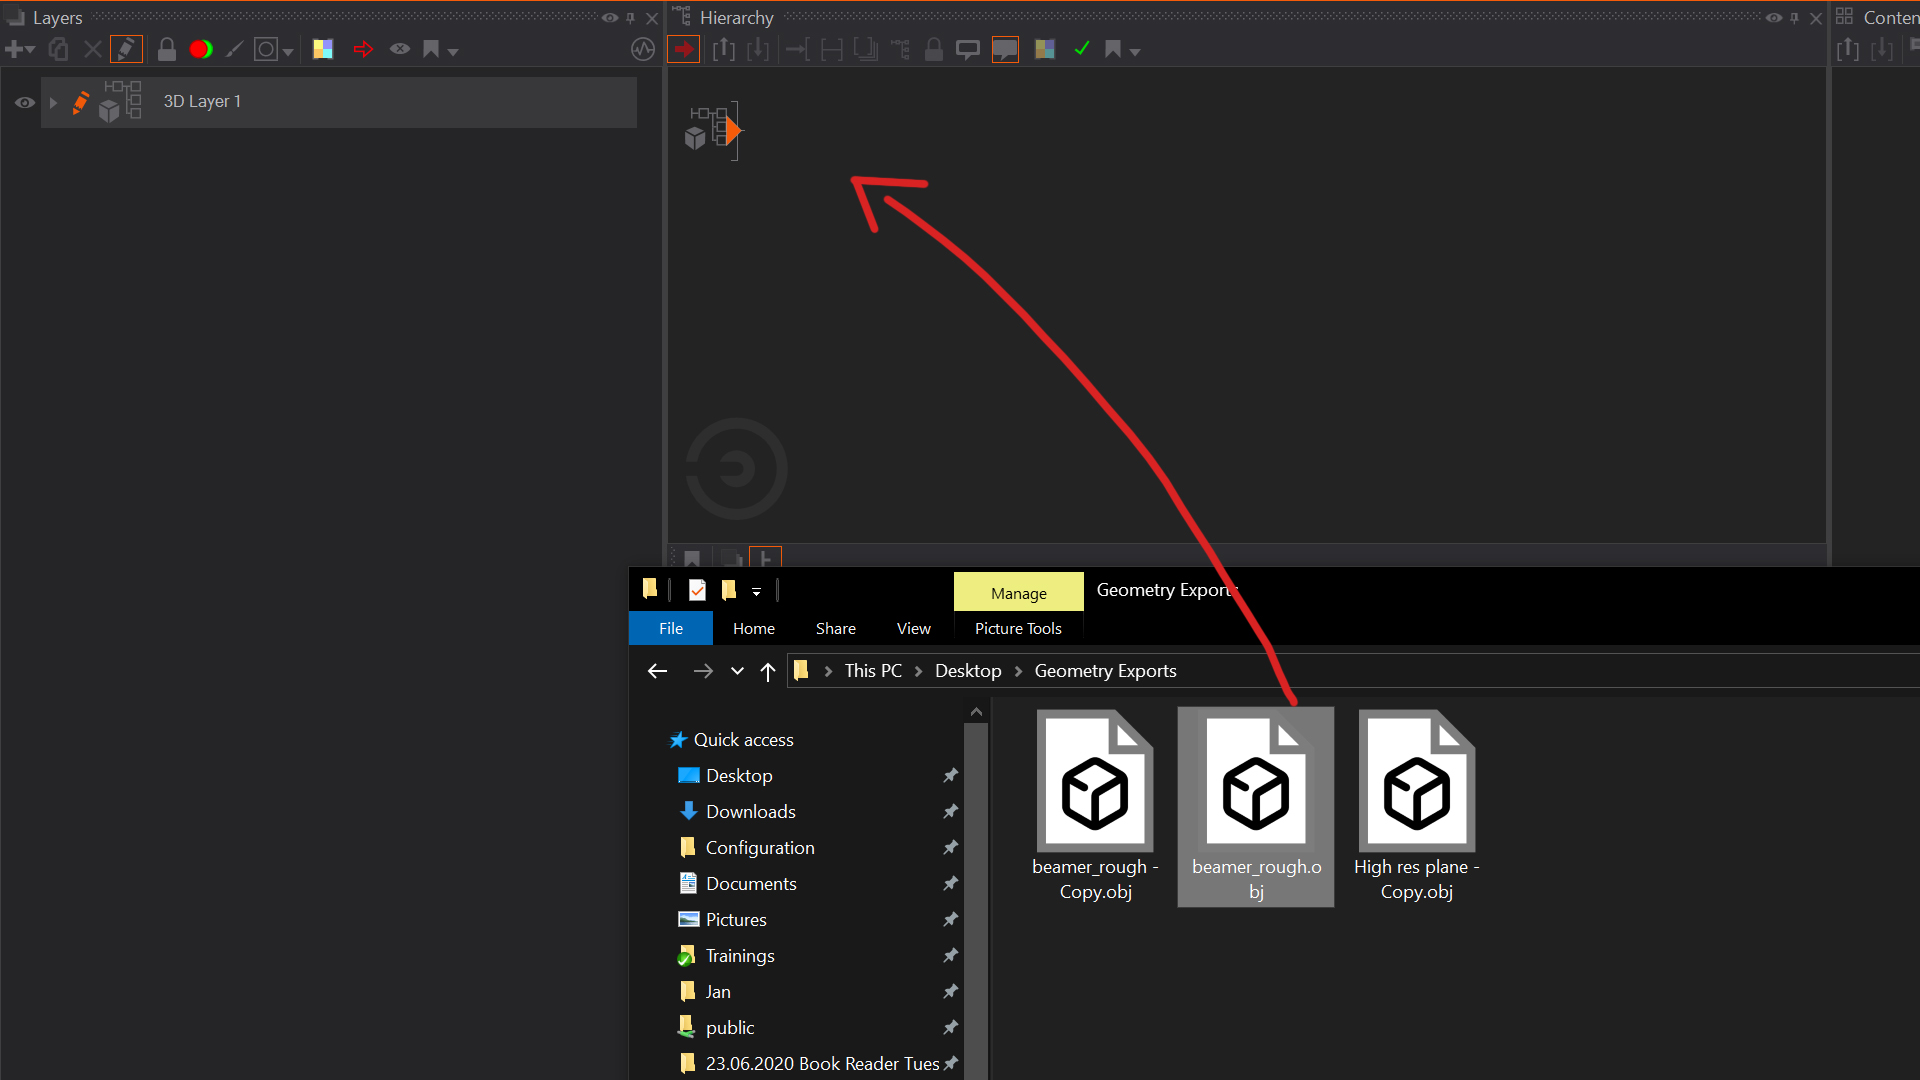
Generally speaking the import of a 3D asset from a geometry file is done very quickly by just dragging and dropping it from the Windows File Explorer into the Hierarchy Editor in Ventuz. For more supported 3D formats see further below.

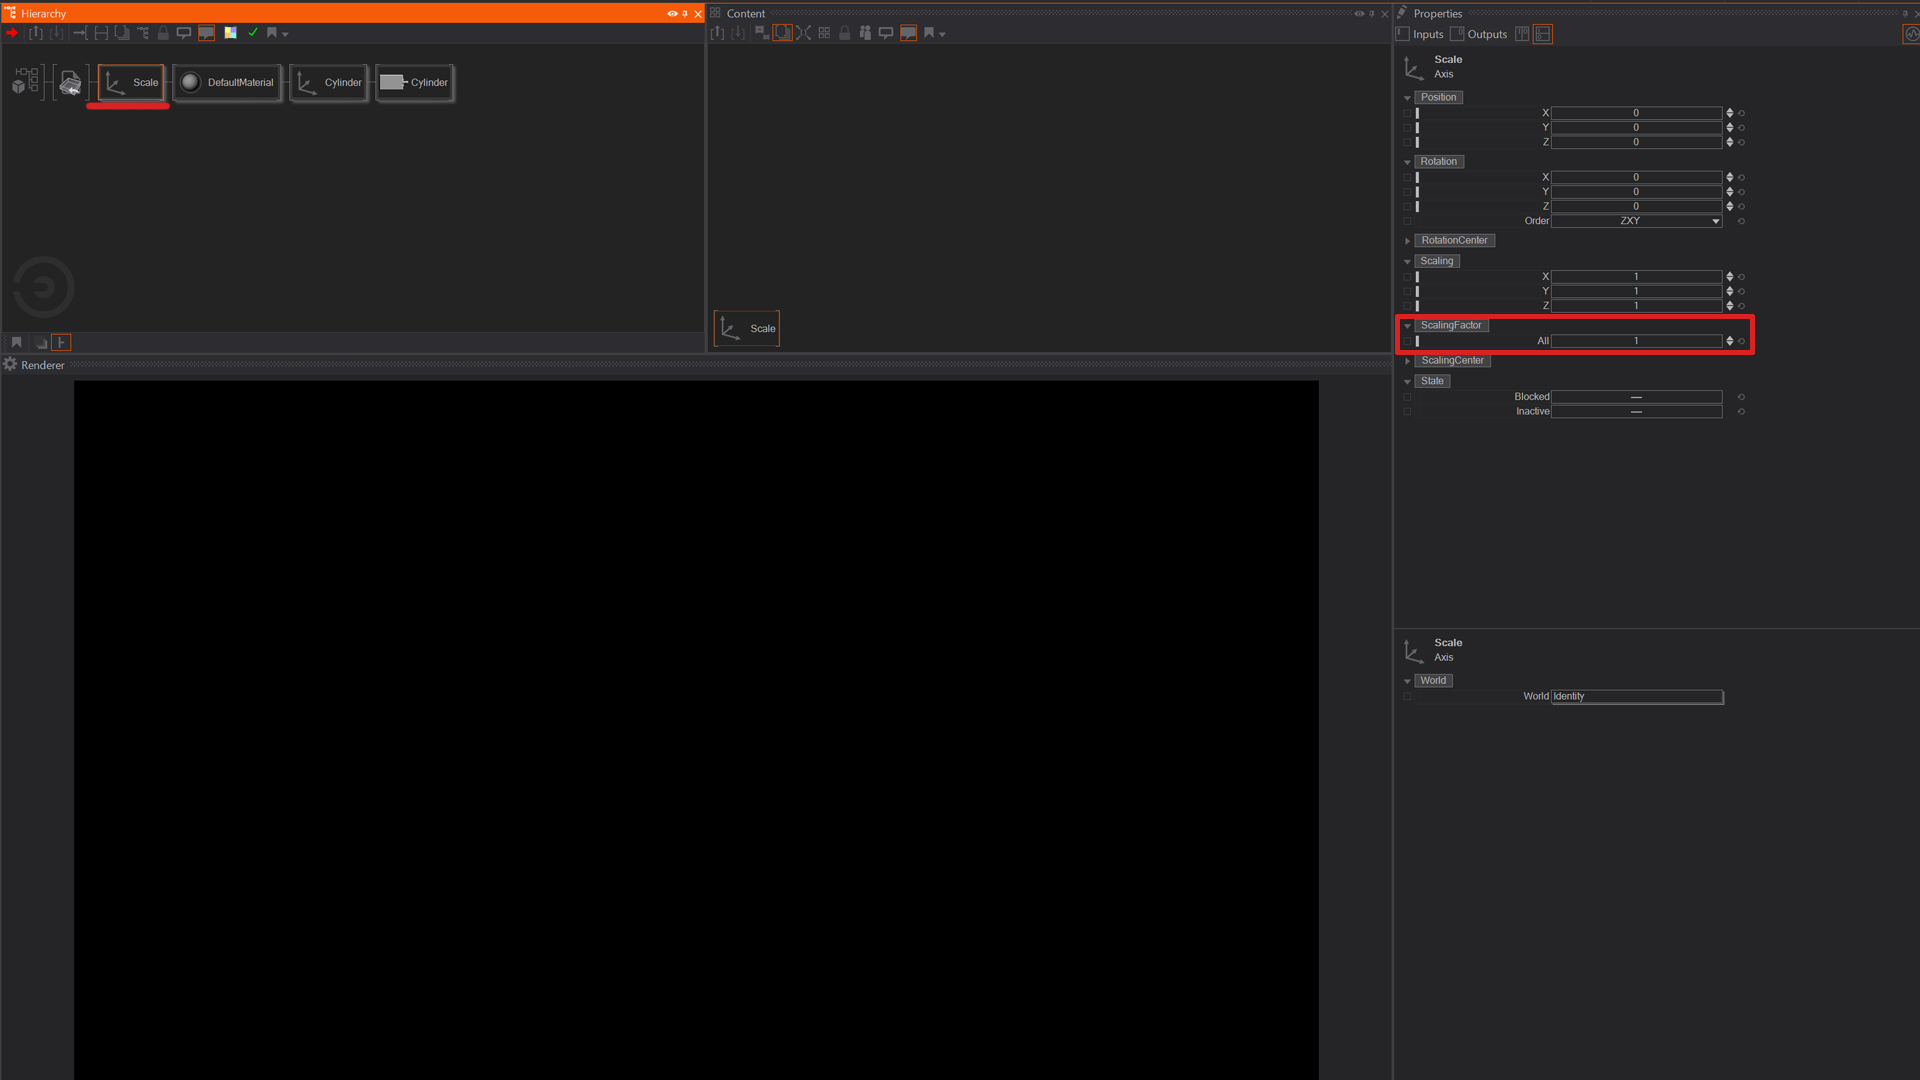
If you do not see anything in the Renderer Window that is probably because the units of the object are not set correctly to 1 Meter. So your object might be either very small or very big.

Always use 1 Meter as 1 Unit so your object keeps the right scaling.

For now you can just change the scaling of the first axis in your geometries tree in the Property Editor if you encounter this problem.

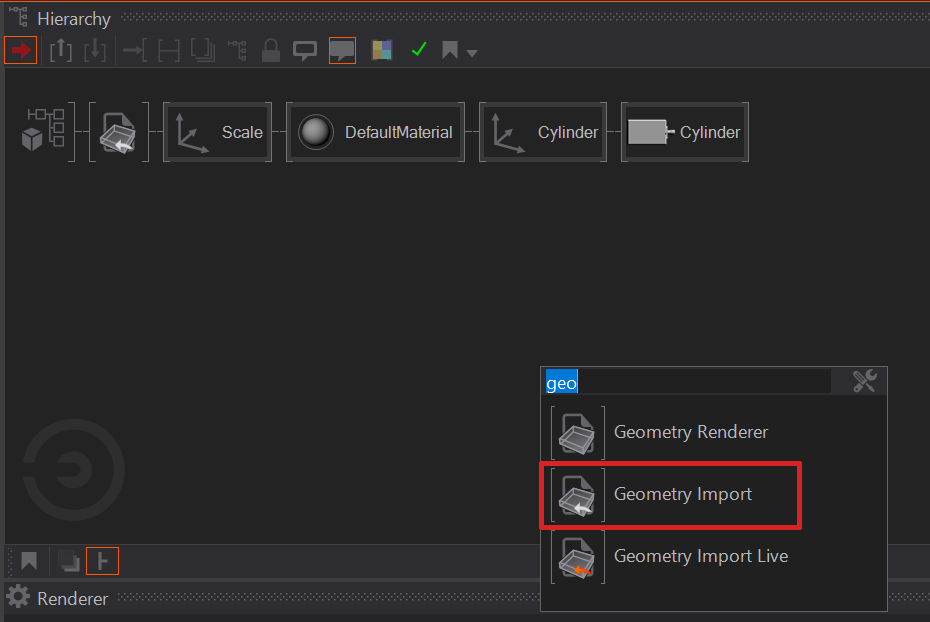
It is also possible to do it the other way around by grabbing a Geometry import node from the toolbox, clicking on the asset property and searching for your asset with the file explorer.

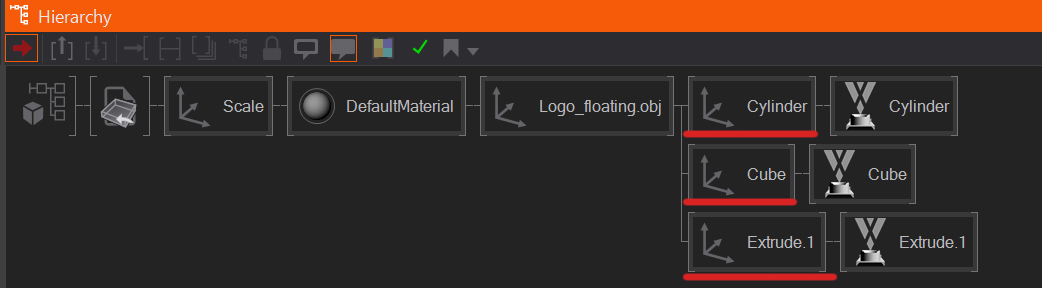
As you can see when there is no texture provided with the mesh Ventuz will just skip it (warn you with an error) and add a default material. Depending on the complexity of the mesh there will be more objects in the hierarchy editor. Ventuz will never merge meshes and will always display every mesh with its own axis and the corresponding name.

Geometry Live Import

Another way of working with your 3D models is the Live import.The Cinema 4D plugin for Ventuz is included with the Ventuz installer. After you've installed Ventuz, simply locate your install folder and run Cinema4dPluginInstaller.exe and follow the on-screen instructions.

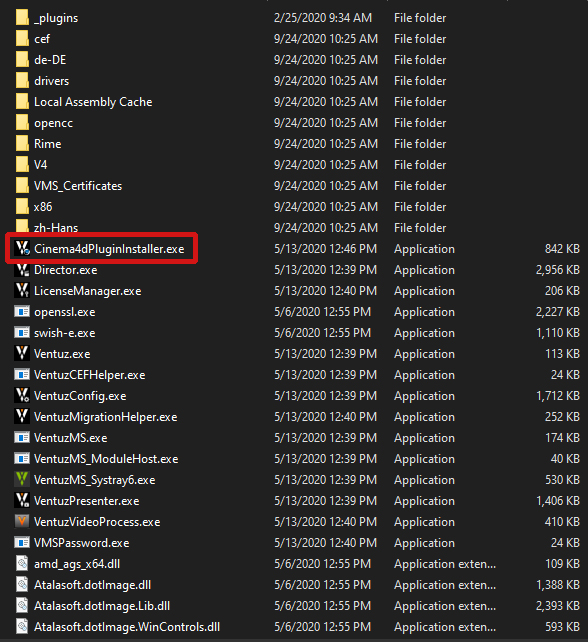
Cinema 4D must be opened once before the installation of the plugin!

For a detailed description of how the Live Link works take a look right here.

Materials

In the following short introduction into Materials you will learn about Material Stages. These are commonly referred as texture channels in most 3D Applications. You will find them directly in the Material that Ventuz created for you after the import of any 3D object. Or just grab a Material Node via the Toolbox.

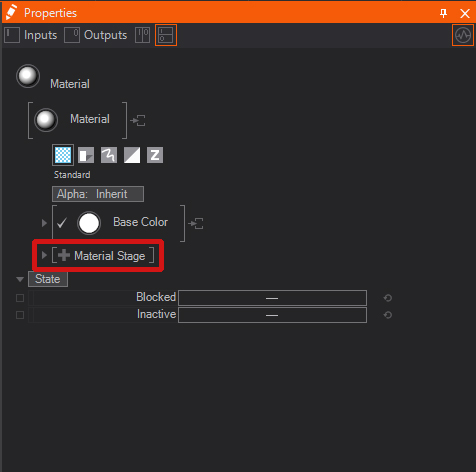
By  clicking on the small plus you can add a new stage. There under Texture you will find many different types which you might be familiar with already.

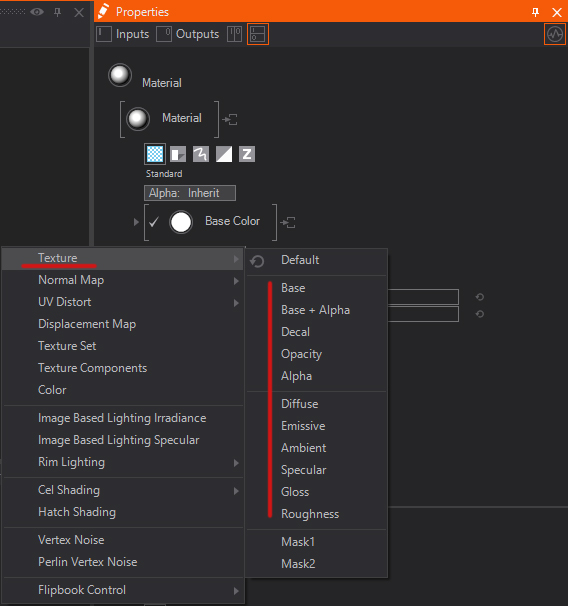
With this you can add as many stages onto the material as you need. Since Ventuz 6.4 we also added the possibility to use Substance Materials (.sbsar) which can easily just be drag and dropped into the hierarchy editor.
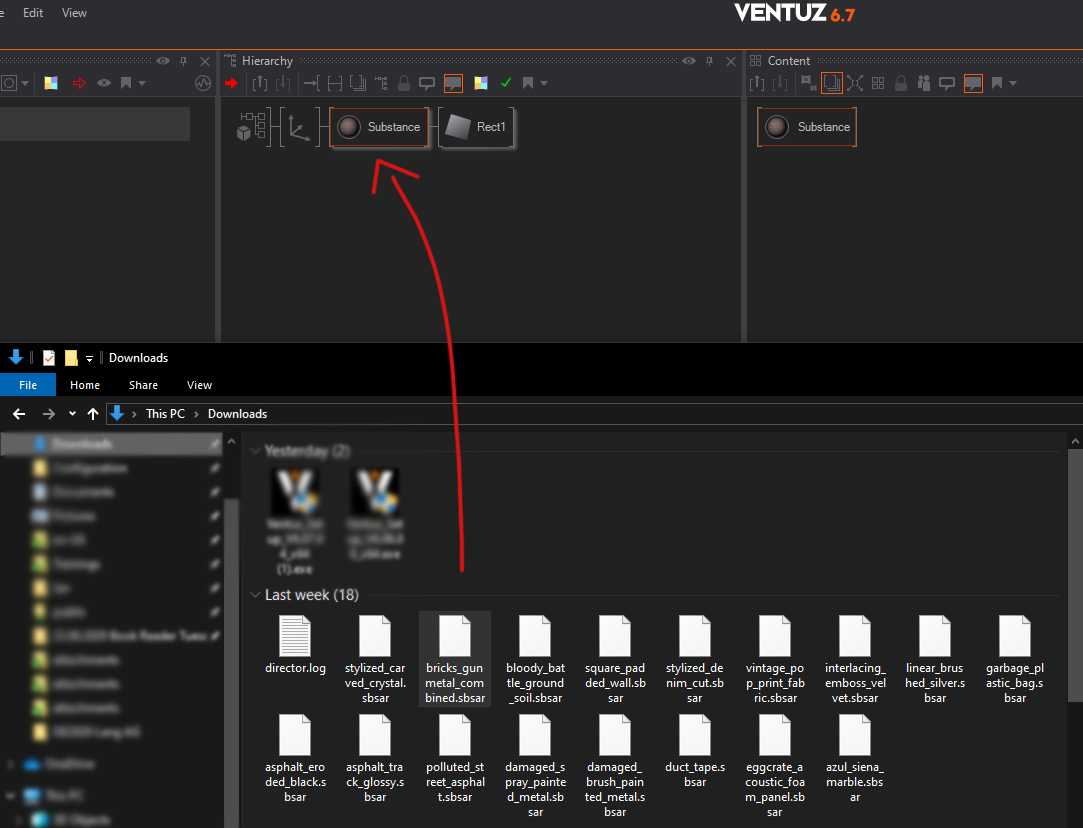
A good source for those textures is ​https://source.substance3d.com/, if you have a abo of there software you get free points every month to download high quality textures which can be used for commercial projects as well. These textures have predefined properties which you can change in Ventuz as well. You will find them in the properties window after clicking on the just imported texture in the hierarchy editor.

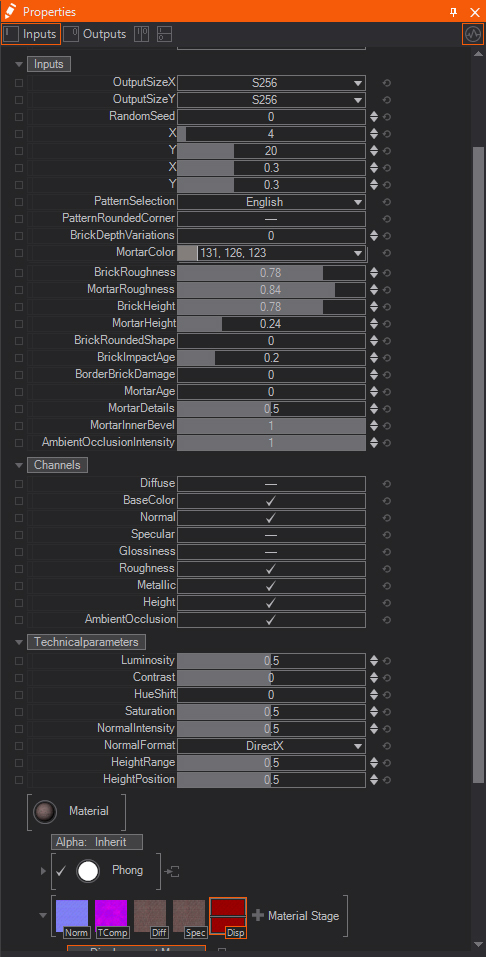
This is different from texture to texture depending on what the artist exposed while building it.

There are some things to keep in mind when working with such Materials. for a detailed description on Substance materials click here. We also have a How to where you can learn to use the Substance integration right here.

To learn more about the Material stages and its possibilities take a look right here.

Animations

Animating is one of Ventuz strong suites due to its non linear nature. But covering this completely in this how to would be to much. There are several ways to animate in Ventuz. You can either import your animations directly with a .fbx from a third party 3D programm. Or do it directly inside the Designer. We recommend reading trough this page to get a deep look into everything related.

Animation Editor

Or watch this Video for a short introduction: ​https://youtu.be/jnmG8nRs7mY

Supported Formats

Geometries

The following file formats can be imported into Ventuz to create complex geometries.

File Extension Name Version
.gltf / .glb GL Transmission Format only v2.0
.3ds / .prj 3ds Max 3DS all
.ase / .ask 3ds Max ASE all
.dae / .zae Collada (zipped) up to 1.5
.fbx Autodesk up to 2013
.obj Wavefront all
.stl Stereo Litho all
.stp Step Files all

Some information on the formats mostly used:

GLTF

The glTF Transmission Format is a royalty-free specification for efficient transmission and loading of 3d scenes, models, textures/materials and animations. The format is introduced by the Khronos Group. It defines a streamlined authoring workflow and enables the interoperable use of the content across different software packages and platforms. The importer itself supports the glTF2 standards like:

  • meshes
  • materials
  • cameras
  • scenes
  • SRT animations
  • skeletal animations
  • skinned characters/meshes

Limitations currently are:

  • mesh morph targets not supported
  • reimport is only possible in a constrained way

Reimporting a scene can be done as long as the order of the objects in the file did not change. This is since glTF2 doesn't have unique IDs for elements.

The following glTF extensions are supported:

Extension description
KHR_blend advanced alpha blending modes such as additive or multiplicative
KHR_lights_punctual support for directional/point/spot lights in the scene
KHR_materials_emissive_strength PBR only: set the gain of the emissive channel
KHR_materials_pbrSpecularGlossiness slightly more flexible way to define materials than the default base-metallic-roughness materials
KHR_materials_unlit no light, everything except base color and texture is ignored
KHR_texture_transform scale, rotate and translate for texture coordinates
MSFT_texture_dds Microsoft extension to use DDS textures, e.g. for compressed or HDR textures

3DS

The 3DS format was used by the 3D Studio DOS version and has been replaced with the first release of 3DS Max. This format is still used as interexchange format for several modeling software suites. Keep in mind that this format has big limitations compared to the OBJ file format. See ​wiki for a detailed limitations (shortcomings).

ASE

ASE stands for ASCII Scene Exporter and is a the native file format from 3D Studio Max, ActorX and Maya.

Please do not mix it up with the Adobe Swatch Exchange file format!

DAE / ZAE (COLLADA)

The COLLADA Digital Asset Exchange format was introduced by Sony Computer Entertainment and is now maintained by the Khronos Group. Collada defines an open XML-based database scheme that enables 3-D authoring applications to freely exchange digital assets without loss of information, enabling multiple software packages to be combined into extremely powerful tool chains. Currently, all of the important DCC tools have either built-in exporters for the Collada format or there exist third-party plug-ins. Collada is a very powerful and flexible 3D format which seems to be evolving to an industry standard. In addition to common 3D features, the Collada specification supports, amongst others, animations, shaders and physics. In the current version of the Collada importer, Ventuz supports the import of geometry, materials and textures. All other Collada features are not supported yet. Currently we support also the .zae extension, which is basically a zipped dae file including textures.

OBJ

The OBJ file format was introduced by Alias/Wavefront and is similar in status to the 3DS format, in that it is somewhat antiquated and unreliable. The OBJ file only stores geometry information. The material and texture properties are stored in a separate file, it is the .MTL file. This file is referenced from the OBJ file. If your imported model is missing materials and textures, check if the according .MTL file exists.

FBX

The Filmbox format. This format can include Texture/Materials and SRT animations. if you have any issues using this format please try to use the 7.3 (2013) version of FBX.

STL / STP

The "Stereo Litho" and STEP format are used for FDM and CAM as well as a standard exchange between CAD and CAM programs. We support the Binary and ASCII representations. These formats include just triangles - no support for materials or textures is given.

See also:
  • Materials
  • Substance Integration
  • Geometry Import
  • ​Substance Designer and Painter
  • Drag and Drop tricks
  • 2D layer
  • 3D Layer

« Previous: 2D Workflow
» Index «
Next: PBR Workflow »
Copyright 2025 Ventuz Technology