Navigation

Ventuz Introduction

  • Introduction
  • Getting Started
  • Ventuz Editions
  • Ventuz Products
  • Realtime Rendering
  • Frequently Asked Questions
  • Common Mistakes
  • Deploying a Ventuz Presentation
  • Scene Performance and Tweaks

Quick Guides

  • Quick Guide Index
  • Business Logic
  • 3D Art
  • 2D Art
  • Programming
  • System Engineer

General

  • Index
  • What's New
  • Ventuz System Requirements
  • Configuration Editor
  • Device Configuration
  • Machine Configuration
  • Render Setup Editor
  • Introduction to Compositions, Screens and Outputs
  • Explanation of Compositions, Screens and Outputs
  • Live Runtime Control
  • Project and Show Management
  • Web Configuration Editor
  • Communication Protocol Overview
  • GPI Configuration for Runtime or Director
  • Introduction to the Ventuz Video Engine
  • Supported Formats
  • Supported Hardware
  • Color Management and HDR Workflow
  • Multisampling / Anti-Aliasing
  • Input Subsystem
  • Ventuz Proprietary Files
  • Migrating Configs & Content to Ventuz 8
  • Migrating Content to Ventuz 7
  • Migrating Content to Ventuz 6
  • Migrating Content to Ventuz 5
  • Summary Shortcuts
  • Terminology
  • Manual Index

Ventuz Designer

  • Designer Indices
Introduction
  • Designer Introduction Index
  • Designer Overview
  • Realtime Rendering
  • Project Browser
  • Designer Interface
  • Designer Options
  • Working with Nodes
  • Hierarchy and Content Editors
  • 2D Workflow
  • 3D Workflow
  • PBR Workflow
  • Animation Workflow
  • Best Practices
  • Reading Data in Ventuz
  • Display Images and Movies
  • Scene Performance and Tweaks
  • Deploying a Ventuz Presentation
  • Render to Disk
  • Multi Screen and Output Setup
  • Explanation of Compositions, Screens and Outputs
  • Workflow of using Multi Screens
  • Multi GPU
  • Previs
User Interface
  • Designer User Interface Index
  • Designer Interface
  • Renderer Window
  • Layer Editor
  • Property Editor
  • Property Groups
  • Hierarchy Editor
  • Content Editor
  • Find and Replace
  • Toolbox
  • Animation Editor
  • Shader Editor
  • Text Editor
  • Message View
  • Scene Tree
  • Stage Editor
  • Container Outline
  • Watches Editor
  • Scene Control Window
  • Performance Statistics
2D Workflow
  • 2D Workflow Index
  • 2D Workflow
  • Layer Editor
  • Common Layer Properties
  • IPP Effects
  • Color Correction FX
  • Distortion FX
  • Filter FX
  • Hierarchy and Content Editors
  • Display Images and Movies
3D Workflow
  • 3D Workflow Index
  • 3D Workflow
  • Hierarchy and Content Editors
  • Renderer Window
  • Camera Navigation
  • Manipulate Objects with Gizmos
  • In-Scene Editing
  • Layer Editor
  • Property Editor
  • Hierarchy Editor
  • Working with Nodes
  • Isolated Objects
  • Containers
  • Text Rendering
  • Character Sets
  • Geometry Import
  • Color Management and HDR Workflow
  • Display Images and Movies
  • Particle System
  • Creating Realistic Reflections
  • Unreal Integration
  • Notch Integration
  • E2E Node Overview
Logic Workflow
  • Logic Workflow Index
  • Hierarchy and Content Editors
  • Content Editor
  • Hierarchy Editor
  • Working with Nodes
  • Property Editor
  • Containers
  • Project and Scene Data
  • Reading Data in Ventuz
  • Display Images and Movies
  • Input Subsystem
  • Multitouch
  • TUIO Protocol
  • Open Sound Control
  • Unreal Integration
  • Notch Integration
  • E2E Node Overview
Animation Workflow
  • Animation Workflow Index
  • Animation Workflow
  • Animation Editor
  • Content Editor
  • Hierarchy Editor
  • Property Editor
  • Animation and State Engine
  • Templates
  • Template Engine
  • Scene Transitions
  • Unreal Integration
  • Notch Integration
Project Structure
  • Project Structure Index
  • Annotations
  • Project Documentation
  • Projects and Scenes
  • Project Properties
  • Project Maintenance
  • Project and Scene Data
  • Scene Management
  • Scene Statistics
  • Scene Tree
  • Performance Statistics
How Tos
  • Designer How to Index
  • How to Run Ventuz
  • How to Work with Designer
  • Ventuz Designer Drag&Drop Workflow
  • How to work with Shadows
  • How to Build Content for Multiple Screens
  • How to Use Emoijs
  • How to Build a Template
  • How To Build a Custom Scene Transition
  • How to Use the Color Difference Keyer
  • How To Enable HDR Video Output
  • How To Work with the HDR Layer
  • How Create Lens Flares and Bloom
  • How to Create Visuals Loader Node
  • How to Remote Control with a Phone
  • How to use Head Mounted Displays
  • How to work with 3D Reference Layers
  • How to create a Firework Particle System
  • How to use DDS with new Block Compression modes
  • How To use Stream Out
  • How to use the Substance Integration
  • How To Integrate Unreal
  • How To Integrate Notch
  • How To use the Vertex Integration
  • How To Control and Customize Ventuz
  • How to use the Companion with Director
  • How to build Previs scenes with Designer
  • How to migrate from Ventuz 6 to Ventuz 7
Reference
  • Available Nodes
  • Animation Nodes
  • Material&Color Nodes
  • Data Nodes
  • E2E Nodes
  • Geometry Nodes
  • Interaction Nodes
  • IO Nodes
  • Layers
  • Light Nodes
  • Logic Nodes
  • Previs Nodes
  • Render Option Nodes
  • Slides Nodes
  • Sound Nodes
  • Text Nodes
  • Texture Nodes
  • VR Nodes
  • World Nodes
  • Summary Shortcuts
  • Layer Editor Shortcuts
  • Hierarchy Editor Shortcuts
  • Content Editor Shortcuts
  • Animation Editor Shortcuts
  • Director Shortcuts

Ventuz Director

  • Index
  • What's New in Director
  • Introduction
  • Environment
  • Show
  • User Interface
  • Assets
  • Taking Action
  • Property Editor
  • Shot Box
  • Project Data
  • Pages
  • Playlist
  • Transitions
  • Timeline
  • Content References
  • Topology
  • Channels
  • Macros
  • Designing Templates
  • Scene Transitions
  • Plug-Ins
  • Shortcuts
  • Command Line Options
  • Application Settings
  • Glossary
  • GPI Configuration

Ventuz Runtime & Configuration

  • Runtime Index
  • Configuration Editor
  • Machine Configuration
  • Device Configuration
  • Project and Show Management
  • Live Runtime Control
  • Web Configuration Editor
  • Render Setup Editor
  • Warping and Soft-Edging Editor
  • Multi Screen and Output Setup
  • How to migrate from Ventuz 6 to Ventuz 7
  • Machine Clustering
  • Supported Hardware
  • Director Mode
  • How to Configure Audio
  • How to Use Live Options
  • How To Play Out On Multiple Screens
  • How To Render on a Machine Cluster
  • How to Use Head Mounted Displays
  • How to Setup Spout with Ventuz
  • How to Use Newtek NDI
  • How to Use a Mixed Frame Rate Cluster
  • How to Use Tracking

Multi Output & Display Setups

Introduction
  • Introduction to Compositions, Screens and Outputs
  • Explanation of Compositions, Screens and Outputs
  • Machine Clustering
  • Support for multiple GPU's
Editors
  • Configuration Editor
  • Device Configuration
  • Render Setup Editor
  • Warping and Soft-Edging Editor
  • Designer Stage Editor
Workflows
  • How to Build Content for Multiple Screens
  • How To Play Out On Multiple Outputs
  • How To Render on a Machine Cluster
  • How to build Previs scenes with Designer

How To

Designer
  • Designer How to Index
  • How to Run Ventuz
  • How to Work with Designer
  • Ventuz Designer Drag&Drop Workflow
  • How to work with Shadows
  • How to Build Content for Multiple Screens
  • How to Use Emoijs
  • How to Build a Template
  • How To Build a Custom Scene Transition
  • How to Use the Color Difference Keyer
  • How To Work with the HDR Layer
  • How To Enable HDR video output
  • How Create Lens Flares and Bloom
  • How to Create Visuals Loader Node
  • How to Remote Control with a Phone
  • How to use Head Mounted Displays
  • How to work with 3D Reference Layers
  • How to create a Firework Particle System
  • How to use DDS with new Block Compression modes
  • How to use the Substance Integration
  • How To Integrate Unreal
  • How To Integrate Notch
  • How To build and playback Ventuz Content in Vertex
Runtime & Configuration
  • Runtime How Tos Index
  • How to Configure Audio
  • How to Use Live Options
  • How To Play Out On Multiple Screens
  • How To Render on a Machine Cluster
  • How to use Head Mounted Displays
  • How to setup Spout with Ventuz
  • How to use Newtek NDI
  • How to use a Mixed Frame Rate Cluster
  • How to use Tracking
  • How To Integrate Unreal
  • How To Integrate Notch
  • How To build and playback Ventuz Content in Vertex
  • Multi Screen and Output Setup
  • How To Enable HDR video output
Director
  • How To Control Multiple Graphics Independently From Each Other
  • How to use the Companion with Director

Ventuz Node Reference

Available Nodes Overview
  • All Designer Nodes
ANIMATION
  • Mover
  • Alternator
  • Simple Control
  • Timeline Control
  • Anmation Rig
  • Keyframe Animation
  • Animation Group
COLOR/MATERIAL
  • Alpha
  • Fog
  • Ground Fog
  • Sky Box
  • Color to RGBA
  • HSLA to Color
  • RGBA to Color
  • Color Transformer
  • HLSL Shader
  • Color
  • Material
  • Color Picker
  • Substance Material
DATA
  • Database
  • Excel
  • JSON
  • RSS Feed
  • Resource Linker
  • Text File
  • XML
E2E
  • E2E Axis
  • E2E Data
  • E2E Control
  • E2E Layer
  • E2E Provider
  • E2E Node Overview
GEOMETRY
  • Rectangle
  • Rounded Rectangle
  • Gradient Rectangle
  • Overlay Rectangle
  • Cube
  • Circle
  • Sphere
  • Cylinder
  • Cone
  • Torus
  • Chart
  • Random Points
  • Mesh Loader
  • Geometry Import (Live)
  • Volume
  • Get Bounding Box
  • Arrow
  • Particle System
  • Path Renderer
  • Geometry Renderer
INTERACTION
  • Interaction Rect
  • Touch Button
  • Touch Excluder
  • Touch Marker
  • Touch Paint
  • Touch Pattern
  • Touch Proxy
  • Touch Ripples
  • Touch Transformations
  • Web Browser
  • Touch Teleport
  • Touch Simulator
INPUT/OUTPUT (I/O)
  • GPI
  • Joystick
  • Keyboard
  • MIDI
  • Mouse
  • Network
  • Open Sound Control
  • Serial
  • Timecode
  • DMX
  • HTTP
  • RamDiskWriter
LAYER
  • 3D Layers
  • 3D Layer Reference
  • Composition Layer
  • 2D Layers
  • PSD Import Layer
  • E2E Layer
  • Mixer Layer
  • Others
LIGHT
  • Light Sources
LOGIC
  • Array Processing
  • Convert To Text
  • Cluster Synchronization
  • Counter
  • Data Portals
  • Date Time
  • Directory
  • Dispatcher
  • Enumeration
  • Expressions
  • Invert
  • Log
  • Loop Breaker
  • Math Effects
  • Matrix Operations
  • Scene Event
  • Script
  • String Operations
  • System ID
  • Render Setup Relation
  • Text Splitter
  • Timer
  • Toggle
  • Transition Info
  • URL
  • Value Switch
  • Value Buffer
  • Variables
  • Visual Indexer
PREVISUALIZATION
  • Introduction to Previs
  • Previs Screen
  • Previs Canvas
  • Compositon List
  • Rendersetup Objects
  • Composition Projector
  • Previs Screen Render Options
RENDER OPTIONS
  • Alpha Blending
  • Color Write
  • Alpha Testing
  • Clip Plane
  • Filter
  • Mask
  • Mirror
  • Effect
  • Render Cube Map
  • Draw Modes
  • Stencil
  • ZTesting
SOUND
  • Audio Clip
  • Sound
  • Volume Control
  • Audio Analysis
SLIDES
  • Slide Manager
  • Slide
  • Slide Port
  • Pivot
TEXT
  • Text Effects
  • Text Layouts
  • Text Rendering
TEXTURE
  • Background
  • Hatch
  • Image
  • Texture
  • SVG Loader
  • Gradient Texture
  • Live Video
  • Movie Stream
  • Movie Frame
  • Movie Clip
  • Texture Loader
  • Snapshot
  • Snapshot Framebuffer
  • Texture Saver
  • Video Source Selector
  • VIO Input
  • Spout Receiver
  • NDI Receiver
  • Substance Loader
  • QR Code
VR/AR
  • Tracked Devices
  • Draw Tracked Devices
WORLD
  • Axis
  • Billboard
  • GetWorld
  • SetWorld
  • Arrange
  • Ticker
  • Layout
  • Group
  • World Z Sort
  • YesNo
  • Switch
  • Spread
  • Filter Pass
  • Set Pass
  • Hierarchy Container
  • Scene Port
  • Content Container
  • Template Port
  • Container Info
  • Camera
  • Paths
  • Cloner

Advanced and Development

  • Advanced and Development Index
  • Command Line Options
  • Ventuz IP Ports
  • Ventuz Machine Service
  • TUIO
  • .NET Scripting
  • HLSL Shader Programming
  • Ventuz API and SDK
  • Ventuz Extension API
  • Ventuz VIO API
  • Ventuz File Format (VFF)
  • Ventuz Stream Out API
  • Lens Calibration File for FreeD
  • E2E Node Overview
  • Unreal Integration
  • Notch Integration
Remoting
  • Remoting Index
  • Remoting Overview
  • How To Control and Customize Ventuz
  • Remoting 4
  • Remoting 4 via Websockets
  • Remoting 4 via HTTP
  • Director Remoting
  • Deprecated Remoting

Misc

  • Presets
« Previous: How To Enable HDR Video Output
» Index «
Next: How Create Lens Flares and Bloom »

How To Use a Skybox in an HDR Layer

Table of Contents

  1. Introduction
  2. Enable an HDR Layer
  3. Load an HDRi Sky Texture
  4. Load an HDRi Irradiance and Specular Texture
  5. Adjust the HDR values
    1. Gamma
    2. Exposure
    3. Tonemapping - Whitepoint
  6. Conclusion

Introduction

This How To will give you a better of the HDR Engine and the HDR workflows in Ventuz.

This tutorial is about the workflow of an HDR Layer. To enable HDR output, see: How To Enable HDR

In this Article HDR means solely the HDR Engine that uses 16-bit floating point numbers for each color channel instead of 8-bit integers. In the end, these color values will be calculated to match the output's colorspace. Three things result from this different representation:

  1. We have more bits to represent a color and so they can be expressed with more precision.
  2. Using Floating Points means we can express values that are "brighter" than what would be displayed as full white on the screen.
  3. We can use a linear color space instead of gamma corrected color spaces in non-HDR engines.

The result has one major advantage over non-HDR rendering engines: We can use physically correct formulas instead of approximations - thus allowing for the creation, adjustment, and animation of realistic images. When using the Video Engine in HDR Mode, you can use IPP effects like Lens Flares and Bloom more easily. Lighting is also significantly different when working in HDR. For example, the transition between light and dark are smoother and you can make use of the gain to overbrighten certain areas of the scene; This is, basically, the intended use for HDR - more (a higher) dynamic range.

Keep in mind that HDR is an imaging technique that captures, processes, and reproduces the content in such a way that both the shadows and highlights of a scene are increased. You have a wider range of colors when compared to non-HDR. Therefore, HDR captures a wider and more dynamic range between the darkest and the lightest part of an image.

Enable an HDR Layer

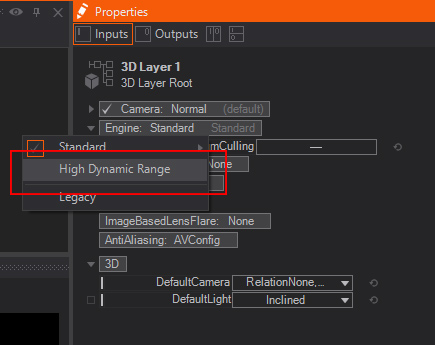
  1. Select the 3D Layer Root node - the very first node in the Hierarchy Editor in every 3D Layer.
  2. Inside the Properties Editor, you will find a dropdown menu for the Engine.
  3.  Click on Engine:Standard to bring up the selection menu and  click High Dynamic Range.

When switching from Standard to HDR, the overall colors will have a slight variation due to the nature of the HDR Mode.

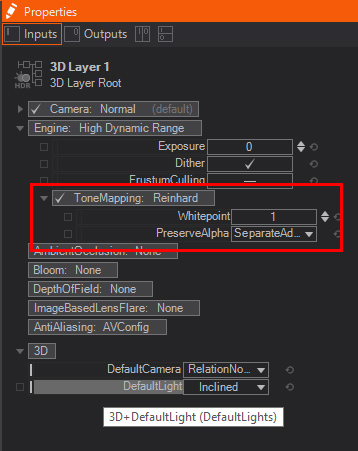
When the HDR Engine is enabled, you will see additional properties such as: Exposure, Dither, FrustumCulling and another dropdown menu for the ToneMapping selection as well as another set of properties depending on the selected ToneMapping mode.

You don't have to switch the whole engine to HDR, to work with a HDR layer. If the engine is set to SDR, the blending is in 8-bit int and the HDR layer is tone mapped before blending, but is still calculated in 16-bit float.

Load an HDRi Sky Texture

A Sky Texture's purpose is to show an environment. The Sky Texture will not have any influence on the way Geometries or the whole scene is lit. To light the scene or geometries, follow the section where we use an HDRi to light the scene.

  1. Create a SkyBox and load an HDRi sky-texture.
    • We already have included 2 HDRi's in the Help scenes - one is a specular and the other is an irradiance texture.
    • To access them, navigate to the default project directory (usually located at %public%\Documents\Ventuz[Version]\Projects\__HELP__ where [Version] must be replaced with the Version Family of Ventuz).

You can find a default cubemap by activating the SkyBox interactive help and use the specular/reflection texture from there or navigate to %public%\Documents\Ventuz[Version]\Content\Projects\__HELP__\VentuzHelp\Textures\__HELP__\HDRI\Reflection where [Version] must be replaced with the Version Family of Ventuz

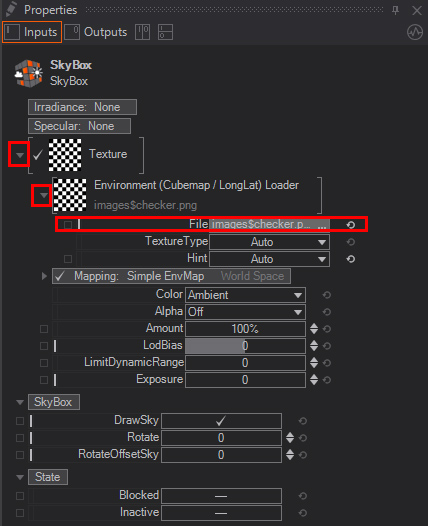
  1. Select the SkyBox node and select the SkyTexture Property, switch from None to Texture to load a HDRi.
  1. Unfold the Texture Property, unfold the Environment (Cubemap /LongLat) Loader and chose/load a Texture by clicking click  the File Property.

Load an HDRi Irradiance and Specular Texture

An Irradiance Texture will light your scene and is not much bigger than 128px x 128px. While the Specular Texture will be used for either reflections on geometries or when used with !IBL/Roughness maps, the roughness maps will control the mipmap level on the surface to give the surface a specific glossy finish such as rubber, coal, iron, or mirror.

  1. Use the existing SkyBox or create a new one and load an Irradiance Texture into the Irradiance slot and a Specular Texture into the Specular Slot. You can find example Textures by using the interactive Help for the SkyBox or use the Link from the hint above to locate the example textures.
  2. Create a an Axis with ScalingFactor: 10 and a Cube with BevelRadius:0.1 behind the SkyBox node.

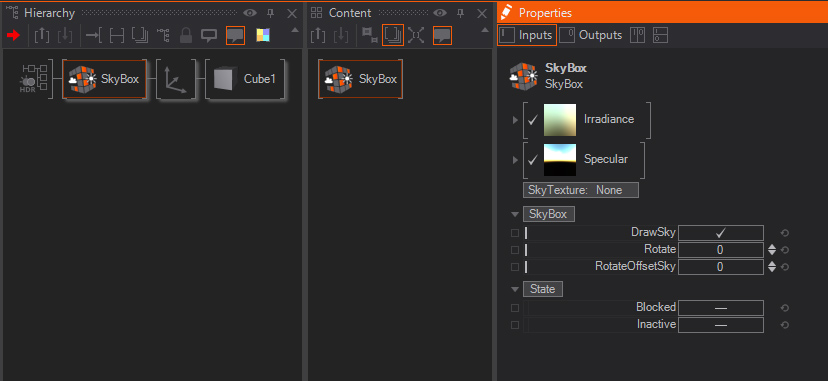
The SkyBox node works like a LightGroup. Only the nodes/objects behind the SkyBox will be affected by the SkyBox

Adjust the HDR values

In most cases you will notice that the whole environment looks too bright and/or has an incorrect gamma.
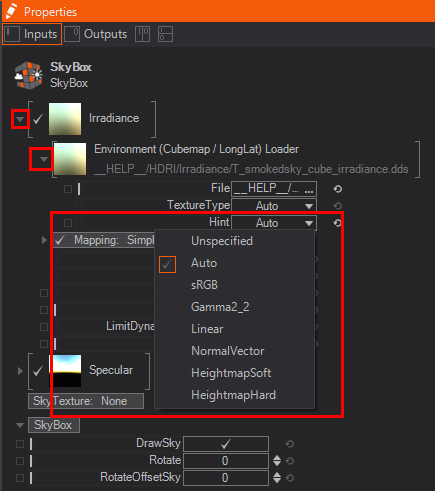
Most times the first step is to adjust the Gamma for the loaded images. Adjusting irradiance, specular and SkyTexture comes next. For each of these textures there is a dropdown property called Hint.
To access this property you need to unfold the Irradiance Property then the Cubemap Loader and there you will find the hint dropdown menu which is usually set to Auto.

Gamma

HDRi images will have a gamma value written in their metadata; Ventuz will try to adjust the gamma using this information as the default setting is Auto. If necessary, you can adjust the gamma manually to correct for errors. In most cases you will need to switch the hint to Gamma2_2. Its important to check if you need to do that for both or all used SkyBox textures. The hint is available for all texture loaders: Irradiance, Specular, and SkyTexure
The next step would be to adjust the Exposure.

Exposure

Exposure in Ventuz behaves the same way as a real camera does. You can find the Exposure property at the 3D Layer Root node. The higher the exposure value the more light will travel into the camera resulting in more brightness, the lower the exposure the less light will travel into the camera and therefore darken the scene/environment.

In the case of the HDRis from the Help Scenes, it would be wise to darken the scene, it still looks over-exposed (as long as you use our default textures). You will notice that starting with exposure values around -2.26, details such as clouds will be noticeable, and the cube will become more naturally lit. Adjust the 'Rotate: 70' for the SkyBox - this will rotate the whole sky and you should face the sun.

Experiment with the Exposure and lower the value to around -8.5 so you can spot the Sun-Disc.

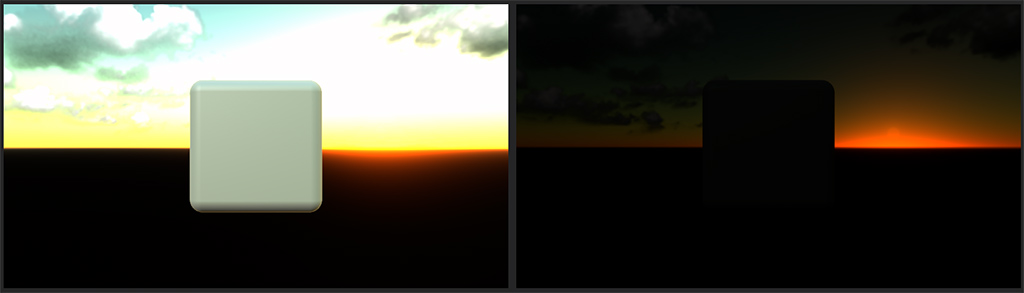
The above example shows the difference between an exposure value of -2.26(left) and -11.0(right) - This way you can realize how much dynamic light information is stored inside the HDRi. Also notice that the environment also lights and colorizes the geometry, the beveled cube in this case.

Tonemapping - Whitepoint

The Tonemapping is only used while the blending is in SDR 8-bit (non-HDR mode). If the whole engine is in HDR, there is only one tonemapping step at the output device.

As long as you use the default set Tonemapping: Reinhard you can adjust the Whitepoint. By adjusting the whitepoint you simply tell the engine which brightness value is pure white. It will bring more clarity and detail to your image and eliminate the haze you see in many images.

In our case with the default Sky Textures we would adjust the Whitepoint, depending on the Exposure as well, by setting it matched to the "white in the clouds". You adjust the Whitepoint first to have the image, or in our case, sky, look more natural.

Adjust the following properties to match these values: Exposure: -6.28and Whitepoint: 0.24

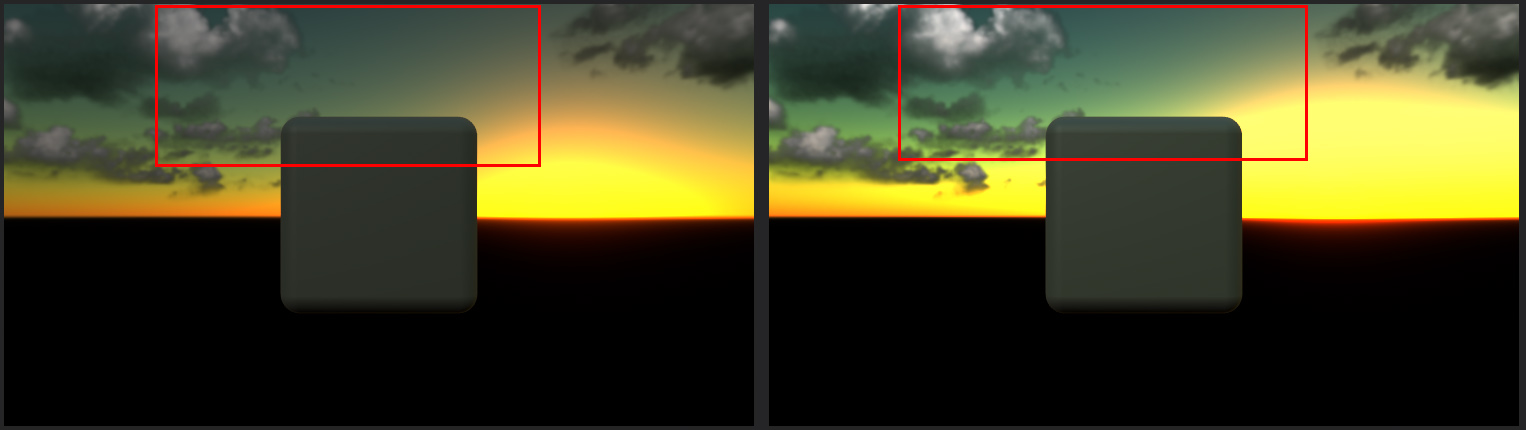
You can spot the differences not only while you adjusted the values; You will see the differences in the clarity and that the clouds are not starting in the gray - they start with the corrected white and then have their gray scale applied.

Conclusion

There are several ways of using HDR with Ventuz. On one hand you simply use HDRi's to create a nice SkyBox environment, on the other hand by using HDR you can take advantage of the whole dynamic range stored in the images by adjusting the exposure. It is possible to use the environment textures to light your scene.

By adjusting the whitepoint, you figured out that this will have an impact on the clarity which is common for the colorful look of HDRi images. Setting the Whitepoint manually will also result in higher details in the areas needed.

Setting up HDR with a SkyBox properly is crucial if you want to use features like Material Roughness for Image Based Lighting driven scenes.

See also:
  • 3D Layer
  • Sky Box
  • How-To Enable HDR
  • General Ventuz HDR information
  • HDR Performance

« Previous: How To Enable HDR Video Output
» Index «
Next: How Create Lens Flares and Bloom »
Copyright 2025 Ventuz Technology